
Adam D. Roberts's Blog, page 7
October 28, 2020
Roasted Honeynut Squash Soup with Apples, Ginger, and Yellow Miso
One of the biggest clichés in food writing is the idea of cooking with love. It’s abstract, vague, overly sentimental.
And yet, there’s something about it that makes sense to me, especially when I’m making soup. You can cook with a lot of love when you’re making soup. You can take the time to strain it, for example, to make it extra smooth. You can take the time to make stock from scratch, instead of using stock from a box. Most people won’t notice the difference, but you’ll know that you took the time to do it. So what else to call that except cooking with love?
The love even starts with the food shopping: taking the time to go to the farmer’s market on your Sunday morning, instead of sleeping in.
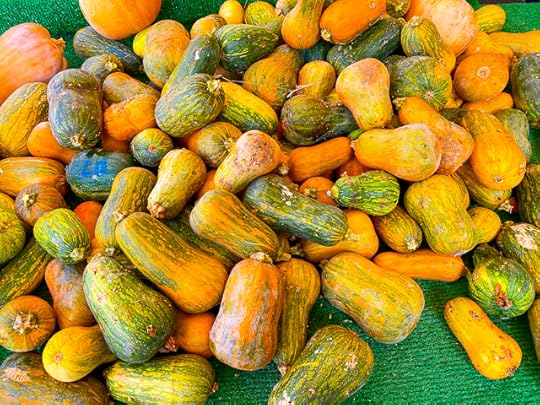
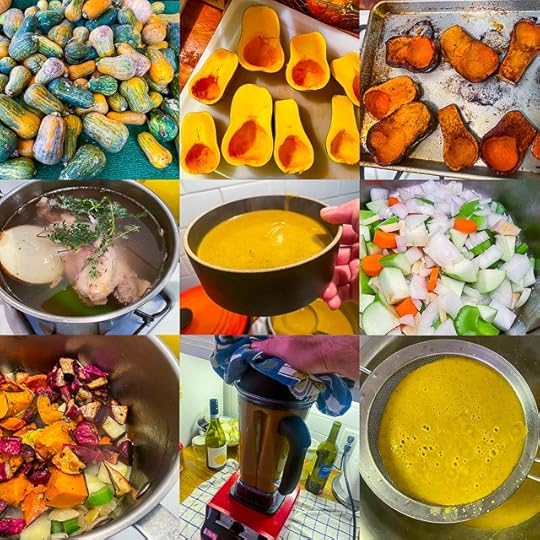
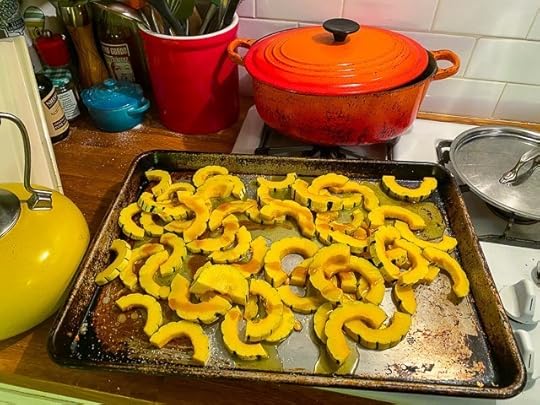
On a recent trip to the Hollywood farmer’s market, two Sundays ago, I stumbled upon these honeynut squash at the Weiser Farm’s stand. They’re like adorable mini butternut squashes; prized for their sweetness and how cute they look on your counter.
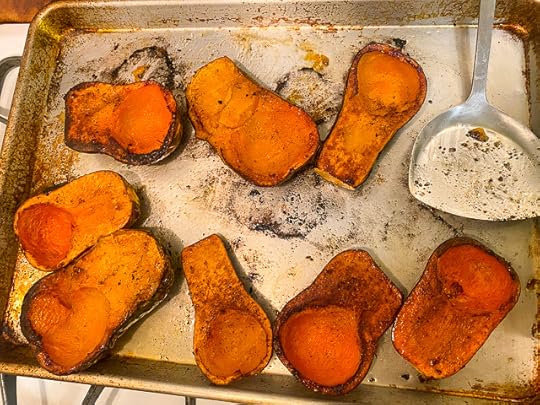
When I got them home, I sliced them in half vertically, scooped out the insides, rubbed them all over with olive oil, sprinkled with salt and pepper, and roasted in a 425 oven until golden brown all over, flipping halfway through.
I served that as a side dish one night and, to cut the treacle of this post, I’ll tell you that Craig isn’t a fan of “mealy” foods — roasted squash fits that category so he didn’t even finish his. The nerve! He said, “I’d like it better in a soup.”
The point was noted. I refrigerated the leftover squash and then, on Monday night, I took the squash out of the fridge, along with a few other ingredients I had laying around, including some roasted Japanese yams from a steak dinner (Craig will enjoy yams if they’re cut into cubes), and yellow miso that I picked up at McCall’s Meat and Fish.

I also happened to have a roast chicken leftover from the previous Sunday. An idea started to form: what if I made a REALLY quick stock with the chicken carcass, an onion, carrot, and some celery? (Really quick because I was starting this project at 6:30.)
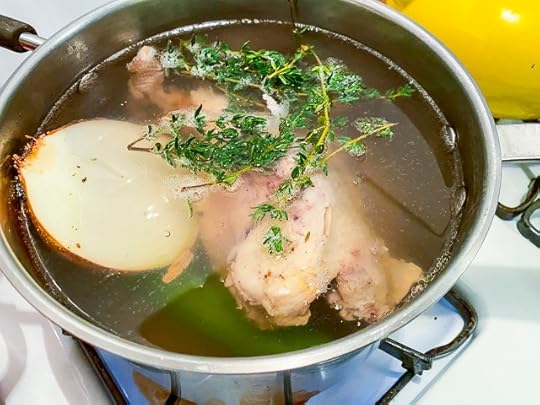
It was as simple as putting the whole chicken carcass, half an onion (skin on), the celery, the carrot, and fresh thyme in a pot, covering everything with water, and bringing it to a boil. Normally, you don’t boil stock (it can make it gritty), but the circumstances here were extenuating. I let that burble away for almost an hour and then strained. Look at that color!

It’s a great lesson in never throwing away your leftover roasted chicken carcass. Another quick note: the less water you use to make the stock, the more concentrated it’ll be. So a small pot, in this situation, is ideal.
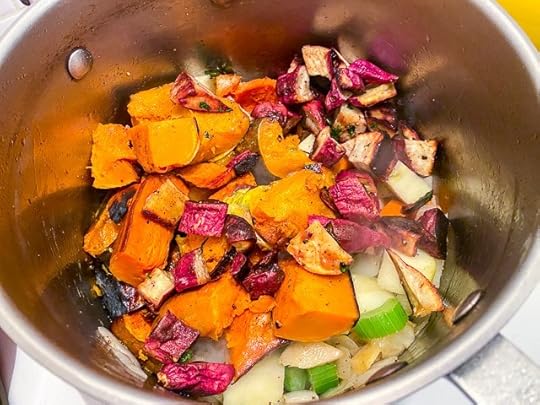
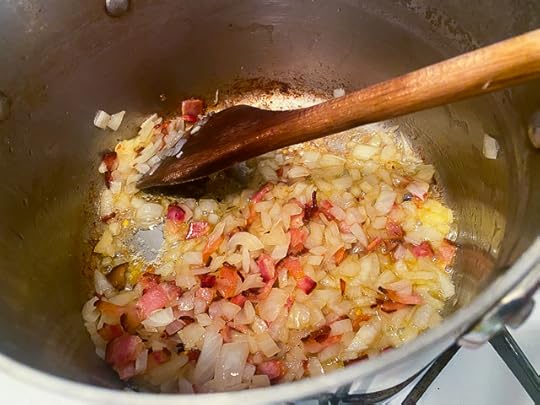
To be kind to myself, I used that same pot (one less dish to clean), now emptied, melted some butter in it with a splash of olive oil and added chopped onion, carrot, celery, a green apple, and a healthy amount of ginger.

I cooked that for a bit with a big pinch of salt, then added the yams and cooked squash, skin-on.
Once everything was nicely heated up, I added the stock to cover and simmered for 30 minutes. Then, into the blender it all went, with a healthy spoonful of the yellow miso.
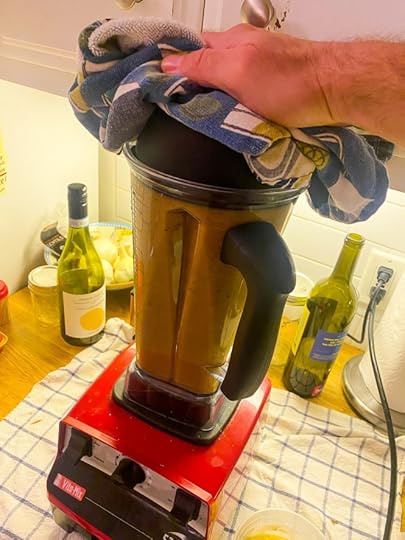
I probably filled the blender too much, but I was careful to start it slowly, keeping a kitchen towel over the top so the whole thing wouldn’t explode.
After blending for a few minutes, I strained (cooking with love!), then added back to the pot.
HOLY HELL was that delicious. I was a bit flabbergasted. I thought I was going to have to add more butter or cream or maple syrup for sweetness, but it was absolutely perfect, and maybe even, dare I say?, healthy (ignoring the little bit of butter that’s in it).

The apples leant their sweetness, the ginger leant the heat, the burnt bits on the squash skin gave it depth, and the yellow miso gave it lots of interesting umami flavor.
It’s a soup for the ages — good enough to be dinner on its own, though I did serve it with some grilled bread — and the secret ingredient was, after all, (everybody groan)… LOVE.

Roasted Honeynut Squash Soup with Apples, Ginger, and Yellow Miso
A soothing, gingery soup that's perfect for autumn and a great way to use up whatever roasted squash or pumpkin you have in your fridge.
Ingredients4 honeynut squash, halved, seeded This recipe will also work with any kind of roasted squash.Extra-virgin olive oilKosher salt and freshly ground pepper2 tablespoons butter1 yellow onion, roughly chopped1 to 2 celery, roughly chopped1 to 2 carrots, roughly chopped1 Granny Smith apple, cored, roughly chopped (skin-on)2-inch piece ginger, peeled, roughly chopped4 – 6 cups chicken stock (preferably homemade; see post for the quick way)1/2 cup yellow misoMaple syrup (optional)
InstructionsHeat the oven to 425. Coat the squash in olive oil (about 1/4 cup), sprinkle with lots of salt and pepper, and roast on a cookie sheet 20 to 30 minutes, flipping the squash halfway through. Keep an eye on it as it roasts; you want it deep, dark brown all over, but not burnt. Allow to cool and then roughly chop, skin-on.In a large pot, melt the butter along with 2 tablespoons of olive oil. When hot, add the chopped onions, celery, carrots, apple, and ginger. Stir all around with a pinch of salt and when everything is softened and fragrant, add the squash. Stir all around until the squash is thoroughly mixed in with everything else. Add just enough stock to cover everything (you can always add more later). Bring to a boil, lower to a simmer, add a pinch of salt and cook at a low simmer for 30 minutes. You'll know you're ready when everything mushes easily against the side of the pot with a wooden spoon. Pour the mixture into a blender, add the yellow miso, and CAREFULLY turn the blender on, being sure to start slow and to cover the hole at the top with a kitchen towel. Slowly crank up the speed and blend on high speed for a good minute or two.Strain the mixture back into your pot and taste. Adjust with salt and pepper and, if for some reason it's not sweet enough, add a splash of maple syrup. If it's not rich enough, you can add cream or butter. And if it's not funky enough, add more miso. Enjoy!
Related Posts:
Celery Root and Caramelized Pear Soup
White Bean Soup with Parmesan and Kale
Cold-Killing Chicken Soup with Ginger, Chili Paste, and Soy Sauce
Carrot Coconut Soup with Chili and Lime (Orangette)
Roasted Butternut Squash and Coffee Soup (A Brown Table)
The post Roasted Honeynut Squash Soup with Apples, Ginger, and Yellow Miso appeared first on The Amateur Gourmet.


October 25, 2020
How To Make Really Great Pizza at Home

As a person who’s devoted most of my life to food, I have certain beliefs that I fervently hold on to. One: never grill chicken breasts for a dinner party. That’s depressing. Two: When baking with chocolate, it’s important to eat a quarter cup of the chocolate in its raw state. Quality control. And three: there’s absolutely no reason to make pizza at home. Order in, it’ll be better.
Pause on that last one. Recently, I felt inspired to try my hand at homemade pizza again after many unimpressive efforts from the past, earning comments like this one:

Nicholas Bergus had a point. I never quite got the dough thin enough, giving up on stretching it while it still looked rather puffy. The resulting pizza was, as Nicholas Bergus says, “more like focaccia than pizza.” When the internet trolls are right, you know you’re doing something wrong.
So what changed?
My friend Ben gifted me with a pizza steel. You may be thinking: “I’m not going out and buying a pizza steel!” and that’s fine. Get a pizza stone. What you want is a hot surface to cook your pizza on. If you’re Gwyneth Paltrow, it’s a wood-burning oven in your backyard; if it’s me, it’s a pizza steel your friend Ben gave you.
The other big thing that changed is I stumbled upon David Tanis’s pizza dough recipe.

I love how simple it is: you mix yeast, warm water, flour, salt, and olive oil in a mixer and when it becomes dough, you work it a bit longer, then work it on the counter. You cut that dough into four and you can make four pizzas right away or, for more flavor, you can place the dough into sandwich bags and refrigerate overnight.

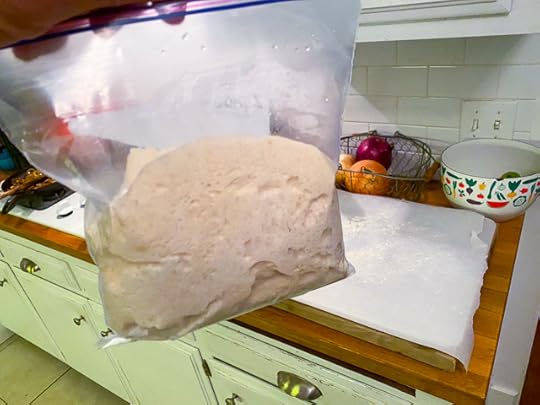
I opted for the second option, taking the slow-fermented pizza dough (which is a fancy way of saying: “pizza dough that sat in the fridge for the night”) out of the fridge a few hours before I was ready to use it.
At the same time, I placed the baking steel on the highest oven shelf, cranked the oven to 500, and let it rip for an hour while walking the dog.
When it was time to start the pizza show, I put some parchment paper on my cutting board, sprinkled it with flour, cut the dough out of the bag (scissors helped), and sprinkled the dough with a little flour too.
To stretch, I watched this video and read this article on the Ooni Pizza Oven web site. Here’s the gist: don’t overflour it. Use your knuckles to press down on the dough, flattening it, and defining a crust (a ring that stays elevated around the perimeter of the dough). Then you push out as you rotate it on the parchment, like two hands on a steering wheel going in different directions. When you’re ready to stretch further, you lift up the dough and use the back of your hands to stretch it even more. Don’t give up if it tears, you can pinch it back together. Just keep stretching and stretching until it looks something like this.
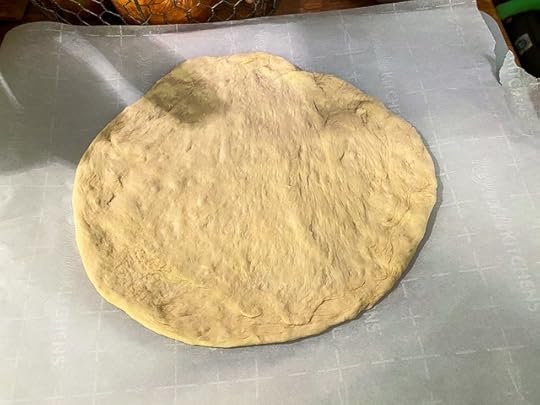
Truly that’s the hardest and most important part. If you look at my old puffy pizza post, the dough never got thin enough, hence Nicholas Bergus’s comment.
But once you get your dough this thin and you have a hot surface to cook it on, you’ve already won the battle for excellent homemade pizza.
For my first pie, I used a tomato sauce trick that Delancey’s Brandon Pettit taught me for my cookbook.

It’s as easy as this: drain a can of San Marzano tomatoes. Put the solid tomatoes in a bowl and squish them with your hands. Add a teaspoon of sugar, a teaspoon of salt, a splash of red wine vinegar, and a clove of grated garlic. Use a handheld blender to blitz the mix into what looks like chunky tomato soup. Then, the most important advice: taste. You want it to be big and bright, so you’ll probably add more vinegar and salt, maybe even more sugar. Keep going until it’s undeniable.
Spread it gently on to your pizza dough, keeping it away from the edges and, if you like it spicy, adding some red chili flakes.

I had burrata in the fridge, not mozzarella, and since people on Twitter told me cooking burrata on pizza was a waste of burrata, I decided to just cook the pizza just like this and to add the burrata after.
Here’s the only other tricky part: the transfer of the pizza on the parchment to the cooking stone/steel. The first time around, I lifted the parchment with two hands and ran it across my kitchen, which was a bad move because it almost reshaped the whole pizza.
The real move is to put the parchment on the back of a cookie sheet and then to slide it directly on to the cooking surface. It’ll slide right off.
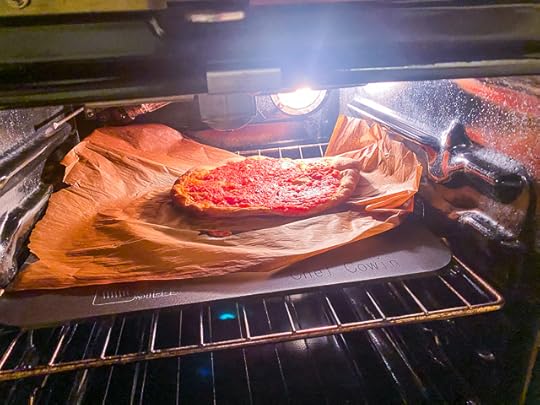
As you can see, it’s okay to leave the pizza on the parchment; the parchment turns dark brown, but it doesn’t catch on fire or anything. It makes the transferring so much easier.
Cooking time-wise, you want the pizza to look like pizza, so go for 8 to 10 minutes, until the crust is deep brown and charred in spots and the top looks like a pizza should look.
Out of the oven, I topped with the burrata, a dusting of Parmesan, a drizzle of olive oil, and some more chili flakes.

I cut into it and we ate it almost immediately.

The verdict? An absolute hit. The crust had the perfect amount of salt and it went CRUNCH when we bit into it. There was nothing overly chewy about it. It didn’t taste like bread, it tasted like pizza. Even Nicholas Bergus would approve.
The next pie involved a little more fancy footwork. Following someone else’s advice from Twitter, I cooked a yellow onion in olive oil and then added a bunch of sliced button mushrooms. I cooked that all together, with some chopped thyme, salt, and pepper, until it looked like this.

You don’t want to get it too much darker, or it’ll burn on your pizza.
As for the pizza, same approach: cut open the bag, stretch stretch stretch. I topped this one with a generous amount of Bellwether Farms ricotta, then the onion/mushroom mixture.

Same technique going into the oven.

Did I tell you how to get it out? I used a spatula.

This pie was the star of the night. Once again, I dressed it up with a little olive oil and red chili flakes, but it didn’t need a lot of help. The pizza crust was, once again, crispy and not overly bready (despite how it looks in the picture). And the creamy ricotta with the onions and the mushrooms was a dreamy experience.

For the third and final pizza, I used up the rest of the raw tomato sauce and the mushroom/onion mixture.

Once again, I didn’t overload it. Transferred the same way, about ten minutes (or maybe longer, I wasn’t really timing… just looking) and behold.

As a homemade pizza skeptic, I’m absolutely converted. I like the idea of starting a Friday night tradition of homemade pizza night. The only trick will be remembering to make the dough the night before (which should be easy enough).
So if, like me, you have your doubts about pizza-making at home, take my word for it. Get yourself a steel or a stone (if it gets you stop ordering pizza from Postmates, it’ll pay for itself). Then just learn how to stretch and you’ll be a pizza-making badass. Your pizza will be untrollable.

Pizza Dough Recipe
Based on David Tanis's recipe from The New York Times.
Servings 4 pizza balls
Ingredients2 teaspoons active dry yeast4 1/2 cups all-purpose flour, plus extra for dusting Just for fun, I did 4 cups of all-purpose and 1/2 cup of whole wheat. It's fun to experiment.2 teaspoons kosher salt2 tablespoons olive oil
InstructionsStart by mixing the yeast with 1 3/4 cups of warm (but not hot) water from the tap with a fork in the bowl of a stand mixer (or a mixing bowl if you're doing this by hand). Let it sit for two minutes (you should see some bubbles).Add the flour, salt, and olive oil, put the dough hook in, and mix until a dough forms, about five minutes. (Again, you can do this by hand.) Dust a work surface lightly with flour. Turn the dough out and knead until it's smooth, another 3 to 4 minutes.Cut the dough into 4 equal pieces and place each piece in a freezer bag and refrigerate overnight. When ready to use, remove the dough from the bags, form into smooth balls, flour lightly, cover loosely with plastic wrap, and let rise in a warm spot for about 30 minutes. Stretch the dough as suggested in the blog post above and make your pizza.
Related Posts:
If You Have A Grill, You Should Be Grilling Pizza
Tasty Sheet Pan Pizza That May Actually Be Focaccia
11 Essential Tips for Better Pizza (Kenji Lopez-Alt, Serious Eats)
Pizza, Made with a Light Hand, California Style (David Tanis, NYT)
The post How To Make Really Great Pizza at Home appeared first on The Amateur Gourmet.

October 19, 2020
Chocolate Chip Cookies with Toasted Coconut and Pistachios

I own a dangerous book called By The Book. It’s a collection of the By The Book column from the New York Times; a column where artists, musicians, and writers talk about their favorite books and what’s currently on their nightstand. It’s dangerous because any time someone sings the praises of a book, I immediately want to own it. (See: the stacks of books currently on my desk, coffee table, and nightstand.)
Not only am I susceptible to “By The Book,” I’m also susceptible to book suggestions in real life. Case in point: Nik Sharma came on my Instagram Live two weeks ago, and sang the praises of Samantha Seneviratne’s Sugar and Spice. It was on my doorstep three days later.
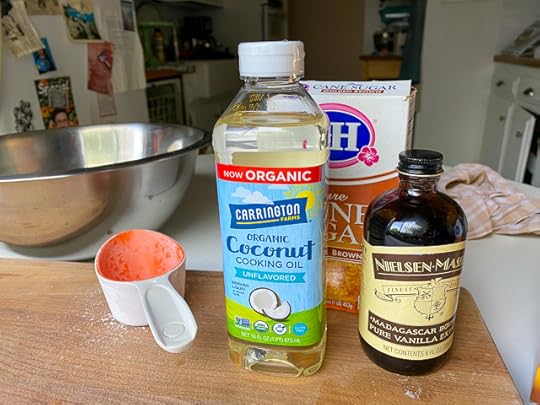
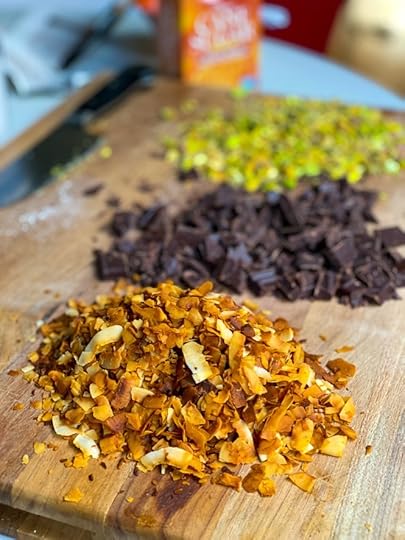
It’s a book that truly lives up to its title. Every recipe has a surprising trick up its sleeve: her sweet fig scones wake you up with black pepper. Her sticky apple date cake has six tablespoons of fresh ginger. But the recipe that caught my eye first is a traditional chocolate chip cookie that you make in a most untraditional manner. For starters, instead of butter (no butter?!), you use coconut oil. Instead of using a mixer, you do it all by hand. And instead of just chips, this one has toasted coconut and 1/2 cup of chopped pistachios. I was intrigued.
The first recipe you make out of a new cookbook is like a first date. You’re sniffing out the vibe, deciding if this is a quick one-night stand or something you could have children with (I wish I could have children with a cookbook). With Sugar and Spice, I knew I was in good hands when I tasted the batter.

The coconut oil doesn’t detract from the cookie’s cookiness (you don’t miss the butter). But the real star here is the toasted coconut: it adds a depth of flavor unusual for a chocolate chip cookie. I’d liken it to a candy bar: it’s in the world of Mounds (a far superior candy to Almond Joy because who wants a nut in their perfect candy bar?). Although, this candy bar cookie DOES have a nut by way of pistachios, which also lend their own texture and flavor.

Once on the cookie sheet (I used an ice cream scoop), the batter looks wetter than a typical cookie dough, but fear not. It’ll all work out in the oven.
And the resulting cookies are marvelous. They’ve got pluck, they’ve got personality. They’re not timid or overly familiar. They’re chocolate chip cookies that wake you up, that say: “Hey, look at me, damn it! I’m here!”
Which is all to say, if you’re thinking about buying Samantha Seneviratne’s Sugar and Spice, let me be an enabler. You need this book on your shelf. Or night stand, coffee table, or anywhere that doesn’t currently have a book on it.

Chocolate Chip Cookies with Toasted Coconut and Pistachios
A surprising twist on a traditional chocolate chip cookie from Samantha Seneviratne's Sugar & Spice.
Ingredients1 cup all-purpose flour1/2 teaspoon baking soda3/4 teaspoon kosher salt1/3 cup melted coconut oil1/3 cup packed light brown sugar1/4 cup granulated sugar2 tablespoons pure vanilla extract1 large egg4 1/2 ounces bittersweet chocolate (60 to 70 percent cacao), chopped (about 1 cup)1/2 cup shelled raw pistachios, coarsely chopped1 cup shredded, unsweetened coconut, toasted Place on a cookie sheet and toast in a 350 oven, stirring every few minutes, until golden brown (about 5 to 10 minutes). Watch it, though, it can quickly burn!Flaky sea salt, for sprinkling
InstructionsPreheat the oven to 350. Line two baking sheets with parchment paper.In a large bowl, whisk together the flour, baking soda, and salt. In another bowl, using a wooden spoon (I used a whisk), combine the coconut oil, brown sugar, and granulated sugar together until creamy. Stir in the vanilla and egg. Add the flour mixture to the coconut oil mixture and stir to combine. Fold in the chocolate, pistachios, and coconut.Scoop the dough in 2-tablespoon scoops and place on the prepared baking sheets, at least 2 inches apart. Sprinkle each with a bit of sea salt. Bake until golden brown, 12 to 14 minutes, rotating the sheets halfway through. Let the cookies cool on the sheets on racks for about 5 minutes. Eat warm or store in an airtight container at room temperature for up to 2 days.
Related Posts:
Very Good Chocolate Chip Cookies
Oatmeal Raisin Cookies That Will Keep You Sane
Nancy Silverton’s Chocolate Chip Cookies
Maple Cream Pie (Samantha Seneviratne, Food Network)
Banana Bread Scones (Samantha Seneviratne, Food52)
The post Chocolate Chip Cookies with Toasted Coconut and Pistachios appeared first on The Amateur Gourmet.

Sausages Braised in Tomato Sauce Over Polenta

It’s hard for me to think of dinners that aren’t pasta. When I have sausages in the refrigerator, for example, I think of all of the different pastas I can make with them: rigatoni with sausage and broccolini, ziti with sausage, onion, and fennel. I think I took it too seriously when Sophia Loren said: “Everything you see I owe to spaghetti.”
A year or two ago, though, I developed a dinner that feels like a pasta dinner that isn’t a pasta dinner, it’s a polenta dinner. I take whole sausages, brown them in olive oil, add onions and garlic to the pan, make a quick tomato sauce, and braise the sausages in there. Meanwhile, I cook a pot of polenta at the same time.

If I have any polenta advice, it’s this: get the slow-cooking stuff, nothing quick cooking. If it says “quick-cooking” or “instant” on the bag, don’t use it.
I get my polenta at the farmer’s market from Roan Mills and it’s the best I’ve ever used. It looks golden straight out of the bag and takes nicely to long, slow cooking. People on Instagram asked me for my recipe, but it isn’t so much a recipe as it is a technique. To wit: I bring five cups of water to a boil (you could use chicken stock or a mixture of water and milk, but water works fine). Season the water with salt and whisk in a cup of the polenta on high heat.

Whisk it constantly, and then when it starts to get thick, lower the heat and put a lid on. Let it cook like that, stirring every ten minutes or so with a wooden spoon, for an hour. At the end, you stir in butter and Parmesan. It’s dreamy stuff.

As for the sausage part of our story, it’s as simple as slicing an onion, slicing some garlic, and opening a can or two of tomatoes. Brown the sausages in olive oil, remove. Then in that same pan you add your onions and garlic.

You sauté until the onion is wilted and the garlic starts to turn lightly golden. Add a pinch of chili flakes along the way, and then you add your tomatoes.

Let that come to a boil, nestle the sausages back in, then lower to a simmer.

It’s as simple as letting that cook until a thermometer inserted into a sausage reads 160. Remove the sausages to a plate and continue to cook the sauce on medium heat until it’s nicely thickened.
To serve, ladle polenta on to a plate, top with a sausage or two, and spoon the sauce over the top. Garnish with chopped parsley and a sprinkling of Parmesan.

You could serve with a glass of Chianti, but I recommend the Negroni route. Things are tough out there, we could all use a stiff drink right around now.
Buon appetito!

Sausages Braised in Tomato Sauce Over Polenta
A quick, savory dinner that features sweet Italian sausages, San Marzano tomatoes, and slow-cooked polenta.
IngredientsKosher salt1 cup slow-cooking polenta Look for polenta that doesn't say "instant" or "quick-cooking." Olive oil3 to 4 sweet Italian sausages The thicker the better here. (Save your skinny sausages for breakfast.)1 red onion, peeled and thinly sliced4 cloves garlic, peeled and thinly slicedPinch red chili flakes, to taste2 cans San Marzano tomatoes, crushed by hand This will make lots of sauce; you can use the leftover sauce for pasta.2 tablespoons butterParmesan cheese, freshly gratedchopped Italian parsley
InstructionsStart by making your polenta. Bring five cups of water to a boil and season with salt so it tastes like a good broth, but not like the sea (or it'll be too salty). Whisk in the polenta and continue whisking as it cooks to avoid lumps. Keep cooking like this until the polenta thickens; it'll start forming large bubbles and look slightly volcanic. Lower the heat to low and cover with a lid. Stir the polenta every ten minutes with a wooden spoon. Let cook for 45 minutes to an hour. (It doesn't really matter, as long as you let it go a while; if it gets too thick, add a little more water.)In a large skillet, pour in 1/4 cup olive oil and heat on medium high heat. Add the sausages and lower the heat to medium low. This is a tricky part: you want to brown the sausages all over, but if the heat is too high they might burst. So play with the heat as you brown them, taking your time to get them good and brown all over.Remove the sausages to a plate, crank up the heat in the skillet, and add your red onion and a pinch of salt. Cook the onion until wilted and starting to brown. Add the garlic and cook until light golden brown. Add a pinch of red chili flakes and then add the tomatoes (careful, they'll spatter). Add a good pinch of salt and allow to cook on high heat, stirring, until the sauce starts to come together (a few minutes). Nestle the sausages back in, trying to submerge them as much as possible.Cook at a high simmer, rotating the sausages every so often, until the sausages read 160 on a thermometer. Remove the sausages to a plate and continue cooking the sauce on medium-high heat until nice and thick. You'll have too much sauce, but that's okay.To finish, remove the lid from the polenta. If it's still very runny, cook on medium heat until thickened to your liking. Off the heat, add the butter and about 1/2 cup of the grated Parmesan. Taste here and adjust with more salt and Parmesan.To plate, ladle the polenta on to plates, top with the sausage, and spoon the sauce over the top. Garnish with the parsley and more Parmesan and serve right away.
Related Posts:
Say Hello To Fall: Spiced Pork Stew with Polenta
Lemon Polenta Cake (Martha Stewart)
How To Cook Sausages So They’re Not Weirdly Raw Inside (Or Burnt) (Bon Appetit)
Tomato and Sausage Risotto (Smitten Kitchen)
The post Sausages Braised in Tomato Sauce Over Polenta appeared first on The Amateur Gourmet.

October 14, 2020
I’d Like To Propose A Toast For Dinner (Creamed Mushroom Toast with Little Gem Salad + Baba Ganoush Toast with Scarlett Runner Beans)

On Monday and Tuesday of this week, we had toast for dinner. Now when I say “toast for dinner,” you may be imagining a stale piece of bread, smeared with a little butter and jam. That wouldn’t be a very filling dinner, now, would it?
No, the toasts that I made for dinner were hearty affairs; so filling, in fact, we almost couldn’t finish them. Consider them close cousins of bruschetta; they’re the kinds of toasts that you see sometimes at trendy restaurants, like ABC Kitchen in New York which serves a famous butternut squash toast. The premise is simple: a very thick slice of bread, toasted until very dark around the edges, and then topped with something rich and decadent.

I had the idea of toast for dinner because of the beautiful loaf of Sonora sandwich bread that I bought from Roan Mills at the Hollywood Farmer’s market. It just seemed like the kind of bread you want to cut into thick slices and top with something creamy. So that’s precisely what I did.

It’s very important, when making toast for dinner, that you do it this way: buy a whole loaf and slice the bread thickly. If you use pre-sliced sandwich bread, you won’t get the same robustness; it won’t feel like dinner, it’ll feel like a diner breakfast. That’s not what we’re going for here.
The next inspiration that led to toast for dinner was these assorted mushrooms that I also bought at the Hollywood Farmer’s Market.

They were just begging to be cooked in lots of butter, then flavored with garlic, chopped rosemary and thyme.

In case you couldn’t tell, I’m going through a real mushroom phase in my life right now. I think it’s because we’re trying to eat less meat and mushrooms feel meaty when you cook them like this. And to cook them like this, you simply add them to a pan of hot fat (butter, olive oil, bacon fat), sprinkle with salt and pepper, and let them rip. Just keep going and going until they look like they spent the day at the beach without sunblock. Then add your garlic, chopped rosemary and thyme, and, finally, for this particular toast, cream.
You want to lower the heat when you add the cream, and you want to add enough to fill the pan. Then you just let simmer on low heat until it looks like this.

At this juncture, I tasted and felt like it could use a little fruity acid, so I added a splash of balsamic vinegar. If I had to do it all over again, I’d add the vinegar before the cream, but it really didn’t matter. Just be sure to taste here: add more salt, pepper, balsamic, as you need to in order to make it taste dreamy.
To finish: toast the toast, top with the creamed mushrooms, and make a little salad. I used little gem lettuce also from the farmer’s market (okay, okay, we get it, you go to the farmer’s market), tossed in a Dijon dressing made with just Dijon, white Balsamic, olive oil, salt and pepper.
That was toast one! Now for toast two, the Tuesday night toast: Baba Ganoush Toast with Scarlet Runner Beans.

It’s a pretty sophisticated looking toast dinner, if I do say so myself, and it’s made entirely with vegetables and bread.
The first vegetable, or legume, I should say, was one of the most beautiful I’ve ever encountered: Scarlet runner beans.

Taking them out of their pods while listening to Porgy and Bess (because I listened to a vintage Desert Island Discs with Stephen Sondheim where he said it was a perfect musical) was a highly soothing experience.
To cook them, I put them in a pot with water, salt, chopped garlic, a few sprigs of thyme, and a dried red chili. I brought to a boil and simmered for 45 minutes, until they were creamy.

Sadly, they lost some of their color in the process but tasted so fresh and velvety, I didn’t mind.
To finish, I strained them, saving the liquid, then cooked onion and garlic in that same pot, added the beans back in, added a splash of white wine, and half of the cooking liquid to finish cooking in.
But you’re not here for beans, you’re here for toast! So behold my eggplant.

Three Japanese eggplants purchased at the… okay, okay, you know… rubbed with olive oil and placed under the broiler. You want to broil until they’re black all over and squish when squeezed with tongs. Place in a bowl like this, then cover with aluminum foil so they continue to cook.

To turn them into baba ganoush, scrape off as much of the skin as you can (though not all of it; the burnt skin adds a smoky flavor), and add the eggplant to a food processor, with a few tablespoons of tahini, a few cloves of garlic, a squeeze of lemon juice, and a good pour of olive oil, plus a big pinch of salt.

Puree that for a few minutes until it’s smooth and thick. If it’s not thick enough, add more tahini. And taste for acid and salt (more lemon juice and salt never hurt a baba ganoush). Look how smooth.

To turn this into toast, I just toasted more of that thickly sliced bread, slathered this on top, and then topped with smoked paprika, za’atar, and Urfa chili powder. As for the beans, I ladled them into little bowls and topped with Parmesan and lots of chopped parsley, which I sprinkled on to the toast too. Oh and I also drizzled the toast with a little olive oil first.

It was such a surprising and delightful dinner, it may enter our repertoire as an alternative to the obligatory chicken breast dinners I usually make on a typical Monday or Tuesday. Why kill a chicken when you can toast bread instead?
Toast for dinner: it’s a thing now.
The post I’d Like To Propose A Toast For Dinner (Creamed Mushroom Toast with Little Gem Salad + Baba Ganoush Toast with Scarlett Runner Beans) appeared first on The Amateur Gourmet.

October 12, 2020
How To Add Flair To Your Banana Bread

My dad has a joke he makes whenever someone his age has a birthday: “Don’t buy any green bananas.”
I buy green bananas every week, but I’m only 41. The thing about buying green bananas is that eventually they become yellow bananas, perfect for snacking or slicing on to your yogurt and granola. And then those yellow bananas become speckled bananas, perfect for making banana bread.

If you’re a banana bread enthusiast, your bananas really can’t get dark enough: which makes them the perfect fruit to keep around. Black bananas make an even better banana bread than speckled bananas; that’s because they’re sweeter. As it happens, I also had some very ripe Comice pears. It was a perfect opportunity to give my banana bread some flair.

Here’s the thing about banana bread: NEVER try to make it healthy. If you’re making it, make it as rich and decadent as you can (in other words: use butter). As someone who tries to exercise and eat salads during the week, I firmly believe treats should be treats. Otherwise, you’re living in a constant state of punishment.

Once you’ve made your banana bread batter decadent, the next step is to make it interesting. My strategy is to Google “banana bread” + whatever other ingredients I happen to have around. At this particular juncture, I had ripe pears (see above) and pistachios (my favorite nut of the moment). And so I came upon this random recipe from Delicious Magazine UK.

The recipe doesn’t mention pistachios, but it does mention pecans. It also is written in grams and calls for something called “golden caster sugar.” There are no spices to speak of, unless you count vanilla as a spice. So I decided to take matters into my own hands: adding both brown sugar and granulated sugar, a hefty pinch of salt (never trust a baking recipe that doesn’t havae salt), and then heaaping teaspoons of cinnamon, cardamom, and freshly grated nutmeg. I also used a combination of all-purpose and whole-wheat flour.

The most important lesson here? Taste the batter (yes, there’s an egg in it, but you eat Caesar salad don’t you?). If it’s not sweet enough, add more sugar; if it’s not zippy enough, add more salt and spices. When that batter makes you got “hot damn!” you’re there. Now just bake until a tester comes out clean.
That took longer than expected. And because my pears were so ripe, the resulting banana bread was very damp. But, as someone pointed out on Twitter, I could just call it a “pudding” as one does in the U.K.
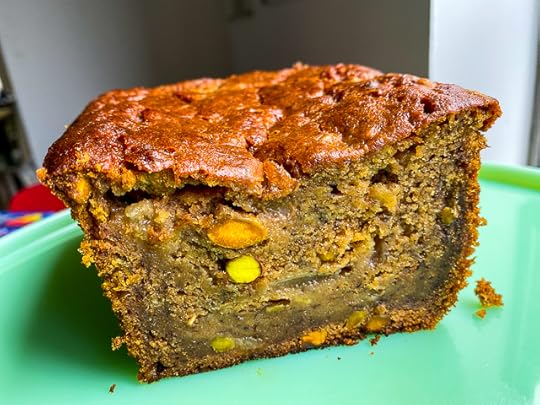
This banana bread isn’t classic by any means, but you better believe it has flair. The pears give it this unexpected juiciness and acidity; and the pistachios give it a nice textural shift. The spices make it warm and inviting, and the sugar and butter make it feel like a real treat, not a fake treat.
So give it a try, but take it in your own direction. Don’t like pears? Add apples. Don’t like fruit? Why are you making banana bread? No matter which direction you take it, make it your own and I’ll be proud of you. Just be sure to use bananas because making banana bread without bananas is weird.
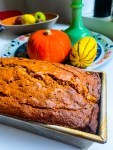
Banana Bread with Pears, Pistachios, and Cardamom
An exciting riff on banana bread using surprising ingredients like pears and pistachios.
Ingredients1 stick unsalted butter, melted; PLUS, more softened butter for greasing the pan3 very ripe bananas, peeled and mashed1/2 cup light brown sugar1/2 cup granulated sugar1 tablespoon maple syrup1 teaspoon pure vanilla extract1 large free-range egg1 cup all-purpose flour1/2 cup whole wheat flour1/2 teaspoon baking powder1/2 teaspoon baking soda1 teaspoon salt1 teaspoon ground cinnamon1 teaspoon ground cardamom1 teaspoon freshly grated nutmeg2 ripe comice pears, peeled, cored, and chopped 1/2 cup green pistachios
InstructionsHeat the oven to 350 degrees. Generously grease your loaf pan (standard size) with the softened butter, making sure to get it into all of the crevices.Add your melted butter to the mashed bananas in a large bowl. Whisk in the brown sugar, granulated sugar, maple syrup, and vanilla extract until no longer gritty. Whisk in the egg for 30 seconds. Gently whisk in the remaining dry ingredients: the flour, baking powder, baking soda, salt, cinnamon, cardamom, and nutmeg. Fold in the pears and the pistachios.Pour the batter into the greased loaf tin and bake for an hour, starting to test after 45 minutes by inserting a wooden skewer (or a piece of dry spaghetti) into the center of the loaf. If it comes out wet, keep cooking.Cool in the pan for 20 minutes, then carefully remove to a wire rack to finish cooling.
Relate Posts:
Nancy Silverton’s Banana Bread
Ghee and Cardamom Scented Upside Down Banana Cake (A Brown Table)
Mom’s Banana Bread (Ben Mims, Saveur)
The post How To Add Flair To Your Banana Bread appeared first on The Amateur Gourmet.

How To Cook Fingerling Potatoes

I get so annoyed, sometimes, watching America’s Test Kitchen. As I’ve mentioned before, my Saturday ritual is to watch all of the PBS cooking shows and America’s Test Kitchen is the one that took me the longest to warm up to. Whereas Lidia’s Italy lets you peer over the shoulder of a real Italian grandmother cooking for her family with a pinch of this and a pinch of that, cooking from the heart and not the brain, America’s Test Kitchen is as antiseptic as a science lab. In fact, the set feels like a science lab and that’s intentional. The whole concept of the show is that everything is tested scientifically. “We did it five hundred times and after creating flow charts and factoring thousands of equations, we determined this is the best way to make a corn muffin.” It’s so dry and sexless.
And yet, there are so many reason to watch. I do love Bridgett and Julia, I do love Adam and the enthusiasm he musters for measuring cups. And then there’s Elle Simone, my favorite of the many chefs who pop up now and again. Elle seems to be just as wary of the show she’s on as I am of watching it. Yet she has such a gleam in her eye when she’s sharing one of her techniques that it’s hard not to want to make exactly what she’s making after she makes it. Which is why I knew I had to make her fingerling potatoes after seeing her make them on Saturday.

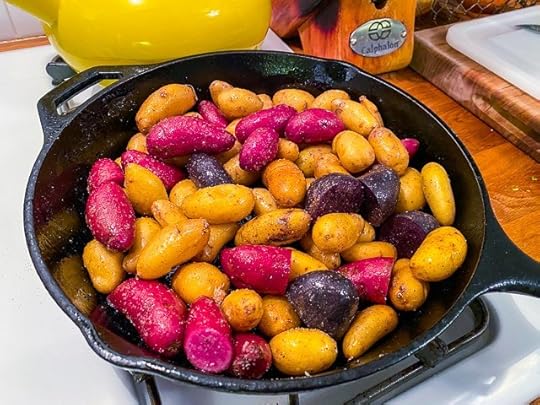
Normally when I pick up fingerlings at the farmer’s market, like the ones above that I got at the Weisler Farms stand on Sunday, I just toss them with olive oil, salt, and pepper, throw them into a cast iron skillet, and roast them at 425 until crisp and golden brown all over.
But Elle Simone offers up a different technique: you use canola or grapeseed oil because it has a higher smoke point (which means the potatoes will get crispier).
You set the oven to 450 and then, most surprisingly, you cover the pan with foil for the first ten minutes.
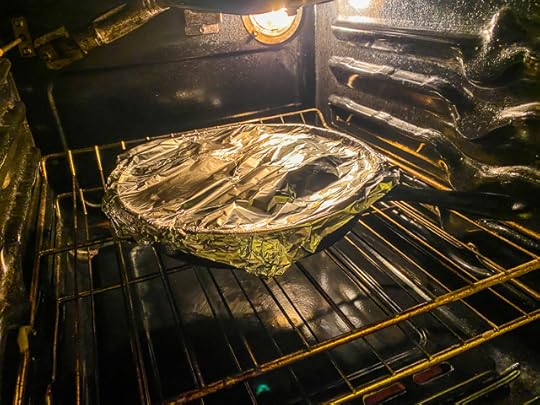
This effectively allows the potatoes to steam with the moisture that’s already in them. It also allows the variously-sized potatoes to cook at the same time.
After ten minutes, you take the foil off and continue to roast for another 20 minutes or longer until the potatoes are crisp all over. Meanwhile, you chop some woodsy herbs: I used rosemary and thyme, Elle uses thyme and sage.

When the potatoes are just out of the oven, you sprinkle them with the herbs, which cook a little in the hot potatoes but still retain their punch because you add them at the end.

These potatoes were so dreamy. Crispy on the outside, fluffy on the inside, and perfectly seasoned with the herbs, salt, and pepper.
Now you know why I keep watching America’s Test Kitchen, even though it’s so science labby. I guess in all areas we have to trust the scientists.

Perfect Fingerling Potatoes
A fool-proof recipe for fingerling potatoes based on Chef Elle Simone's technique.
Ingredients3 to 4 cups small assorted fingerling potatoes If any of the potatoes are much larger than the others, cut them in half.2 to 3 tablespoons canola or grapeseed oilSalt and pepper2 tablespoons finely chopped fresh rosemary, thyme, and sage (or any combination of the three)
InstructionsHeat the oven to 450 degrees.Place the potatoes in a cast iron skillet or baking pan. Toss with the oil and a good sprinkling of salt and pepper (at least a tablespoon of salt and a teaspoon of pepper). Cover with foil and place in the oven for ten minutes.Carefully remove the foil (use oven mitts) and roast another twenty minutes, shaking the pan every so often, until a knife goes through a potato easily and the potatoes are deep, golden brown and crispy.Sprinkle immediately with the chopped herbs. Allow to cool for a few minutes and taste for salt and pepper. Serve right away.
Related Posts:
Diana’s Butter Roasted Potatoes
One-Pan Cod and Potatoes with Olive Gremolata
Mustard Roasted Potatoes (Smitten Kitchen)
Salsa Verde for Potatoes (Orangette)
The post How To Cook Fingerling Potatoes appeared first on The Amateur Gourmet.

October 9, 2020
French Green Lentils with Bacon, Red Wine, and Mushrooms

Speaking of being shattered, did I tell you that I shattered my favorite Italian pasta bowl a few weeks ago? Well, someone suggested I go on Replacements.com to find its doppelgänger. I looked at the name of the designer, Richard Ginori, and didn’t find my beloved bowl, but I found so many cool ones, including the one you see above. So I ordered that, and a Pinocchio bowl (you can see it on my Instagram) and last night I decided to cook something to go into it.
One day I’m going to tell you about all of the plates that I buy on Etsy and Ebay. It started a few years ago, after I finished my first TV job, and I was feeling a little flush with cash and instead of buying a new car or a gold watch, I bought a vintage pasta bowl from Italy. That led to the French bread plates with the orange rims, the dessert plates with hot air balloons on them, and then a set of Italian clown plates that arrived shattered. I was shattered too.
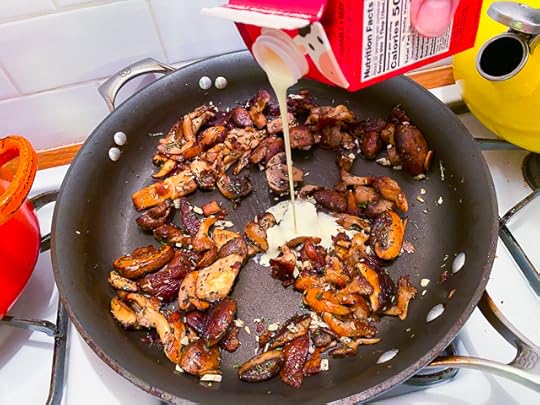
Lentils don’t really get anyone that excited unless you add the “b” word, that word being “bacon.” Bacon is a good thing to keep in your fridge for moments like these, when you don’t really have a protein to make for dinner, but you do have some dried goods and some mushrooms laying around. This dinner started by rendering the bacon and then adding some onion and sliced garlic.

Red wine goes in to deglaze the bottom of the pan and to lend some acidity. You let that cook away (did I mention that you have to cook the lentils first in boiling water for 25 minutes? I’m sorry, I owe you a huge apology) until it evaporates and then you can deal with your mushrooms.

My friend Jonathan, a vegetarian, thinks he hates mushrooms but I told him he probably hates slimy, mushy mushrooms; that I could change his mind if he let me sear mushrooms for him in a hot pan. Searing mushrooms is one of my favorite things to do in the kitchen: just get olive oil or butter very hot in a non-stick skillet, add the mushrooms (button mushrooms here, halved), a little salt, and fire away. I just keep cooking and cooking until they look irresistible, then cook a little more.
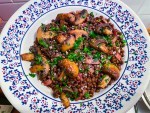
To plate, spoon the lentils into your Etsy bowl, top with the mushrooms, and sprinkle everything with a little parsley and Parmesan.

Welcome to the family, new bowl.
French Green Lentils with Bacon, Red Wine, and Mushrooms
A quick, weeknight dinner that's a little bit healthy, a little bit naughty, and very filling.
Servings 2 people
Ingredients1 cup dry French green lentils, rinsed1 yellow onion, halved; keep one half whole, chop the other half2 bay leavesKosher salt Olive oil4 strips good bacon (I like Neuske's Applewood smoked), cut into lardons4 cloves garlic, sliced thinlyPinch red pepper flakes1/2 cup red wine (whatever you're drinking)1 cup button mushrooms, halvedFinely chopped Italian parsleyParmesan cheese (for sprinkling)
InstructionsStart by cooking your lentils. Bring a pot of water to a boil, add your lentils, the not-chopped half of the onion, the bay leaves and a big pinch of salt. Cook for 25 minutes, then check for doneness. (The lentils should be totally cooked through and a little bit creamy.) Strain, conserving the lentil cooking liquid. Remove the cooked onion and the bay leaves.In that same pot, add a splash of olive oil and the bacon. Turn the heat to medium/high and begin rendering the bacon fat; don't go too fast, or it'll get dark before all of the fat renders. When the bacon looks deep golden brown and there's lots of fat in the pan, add the chopped onion and a pinch of salt. Cook until the onion softens, then add the garlic and the red chili flakes (to taste), cooking until the garlic starts to brown.Add the red wine and use it to pick up the brown bits on the bottom of the pan. When the wine evaporates, add the lentils back in, a big splash of the cooking water (about a cup), and a big pinch of salt. Cook until the liquid is almost entirely evaporated, then set aside.In a non-stick skillet, heat 1/4 cup of olive oil on high heat and, when very hot, add the mushrooms and a pinch of salt. Cook the mushrooms, stirring occasionally, until deep golden brown on all sides. Off the heat, add some of the chopped parsley.To plate: spoon the lentils into a bowl and top with the mushrooms, more parsley, and a sprinkling of Parmesan cheese.
Related Posts:
One Bag of Lentils, Two Dinners
Stewed Lentils with Bacon and Herbs (Anne Burrell, Food Network)
Lentils with Pancetta and Cream (Florence Fabricant, NYT)
The post French Green Lentils with Bacon, Red Wine, and Mushrooms appeared first on The Amateur Gourmet.

October 7, 2020
Spiced Pork Chops with Delicata Squash and Apple Chutney

Making new friends is always a treat but difficult to do when you’re supposed to avoid social gatherings and remain six feet apart while masked. Luckily, I made two new friends last year when the food writer Ben Mims and his partner J made the same move that we made back in 2011 from New York to L.A.
Ben moved here to write for the L.A. Times (his recipes are top notch; I made his tamarind lamb shanks last night and they were dreamy); we met for dinner at a steakhouse on Hollywood and Vine and he told hilarious stories about growing up in Mississippi, then told even funnier stories on my podcast Lunch Therapy.
Ben and J had a small holiday gathering last December and it was there that I met another food writer that I’ve long admired, Nik Sharma, who had just moved here from San Francisco with his husband, Michael. Of course, I pressured him to come on my podcast too (I’m a podcast bully), more recently my Instagram live, where we made a plan to go with Ben to the Hollywood Farmer’s Market this past Sunday.

Such a formidable trio the market hasn’t seen in ages!
Ben acted as the market tour guide, pointing out the best place to get lettuce and berries and, for our purposes today, he pointed out a great place to procure pork, called Peads and Barnetts.
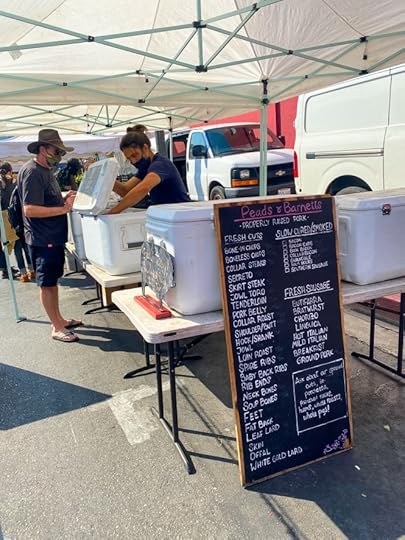
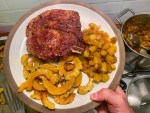
The pork chops that I got here, as you’ll see in a moment, were such beautiful specimens — marbled with fat, on the bone — even a first-time pork chop chef would have a hard time screwing them up.
I also spied Delicata squash at the market and I brought a few of those home with me too (paying for them first, of course!).

Finally, I bought a few apples (Ben recommended the Crispin) and suddenly a vision of a dinner started to appear; an autumnal dinner, one that would be very brown, but in a good way.
I started by making Ina Garten’s apple chutney. Making your own chutney may sound intimidating, but basically you throw a chopped onion into a pot with a few chopped apples (okay, you should core and peel them first), then some cider vinegar, brown sugar, ginger, mustard seeds, and red pepper flakes.
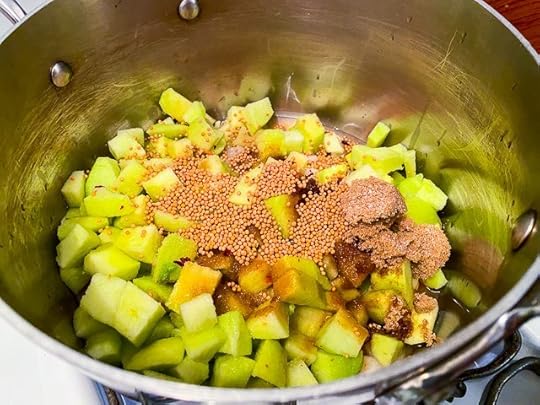
Crank up the heat, wait for a boil, lower to a simmer, and 45 minutes later you have chutney (then you add raisins, unless you hate raisins, in which case… don’t add them).
Delicata squash may be my favorite squash to cook because you don’t have to cut off the skin (many a finger has been lost to a butternut squash). You just cut the squash down the middle, scoop out the seeds, then slice into little half moons. I tossed with olive oil, a little maple syrup, salt and pepper…
…and roasted at 425 until it was golden brown all over, flipping halfway through.
Now for those pork chops! Here’s what I do: I coarsely grind fennel seeds, coriander seeds, and peppercorns in a spice grinder, bring the chops to room temp, season them with lots of salt and then the spices. Then I heat a cast iron skillet on high heat, add the tiniest splash of grapeseed oil just to coat the bottom of the pan (but not like a layer of oil, just a slick of oil), and when it starts to heat I put the chops in fat side down first.

As the fat renders, the pan gets hotter and hotter and even more fat coats the bottom of the pan. Then, when that side is pretty golden brown, I carefully lay the chops flat-side down into the skillet. Cook on one side until golden, then flip.

You can finish in a hot oven, but I like to finish in the skillet. I just keep flipping until a thermometer inserted into the center of the chop reads 135/140.
Let them rest, serve with the apple chutney and the squash, and wash down with some French apple cider if you’ve got it. (We didn’t have it, I don’t know what made me say that.)
It’s a dinner that sings “fall!” and “new friends!” even though I didn’t invite my new friends over to eat this. But when Covid’s over, you better believe, I’m going to make some new friends and feed this to them (sorry, Ben and Nik, I just used you for my podcast).
Spiced Pork Chops with Delicata Squash and Apple Chutney
IngredientsFor the apple chutney:6 Granny Smith apples, peeled, cored, and half-inch diced1 cup chopped yellow onion2 tablespoons minced fresh ginger1 cup freshly squeezed orange juice (2 oranges) for an extra thrill, put the orange zest in with everything3/4 cup apple cider vinegar1 cup light brown sugar, lightly packed1 teaspoon whole dried mustard seeds1/4 teaspoon hot red pepper flakes1 1/2 teaspoons kosher salt3/4 cup raisinsFor the delicata squash: 3 delicata squash1/4 cup maple syrup1/4 – 1/2 cup olive oilSalt and pepperFor the pork chops:3 tablespoons coriander seeds3 tablespoons fennel seeds1 tablespoon black peppercorns2 bone-in, well-marbled pork chops, left at room temperature for an hour It's really important to get two thick, fatty chops with the bone; otherwise, they'll come out dry. Best to get from a butcher.Kosher saltGrapeseed oil or other neutral oil
InstructionsStart by making your chutney: combine all of the ingredients, except the raisins, in a large saucepan. Bring to a boil, lower to a simmer, stirring occasionally, and cook for 50 minutes to an hour until most of the liquid is evaporated. Take off the heat and add the raisins.To make the squash, heat the oven to 425. Slice the squash in half lengthwise, scoop out the seeds, and slice into 1/2 inch rings. Toss on a cookie sheet with the maple syrup, enough olive oil to coat everything, and lots of salt and pepper. Roast in the oven for 20 minutes, flipping halfway through, until the squash is deep golden brown on both sides.To make the chops, grind the coriander seeds, fennel seeds, and peppercorns in a spice grinder just until coarsely ground (you don't want a powder or it'll burn). Season the chops all over with lots of salt and the spice mixture.In a large cast iron skillet, heat a splash of the grapeseed oil until very hot. Lay the chops in on their side with the fat-side down. Render the fat until golden brown, then lay the chops flat in the skillet — they should sizzle — and cook, without moving, for 2 to 3 minutes until deep, dark brown. Flip over and cook on the other side. Start taking the chops' temperature in the middle — you're shooting for 135. Keep cooking, flipping every few minutes, until you reach that temperature.Remove the chops to a plate and let rest for 5 to 10 minutes. Serve with the squash and lots of the chutney.
Related Posts:
The Secret To Killer Pork Chops at Home
Quick-Brined Pork Chops with Pan-Fried Cauliflower
Pork Chop Paprikash (Ben Mims, L.A. Times)
Coconut Chutney (Nik Sharma, A Brown Table)
The post Spiced Pork Chops with Delicata Squash and Apple Chutney appeared first on The Amateur Gourmet.

October 5, 2020
Five Weeknight Dinners That’ll Make Your Week Better

Some of you may know that my husband Craig is a director. Last week he went back to work, directing four episodes of our friend Ryan O’Connell’s Emmy-nominated Netflix show Special. The protocols on set are intense, as they should be during Covid. Craig gets tested almost every morning, he wears an N95 mask all day, and when he gets home after a thirteen hour day he’s super tired because of all the extra rigamarole Covid’s causing.
That’s where I enter the picture. I remember one of the first cookbooks that I ever bought was Nigella Lawson’s How To Be A Domestic Goddess and, even though I have my own work to do during the day (I have a few projects in the works!), at night I’ve blossomed as a true domestic diva. Here are the five dinners that I made last week each night that Craig came home from work. They certainly made our week better, maybe they’ll help with yours.
Meal One: Parmesan Chicken Cutlets with Fennel Orange Salad.

In a week of excellent dinners, this was probably our favorite. It’s Ina Garten’s favorite thing to make and you don’t really need a recipe. Here’s all you do: buy some boneless, skinless chicken breasts (one per person is plenty), put each between two pieces of plastic wrap, and smack with a rolling pin until flat.
Then set up three pie tins or cake pans: in one put flour (about a cup or two), in one put three eggs that you whisk, and in the third breadcrumbs (ideally Panko, though my store ran out so I used Progresso plain bread crumbs). Season each of the components with salt and pepper, season the chicken breasts, then dredge them through each: first the flour, then the egg, then the bread crumbs. If you’re feeling fancy, you can put some ground Parmesan in with the breadcrumbs (that’s what I did here).
Heat 1/2 inch of neutral oil in a cast iron skillet and when it’s hot (toss in a few breadcrumbs; if they sizzle, it’s hot), carefully lower in your chicken and fry until deep golden brown on one side, then finish on the other side.

To serve, I made a fennel orange salad by slicing fennel on a mandoline slicer (one of the best times to use your mandoline is for fennel), cutting the peel off the orange and then slicing, and adding a good glug of olive oil, a splash of white Balsamic, salt, pepper, and chopped parsley.
Together, the salad and the chicken were great foils. The acid from the white Balsamic cut the richness of the fried chicken cutlet. A four star weeknight meal and not that hard to make.
Meal Two: Deconstructed Eggplant Parm.

The recipe for this one lives on my blog, though the chef whose recipe inspired it is something of a pariah. Let’s focus on the technique, then, which is pretty straight forward: you slice eggplant, rub with olive oil, sprinkle with salt and pepper and roast on cookie sheets in a 450 oven. Meanwhile, you make your favorite tomato sauce (mine’s basically olive oil, onions, garlic, red chili flakes, tomato paste, and two cans of San Marzano tomatoes).

To assemble, you layer in the roasted eggplant, the sauce, slices of fresh mozzarella, lots of Parmesan cheese…
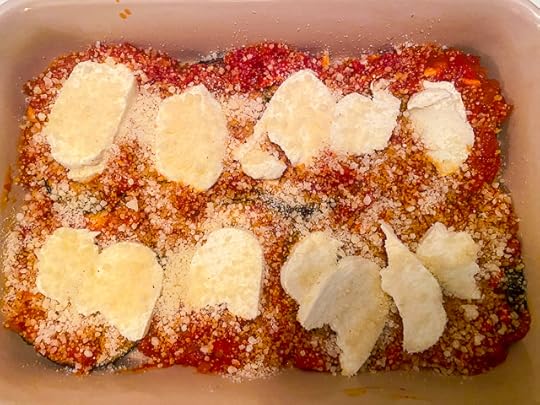
…then you do it again and top the whole thing with breadcrumbs that you cook, briefly, on the stove top with olive oil, salt, and pepper. Pop that into the oven (now at 350) and after twenty minutes, it should be bubbling and the cheese should be melted. If you’re like me, you’ll want to turn on your broiler to get it extra crispy on top. A dreamy weeknight meal, and not that hard!
Meal Three: Ziti with Arugula Pesto and Roasted Cauliflower.

This was so easy and so fast. Have I told you my arugula pesto technique? Let me check. Ah: I have in this post about pistachio arugula pesto. Well this one is the same thing, only I changed the nut.
What’s so great about arugula pesto is that you don’t have to sit there picking leaves off a stalk of basil. You just tear open a bag of arugula, shove it in your food processor with toasted nuts of your choice and garlic, then slowly add olive oil until you have what looks like pesto. Then add a ton of Parmesan. The addition here is roasted cauliflower, for health purposes. Use any roasted cauliflower technique that you like. Me? It’s a 425 oven, olive oil, salt, and pepper on a cookie sheet until the cauliflower is golden brown all over and easily pierced with a knife.
Meal Four: Roasted Sausages with Onions and Potatoes.
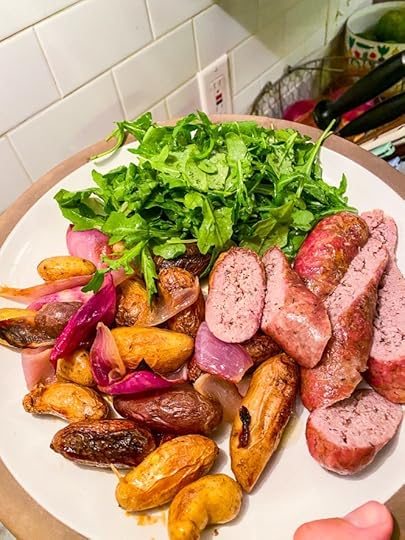
This is one you’re going to want to memorize. It has a lot in common with my go-to roasted chicken technique, except in this case you’re doing it with fat sausages (it works best with fat sausages from the butcher because of all of the fat that’ll help coat the potatoes).
Preheat your oven to 425. Put little potatoes in a cast iron skillet with a red onion peeled and cut into wedges. Toss the veg with oil (I think I used olive oil), salt and pepper, and place the sausages — these are fennel thyme sausages from McCall’s Meat & Fish — on top. Cut some slits into them, to stop them from exploding, and drizzle with a little more oil.

Into the oven it goes for 20 to 25 minutes, until the sausages register 160. Then you take the sausages out of the pan, toss the veg around a bit, and pop back into the oven until they’re deep golden brown and just look delectable and amazing.
I sliced the sausages on the bias and served with lots of grainy mustard. YUM.
Meal Five: Pesto Chicken Thighs with Roasted Broccoli.

Finally, I had some leftover arugula pesto from the pasta night, so I slathered it all over some chicken thighs and also shoved some of it under the skin. I put the thighs into a skillet and roasted in the oven at 425 until they registered 165 on a thermometer and then, unhappy with their color, I blasted them under the broiler while, on the lower shelf, I was making the best broccoli of your life.
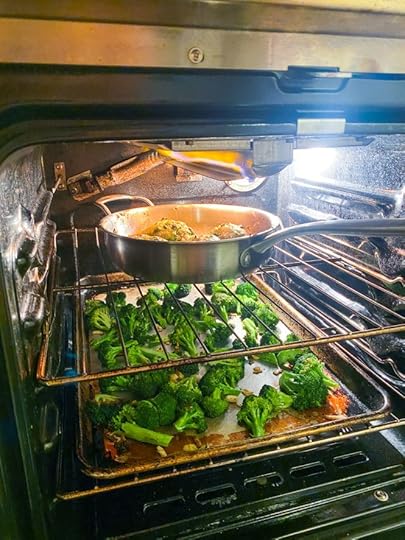
‘Twas a lovely end to the week and a good repurposing of leftovers.
Now before you ask “how do you eat all this and not gain five hundred pounds,” I just stepped on the scale and I think that I did. But at least Craig was comforted after work and, as for me, this week it’s all salads and Jane Fonda workouts. It’s hard work being a domestic goddess.
The post Five Weeknight Dinners That’ll Make Your Week Better appeared first on The Amateur Gourmet.

Adam D. Roberts's Blog

- Adam D. Roberts's profile
- 3 followers

