Nothing But Reading Challenges discussion
note: This topic has been closed to new comments.
Recycle Bin
>
Archived: Goodreads 101 - How do I do that? (Changed to Folder)
message 101:
by
Erin *Proud Book Hoarder*
(new)
Mar 05, 2012 08:44PM
 Very helpful thread, useful to keep referring back to when I forget something :) ...this is often.
reply
|
flag
 Erin wrote: "Very helpful thread, useful to keep referring back to when I forget something :) ...this is often."
One time for Lisa and LK!

 Hi, I don't know where exactly to post this query. I would like to join the month of April group reading challenge. But I don't know how to proceed or how it is done. I won't be able to read Queen's thief because I have exams till April 13 but like to start with the Rose Garden.
 Hi, Parvathy!
That thread hasn't been posted yet as the exact date in April hasn't been decided amongst the moderators. When it does it will be under Books of the Month and have an asterisk besides it to keep it near the top for easy location and viewing.

 Posting Multiple Pics from Pinterest... Fast and Not-so-Dirty!
 Find the pic you like on Pinterest and right-mouse click on it.
A drop down menu should appear. At the bottom is the word properties; click on it.
A dialogue box should now appear. Select all where it says URL (address), and then copy and ok.
Go to your desired GoodReads comment field and paste in the URL:
If you are going to post multiple pics, try this to make it faster.
You already know you can click on (some html is ok) in the right-hand corner above a comment box, and it says (by the bulleted word image) you put this and remove the parts in bold:
<img src="http://www.goodreads.com/image..." width="40" height="100" alt="description"/>And then adjust the width and height. But, since getting rid of that pesky ellipsis (. . .) is so time consuming, and even if I make the height uniform, the width usually needs adjusting, I just make multiple copies of what is left after removing the innards so that it looks something like the following. (Note: I adjusted the uniform height to be 120, but left the width to be adjusted.):
Then I can just copy and paste in the URLs I have copied from Pinterest between the first set of ""s and adjust the second set (the width) accordingly.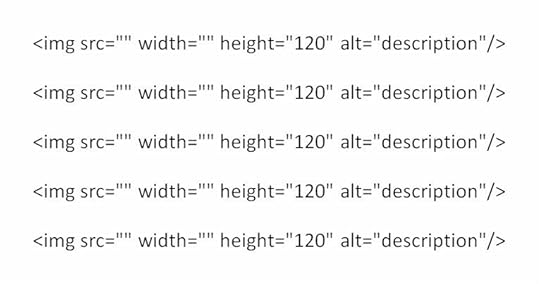
Example - of one pic, with URL in bold
<img src="http://media-cache0.pinterest.com/upl..." width="120" height="120" alt="description"/>Result
[image error]
Example of Multiple - five pics, with widths in bold (150, 110, 80, 100, 120, respectively); returns added in example for easier viewing (not present in results)
<img src="http://media-cache7.pinterest.com/upl..." width="150" height="120" alt="description"/>Results
<img src="http://media-cache4.pinterest.com/upl..." width="110" height="120" alt="description"/>
<img src="http://media-cache6.pinterest.com/upl..." width="80" height="120" alt="description"/>
<img src="http://media-cache0.pinterest.com/upl..." width="100" height="120" alt="description"/>
<img src="http://media-cache0.pinterest.com/upl..." width="120" height="120" alt="description"/>
[image error][image error][image error][image error][image error]
 Do you think I should have posted that the Shift Key + Ins (insert) Key is the universal paste command? for when you are doing the
Or does everyone know that already?
 Parvathy wrote: "Hi, I don't know where exactly to post this query. I would like to join the month of April group reading challenge. But I don't know how to proceed or how it is done."
@ Parvathy, did you see that BOM thread for TRG has been posted. No date set yet... but eventually. If you post a comment in there, you should get updates, if you've set up your e-mail that way.

 Companion “GoodReads How To...” to read before this one:
Shelf Setting: visible columns
.
Companion “GoodReads How To...” to read before this one:
Shelf Setting: visible columns
.A Printout! (From Shelf Setting) - or you can view the info on-line.
Thanks to Ben Babcock for this idea & Almeta for some of the words!
Let’s say I don’t have any nifty little electronic device that I can take with me to the bookstore or library. (So, I can’t use the GoodReads app and connect with goodreads.com to check out all my bookshelves.) All I want is to printout a list of books that I want to check-out, or buy – to use for, say, a specific challenge.
◈ Go to your books (My Books).
◈ Open the shelf from which you want a list generated. I would recommend a manageable
shelf, not your entire 3,000 volume wish list! You know, like the fifty that you need to
complete a challenge, etc. (There is a way to select two bookshelves at a time; however,
to simplify all this, I’ll discuss that at the end.)
◈ Above the list of books, to the right, there are options: covers, table and print .
Click on print . A new window will open.
◈ Click on the shelf settings link to alter the shelf settings panel, to include the columns
that you wish to see in your list, and to remove those that you don’t.
For example; I would make sure that the author, title, average rating, and notes are Clicked On. I would decide on an individual basis whether or not to Click On “shelves” as I may have a lot tagged here. I would Click Off the cover box, and all the rest.◈ Using your browser menu, Print this page. Retrieve your list.
◈ At this point you may choose to permanently save these settings, or to “X” - or exit from the
screen without saving. If you save, this criteria will be the same the next time you look
at this particular bookshelf.
Good Hunting!!!
Addendum for Selecting Two or More Shelves:
Let’s say I was to view & print two or more shelves. The two shelves I’m going to use for this example are my:
• disney♕princess-reading-challenge◈ Select the first one. The title will appear to the right of My Books at the top of the screen.
• library-sj-dead-tree-version
◈ To select the next one, scroll down to the bottom of your list of shelves on that first page.
◈ Notice right above “add shelf”, in little tiny print is the words, “select multiple”
(red arrow, Screen 1).
Screen 1

◈ When you click on that, little plus and minus signs appear. A minus sign indicates it has already
been selected, as shown by the minus sign next to “disney♕princess-reading challenge”
(green arrow, Screen 1).
◈ When both shelves are selected, follow the above directions.
◈ Screen 2 shows what will be ready for me to print and take to the bookstore or library.
Screen 2

 UGHHHHHHH...If we have bookcovers in our post how come they are now listed in a vertical column instead of a horizontal row? Is there a way to fix that as it is driving me crazy lololol
 I just noticed that. I have no idea how to fix it. I will have to play with it and see if I can get it to go back horizontal. I agree though...it is driving me nuts too. Hopefully it is just a bug or something that will be worked out soon.
 Thanks Rachel and Vi!!! I have tried everything to fix it and nothing works lol I seriously thought I screwed something up while updating my posts etc like hitting an extra/wrong key.
 Glad to know it is just a glitch that will hopefully be fixed soon.
 LOL Me too LK Mine were ok until a couple of days ago and then slowly but surely they are ALL vertical now. That's why I thought I had done something wrong, especially yesterday & today when I was working on inserting books into my challenges. It looks so bad and makes the posts seem really long lol : (
 Can someone please tell me how to hide spoilers within reviews. I know how to hide the whole thing but I want to know how to hide just the small part of the review that contains the spoiler - not the whole thing. Thanks
 Sandra wrote: "Can someone please tell me how to hide spoilers within reviews. I know how to hide the whole thing but I want to know how to hide just the small part of the review that contains the spoiler - not t..."
put the part that's a spoiler in between:
< spoiler> hidden text < / spoiler>
But remove the spaces inside < >
 Shay wrote: "Sandra wrote: "Can someone please tell me how to hide spoilers within reviews. I know how to hide the whole thing but I want to know how to hide just the small part of the review that contains the ..."
Thanks.
 ~ Follow Someone’s Reviews ~
First off, if someone has set their profile so that no one can follow them, then it can’t be done. You would have to “friend” them – and have them accept.
Second, there are several ways to follow someone who allows it.
1. Go to their Profile Page and click on “follow reviews” just to the right of
“ add as a friend”.
2. When reading one of their reviews, click on “follow reviews” tab at the bottom.
3. If you are not aware of any books they have read, a quick way to check this out is to
a) Go to their Profile Page.
b) Go into their bookshelves. For example, on the screen pictured below,
you would go into “Annie the Destroyer *Leather Lust*'s Bookshelves”.
c) After reading read the information GoodReads How To… on
Shelf-setting: visible columns and click on “review” – to the far right.
Special Note: Once you set your viewing to these visible columns, they will
appear this way (until you change them) regardless of who’s bookshelves you
view. This came in handy a week or two ago when GR wasn’t
delivering e-mail notifications of my friends’ reviews. This way, I could
just quickly go in and check my top friends’ bookshelves and see if they had recently
posted any.
d) Once you find a book where they have written a review or comment
(red arrow, Screen #1), click on “view” (green arrow, Screen #1) and it will
hyperlink you to their review.
e) Then follow step two above.
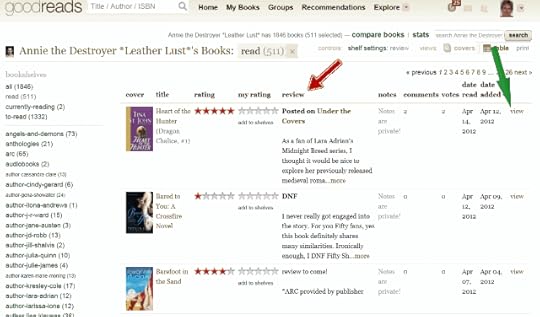
Hope this helps. Let me know if you have any difficulty.
 Book Covers horizontal instead of vertical.
The html/formatting bug is still a problem issue with GRs, as you can see with the extra returns in mine challenge posts. However, a "work-around" to get your book covers horizontal instead of vertical, you can “italicize” them by putting < i > (without the spaces) on a line by itself before your books, and then put < /i > on a line by itself afterwards.
 Lisa Kay wrote: "Book Covers horizontal instead of vertical..."
Thank you, LK! I am implementing this as we speak. Those vertical covers stopped me from updating my Member's Reading List for the past few weeks.


~ Look for Events in Real Life ~
Are you looking for an Event or Book Club that meets in Real Life?
Go here. After you put in the driving distant you’re willing to travel, put in your zip code in the “miles from” field. You can also put in your country.
If GoodReads knows about it, it will show up as an Event, under Explore on the toolbar.
Good luck!
 ~ Add an Image or Picture the Size You Desire ~
Adapted from Mandie's post of Dec 03, 2010 06:03am from the "Nothing But Reading Challenges" group.
REVISED to try and outwit the GoodReads Formatting Bug.
Feel free to practice in this thread and ask questions.
How to post a picture, like a little larger bookcover, or maybe one that is not available on GoodReads or on Photobucket. For example, one of the gazillion bookcovers to Alice In Wonderland.
Or a VERY nice NSFW (not safe for work) picture like this (view spoiler).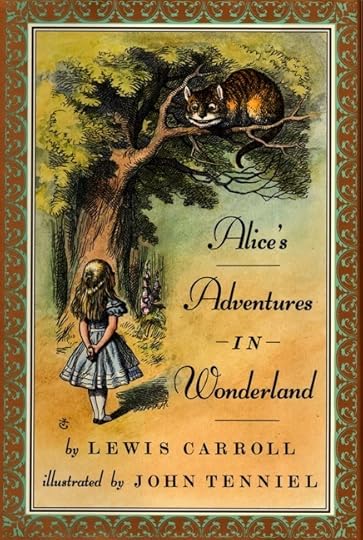
As an example, we are going to post this picture:
a little larger:
The internet location of this picture, or URL, is here. Just right mouse click to copy it. It should read:

TO POST A PICTURE:
◈ Click on (some html is ok) in the right-hand corner above a comment box.
◈ Copy what it says (by the bulleted word image and replace what is between the quotation marks, which I put in bold below.

◈ That is where the picture’s URL is inserted. Cut or delete that and insert the new URL. It should look like this:

◈ Next, change the width and height measurements. You can get out you ruler and calculate aspect ratio, or just wing-it with a guess. I put the numbers in bold that you will change.

◈ You may have to fiddle with these numbers to get the desired size. For the smaller picture, I used width="200" height="150". For the larger picture, I used width="400" height="300".
◈ Use the preview before you post to check the size. The description section is the text that is displayed if the image can't be displayed.
❀✿❀✿❀✿❀✿❀✿❀✿❀✿❀✿❀✿❀✿❀✿❀✿❀✿❀✿❀✿❀✿❀✿❀✿❀✿❀✿
Adjusting Size (in this case, height) to give a uniform appearance.
For my review of Gift from the Sea I wanted to use several pics; while they vary in width, they are all the say height (80) and look like this:


To paste in a picture from photobucket.com you would normally use the html code, but when adjusting the size, you need to use the Direct link as pointed to with the red arrow in Screen 1 and close-up in Screen 2 and paste between the first set of quotation marks " ":
Screen 1

Screen 2 - close up

 Thank you all.
 this has been driving me huts. Kept hoping it would get fixed. I'm glad to try something to fix it myself.
Lisa Kay wrote: "Yes, try putting a space after the


"
Robin wrote: "LOL Me too LK Mine were ok until a couple of days ago and then slowly but surely they are ALL vertical now. That's why I thought I had done something wrong, especially yesterday & today when I was ..."
 ~ How To... Inactivate “Add to my Update Feed” (and what does that mean?) ~
Inactivating this default feature will enable your comment to NOT be viewed on the Recent Updates thread.
Special Note: If the group you are “chatting” in is private/secret, it will NOT show on the Recent Updates thread.
However, if you don’t want all of your friends to see what you are discussing in a certain public thread, make sure you UNCHECK the box that says Add to my Update Feed underneath your comment box. (It defaults in as checked in a Public Group; it will not appear as an option in a Private/Secret Group.)
Screen #1 shows the red arrow pointing to the tab that will list all your friends’ posts. The other tab will show all your groups.

Screen #2 shows the red arrow pointing to the little box underneath your comment box. Click on that if you do NOT want the comment to appear on the Recent Updates.

 ★☆★☆★☆★☆★☆★☆★☆★☆★☆★☆★☆★☆★☆★☆★☆★☆★☆★☆★☆★☆★☆★☆★☆
GoodsReads is a Social Network for people who love books. However, if you want to change the default mentioned above:
• Go to your Profile Page.
• Click on the feeds tab.
• Then UNCLICK Comment on a book or group discussion board.
• Click on save feed settings.

I might have to use this as a temporary function when I go around updating all the “GRs How To...” folders. If I can remember! ☺
 Never a happy topic, but maybe you just want to clean house.
~ Unfriend Someone ~
To “Unfriend” someone, go under your Profile page and look to your right where your “Friends” are listed and click on that. Click on the green lettering that say edit friends (Screen #1, red arrow).
Screen #1

As you scroll over the “X” (Screen #2, red arrow), a white box pops up asking if you are sure. Click on the “X”.
Screen #2
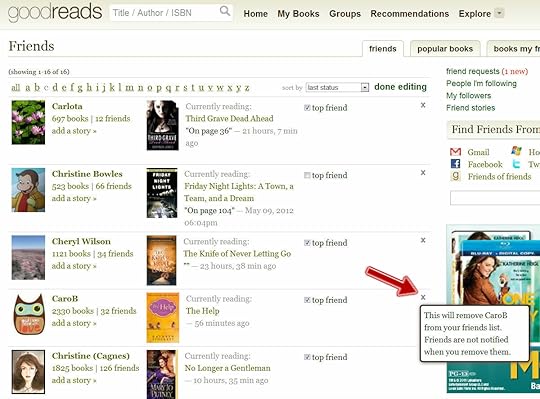
They will NOT be notified that you have “unfriended” them.
My excellent friend and co-moderator, CaroB., who puts up with me through thick and thin (and proofreads for me!! and makes wonderful suggestions kindly) was gracious enough to let me use her as an example for these instructions! Thank you, CaroB, for being such a good sport. ☺
 ~ How to Block a Member* ~

Blocking another member means they can’t send you (another) friend-invite and can’t post on your profile page. If they post in the same thread you are posting in, you will not get e-mail and/or notifications, and you will not see their comment. However, you do have the option to elect to see it. If they have sent you a friend-invite, they automatically started “following” you. Nevertheless, once you block them, they will be unable to do so.
This is assuming they are NOT a GoodReads Friend** of yours.
• Go to the profile page of the member you wish to block.
• At the very bottom on the left hand side, just above below the words "back to top" in a small, light grey font are the words "block this member (?)". Click it.
• You will get this prompt:
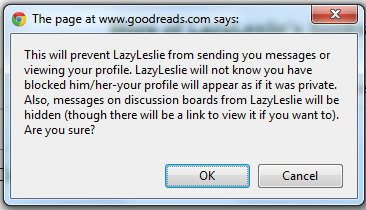
• Click on “OK.” They’re blocked!
They will NOT be notified that you have blocked them. If they go to your Profile Page, they will see that it is now set to Private (which it is only to them). If they send you a friend-invite anyway, they will get the following message:

If they try and send you a Personal Message, they will get the following:

If you post in the same thread as they do, you will see this:

You can click on the “click here” spoiler, only if you wish to read it.
If you wish to unblock them, you may do so. Just go back to their Profile Page.
*Note: These are NOT instructions for the way a Moderator would block a member.
**If you wish to “Unfriend Someone,” check out the instructions here.
 Unfortunately, this has been requested by several members. I held off posting, and I didn’t want to encourage this behavior; however, it is time to post.
 ~ How to Flag ~
Have you received something offensive on your Profile Page or as a Personal Message? If it is in a thread, you can contact a Group Moderator and let them make the determination as to how to handle it.
Please see the explanation below about GRs NOT censoring foul language. If a person’s language upsets you, refer to Block a Member or Unfriend Someone. (Give me a second or two to post these topics!)
However, if it is on your Profile Page or in a Personal Message to you...
First, you should NOT delete the message! I know this is hard, especially when it is on your Profile Page. You should immediately flag* the post; I believe this “freezes” it so that the person themselves cannot delete the post. (That is my understanding, but I’ve never had to do it, so I can’t guarantee this.) Every comment field has one; it is located in the lower right-hand corner of the message in light gray font.

This will take you to the next screen where you can indicated the reason why you flagged the comment.

If the spam has been sent to your Personal Message account, it is NOT safe from tampering either. If the spammer deletes their account, the message will go away, so it is important to flag* it! However, if you have elected to have an e-mail of all your PMs sent to your regular e-mail account, you’ll have a copy of it. I don’t know what you can do with it, but I would save it just in case GRs wants it forwarded to them.
 ~ How to use “Batch Editing” ~
 Thanks, UniquelyMoi *~*Dhestiny*~*, for explaining how you use “batch editing”. Two heads are always better than one. ☺☺
What is “batch editing”?: The help section (hyperlink located at the bottom of every GRs page) of GoodReads defines “batch editing” as follows:
To add or remove books from a shelf in batches, use the "batch edit" on the top of your My Books page. The batch edit tool lets you select as many books as you like to move them from one shelf or another, or even to remove them from your profile.First, an example of how Dhes uses “batch editing” to add a new shelf for a new author.
Second, an example of how I use “batch editing” to ‘tag’ books with a shelf I already have in use.
 EXAMPLE #1
Using “batch editing” to add a new shelf.
In this first example, we’ll say you want to have a special bookshelf for each of your favorite authors, or maybe even a new-to-you-author that you’ve found you really like. You may have started ‘tagging’ her new books you’ve read, but you want to go back and ‘tag’ all the previous books you’ve read with the same bookshelf.
Here is how to use “batch editing” to simplify the process:
◈ Go into your My Books as shown in Screen #1 and add a bookshelf. In this example I
added a bookshelf entitled ‘author-lisa-kleypas’ by selecting “add shelf” that is
to the left, shown in Screen #1.
Screen #1

◈ Notice that there is now a shelf entitled author-lisa-kleypas, as shown in Screen #2
indicated with the green arrow. Type in the author’s name in the search field, as shown
in Screen #2 indicated with the red arrow.
Screen #2

◈ Once all her books dump in, click on the control in green font that reads
“batch editing” shown in Screen #3 indicated by the red arrow.
◈ Then click on the drop-down box (highlighted) and select the desired bookshelf
(return works), as indicated with the blue arrow also shown in Screen #3.
◈ Notice the little white boxes that have now appeared to the left of the bookcovers in
Screen #3, indicated by the yellow arrow.
Screen #3

◈ Instead of clicking each box, you can “select all” (red arrow). Your books will become
highlighted in yellow, as depicted in Screen #4.
Screen #4

◈ You will get a question box telling you the total number selected and asking you
to confirm your request as shown in Screen #5. Click “ok” (red arrow).
◈ Notice under shelves, they are ‘tagged’ “author-lisa-kleypas” as indicated by the
green arrow in Screen #5.
Screen #5

◈ Refresh your screen and notice that you have the new numbers totals in
parenthesizes by the bookshelf.
 EXAMPLE #2
Using “batch editing” to ‘tag’ books with an existing bookshelf.
In the next example I will use the “batch editing” feature to add books to my “reviewed-by-me” shelf. (Eep! Sometimes I forget to mark every book!)
◈ First, narrow my books down by clicking “read.”
(As depicted in Screen #6a, orange arrow.)
◈ Next, turn on the “shelf-setting” command so that I can see the first few lines
of those books for which I have written reviews as shown in Screen #6a (red arrow),
after saving the settings (green arrow, #6a), changing into the screen as shown in
Screen #6b. (A more detailed explanation of this feature can be found here.)
Screen #6a

◈ Screen #6b shows that the first few lines and/or pictures can be seen under the review
column (orange arrow).
◈ As explained in Example #1, click on the control in green font that reads “batch
editing” (in Screen #3 above, red arrow), and this time select “reviewed-by-me”
as your shelf (green arrow, Screen #6b).
◈ Then I can use the universal computer command “Ctrl+F” to find things on the screen;
in this case the books already tagged with “reviewed-by-me” (red arrow, Screen #6b).
◈ This will cause all those phrases to be highlighted (blue arrow, Screen #6b).
Screen #6b

◈ Activate the control “batch editing.” After starting the search for the ‘tag’ “reviewed
by me,” it is now highlighted (for my program, the first is in orange, the rest in
yellow). Now, I’ll take note of those books where I have some writing and/or pictures
added, but the “reviewed by me” is missing and check the little white box to the left.
◈ As shown in Screen #7, ignore
 and
and
 because they are already ‘tagged’
“reviewed-by-me” (high-lighted in yellow, orange arrows) and select
 and
and
 (red arrows) because they have not.
Screen #7

 Sometimes the number of pages of a book I'm currently reading does not show on status update so I can't see the visual progress bar for it :-( I've tried changing editions but to no avail.
Anyone know if there's a way to solve this?
Thanks
 I think I read something about this problem in the GoodRead Feedback Group. Let me see if I can find it, Hayley.
 Sure, Hayley. I know it gets finicky for me sometimes, too. That is why I always update my status from the "Recent Updates" screen showing all my groups. I seem to have the best luck from there.
 Hi can any one help out with how to find a discussion on a particular book. I just read Touch of Power and want to see if anyone had started a discussion on it. But I don't know how to search the discussions - I just get this massive long list of all the discussions on all the books on my shelves and they are not even in any order so it takes to long to try and search through them. if I search on the title I just get taken to the actual book page not discussions. Please help.
 Sandra, go to the very bottom of the book synopsis page. After the synopsis and all the reviews you'll find a footer titled "Discuss this book", followed by a list of links to discussion threads for that book. Hope that helps!
 Sandra wrote: "I just read Touch of Power and want to see if anyone had started a discussion on it."
Here is NBRC groups' discussion when it was BOM: here . The Discussion Questions are at the beginning.
 I have a question related to reading challenges, but I don't really think this is the right thread... I'm going to ask it anyway. Can we use the same book for more than one challenge? As in, use a book for "Animal Alphabet Challenge" in a spell-it-out and then use it for "Tee Shirt Challenge," if it fits? Or is this a no-no?
This topic has been frozen by the moderator. No new comments can be posted.
Books mentioned in this topic
Fair Game (other topics)Murder Uncorked (other topics)
Alpha & Omega (other topics)
Angels' Pawn (other topics)
Caressed by Ice (other topics)
More...
Authors mentioned in this topic
Kate Walker (other topics)Teresa Medeiros (other topics)


