
Beth Cato's Blog, page 5
January 22, 2025
Bready or Not Original: Toffee Blondies
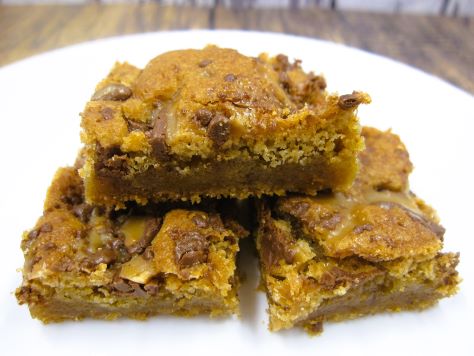
Why have a candy bar when you can have a chewy, luxurious treat that’s filled with candy bar pieces? These Toffee Blondies are a glorious combination of textures and sweetness.

If you can find it, use an 8 ounce bag of Heath Bits that include chocolate. All is not lost if that is unavailable, though. You can chop up normal Heath Bars, or use an all-toffee bag and add separate chocolate.

The result is a thick, chewy bar with crunchy little bits of toffee and pockets of chocolate. These things keep for days, too.
 PrintBready or Not Original: Toffee BlondiesThese are like big, chewy candy bars! If you can’t find the Heath bag that includes chocolate, you can buy candy bars and chop them up, or use the toffee bits and supplement with extra chocolate.Course DessertKeyword bars, chocolate, cookiesAuthor Beth CatoEquipment9×13 panaluminum foilnonstick sprayIngredients2 cups all-purpose flour2 cups brown sugar packed2 teaspoons baking powder1/4 teaspoon salt1/2 cup unsalted butter (1 stick) melted and cooled2 large eggs room temperature1 teaspoon vanilla extract8 ounces Heath Bits with ChocolateInstructionsPreheat oven at 350 degrees. Line a 13×9 pan with foil and apply nonstick spray.In a bowl, mix together the flour, brown sugar, baking powder, and salt. Set aside.In a large bowl, beat the butter, eggs, and vanilla until smooth. Gradually mix in the dry ingredients. Fold in about 2/3 of the Heath Bits.Scoop the thick batter into the prepared pan and level out with an uneven spatula. Sprinkle the rest of the Heath pieces over the top.Bake for 24 to 27 minutes. Middle should be set and pass the toothpick test. Cool to room temperature, speeding the process in the fridge if desired.Use the foil to lift onto cutting board to slice into bars. Store in a sealed container at room temperature. They will keep for up to 3 days.OM NOM NOM!


January 15, 2025
Bready or Not Original: Gingerdoodles
I’ve published many variations on Snickerdoodles (complete with pie and banana versions!), and here is a take called Gingerdoodles.
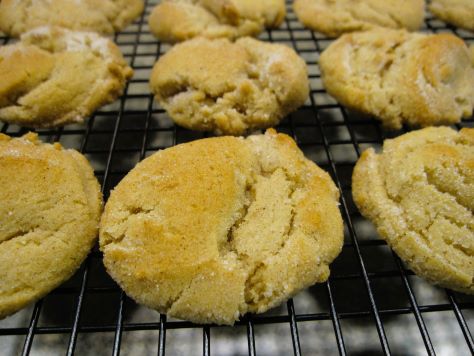
It should come as no surprise that these feature the warmth of ginger along with other complementary spices. To me, these were like a hybrid of snickerdoodles and sugar/spice cookies. The texture is soft and scrumptious.

This recipe is a must if you love soft cookies with some sweetness and spice.
 PrintBready or Not Original: GingerdoodlesThese cookies are like a hybrid snickerdoodle-sugar/spice cookie, soft and sweet and delicious.Course Dessert, SnackKeyword cookies, gingerbread, snickerdoodleAuthor Beth CatoEquipmentparchment papersmall scoop or teaspoonIngredientsDough3/4 cup unsalted butter (1 1/2 sticks) softened1/2 cup white sugar1/2 cup brown sugar packed1 large egg room temperature1/2 cup real maple syrup3 1/4 cups all-purpose flour1 teaspoon baking soda1/2 teaspoon ground cinnamon1/2 teaspoon ground ginger1/4 teaspoon salt1/4 teaspoon cream of tartar1/4 teaspoon nutmegTopping1/2 cup white sugar1/4 teaspoon ground cinnamonInstructionsPreheat oven at 350 degrees. Line a baking pan with parchment paper.Beat together butter and both sugars until light and fluffy. Beat in egg and syrup.In another bowl, combine flour, baking soda, cinnamon, ginger, salt, cream of tartar, and nutmeg. Gradually mix the dry ingredients into the wet, forming a cohesive dough.In a small bowl, stir together the two topping ingredients.Use a small cookie scoop or spoon to shape dough into round balls. Roll them in the topping to coat. Place spaced out on baking pan.Bake for 9-10 minutes, until set and crackled. After 5-10 minutes, move them to a cooling rack.Store cookies in a sealed container at room temperature.OM NOM NOM!
January 8, 2025
Bready or Not Original: Chai Crinkle Cookies
These Chai Crinkle Cookies are a fantastically fresh take on spice cookies. They are like pudgy soft pillows with gentle spice flavor.

This recipe is an easy one to break into sections to make for faster baking. There are a lot of ingredients–tiny amounts of flavorful spices–and those can be mixed with the flour hours or days in advance. The dough itself needs to chill for at least a few hours. I kept it in the fridge a full day.

These are great cookies to make year-round, but there’s something extra special about a warmly-spiced treat at this time of year!
PrintBready or Not Original: Chai Crinkle CookiesThese Chai Crinkle Cookies are like a pudgy, soft, gently-spiced cousin of gingerbread. Makes about 50 cookies.Course Dessert, SnackKeyword cardamom, cookiesAuthor Beth CatoEquipmentplastic wrapparchment papercookie scoop or spoonIngredients1/2 cup unsalted butter (1 stick) softened1/4 cup vegetable shortening1 cup brown sugar firmly packed1 large egg room temperature1/4 cup molasses1 Tablespoon vanilla extract3 cups all-purpose flour1 1/2 teaspoons ground cinnamon1 1/4 teaspoons baking soda1/2 teaspoon kosher salt1/2 teaspoon ground ginger1/2 teaspoon ground cardamom1/8 teaspoon ground cloves1/8 teaspoon ground black pepper1/3 cup white sugar for toppingInstructionsIn a large bowl, beat together butter, shortening, and brown sugar, until fluffy, scraping the bottom of the bowl on occasion. Add egg, molasses, and vanilla.In another bowl, stir together flour, cinnamon, baking soda, salt, ginger, cardamom, cloves, and pepper. Gradually add the dry ingredients to the wet.Cover dough with plastic wrap and chill for at least two hours, or up to a day.Preheat oven at 350 degrees. Line a baking pan with parchment paper. Measure out topping sugar into a bowl.Use a scoop or spoon to form walnut-sized balls. Roll dough balls in sugar. Place them slightly spaced on pan and then compress each one; they will not spread much while baking.Bake for 10 to 12 minutes, until puffed and set. Let cool on pan a few minutes before transferring to a cooling rack.Store them in a sealed container at room temperature up to 3 days.OM NOM NOM!January 1, 2025
Bready or Not: Small Sourdough Boule
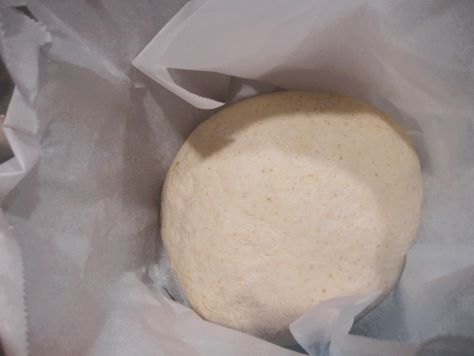
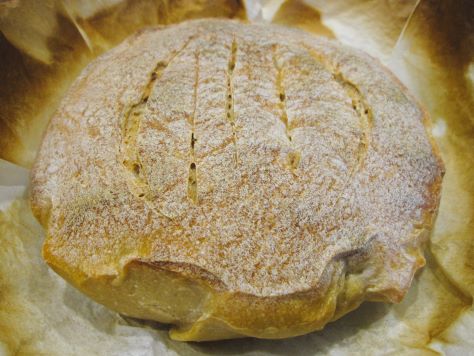
Begin the year as you intend to go, that’s what I have often heard. Therefore, we’re kicking off 2025 with a small bread round that entirely relies on sourdough starter as the rising agent. This Small Sourdough Boule begins a series of sourdough recipes that will continue into the fall, building up to the release of my new fantasy book from 47North, A House Between Sea and Sky.
One of my characters is a sentient sourdough starter by the name of Mother. Yes, I said “character.” Mother does not speak, but her feelings are still made known. I had early readers say that it was a testament to my writing that they came to deeply care for a sourdough starter.
Sourdough has a life cycle. It requires consistent maintenance to stay active. For this recipe, use a mature starter (at least a few days old) and feed it a half day before commending this recipe. Meaning, if the last feeding was in the evening, start making the dough the next morning. Because this bread relies entirely on the starter for leavening, the dough needs to be begun about a day and a half in advance of baking.
 PrintBready or Not: Small Sourdough BouleUse a mature sourdough starter that was last fed about 12 hours before. This dough, with start as the sole leaven, requires about a day and a half of slow rise prior to baking. Therefore, the recipe assumes that the dough is started in the morning and then baked at some point the next day. Adjust as needed to your own sleep/work cycle.Course BreadCuisine FrenchKeyword yeast breadPrep Time 20 hours hoursAuthor Beth CatoEquipmentnonstick spray or oilparchment paperplastic wrap or towelsmall cast iron skillet or baking pan.Ingredients3 2/3 cups bread flour or all-purpose flour1 3/4 teaspoons salt1 1/2 cups water room temperature1/3 cup mature sourdough starter (83 grams)InstructionsMix flour and salt in a large mixing bowl. In another bowl, whisk together the starter and water. Pour wet ingredients into the dry, mixing until the dough looks smooth and is no longer tacky. In a stand mixer with bread hook, this will be about 10 minutes.Turn the dough onto the counter and form it into a ball by tucking dough underneath the tighten the top. Apply nonstick spray or oil to the bowl. Place dough back inside and turn it to coat the surface with oil.Line another large bowl with parchment paper. Place dough inside, seam side down. Cover with a towel or plastic wrap and allow dough to rise for about 12 hours at room temperature.Transfer bowl to fridge to continue its fermenting overnight. Keep there until baking time at some point the next day.Preheat oven at 500 degrees. Place the small cast iron skillet or baking pan inside to heat up as well. Once the oven and pan are at full heat, CAREFULLY remove pan from inside.Pull dough from fridge. Set aside the towel or plastic wrap. Use the parchment as a sling to transfer dough to the hot pan. Use a knife or French lame to score the top so that carbon dioxide can escape the bread as it bakes.Place pan in oven. After closing the door, change the heat to 475 degrees.Bake for 20 minutes. Lower the temperature to 350 and bake for another 20 minutes.When done, the loaf should sound hollow when thumped. A digital thermometer plunged into the center should read over 190 degrees.Let cool for at least 20 minutes before slicing in. Enjoy hot or at room temperature. Fresh bread can also be frozen for later enjoyment.OM NOM NOM!
December 25, 2024
Bready or Not Original: Raspberry-Almond-Chocolate-Oatmeal Cookies
Merry Christmas to those of you who celebrate, and warm wishes to visitors of any or no faith!

The name for these cookies is a mouthful, but that list of ingredients lets everyone know that these aren’t standard Oatmeal Cookies. No, these Raspberry-Almond-Chocolate-Oatmeal Cookies are loaded with flavors and textures with nary a raisin in sight.
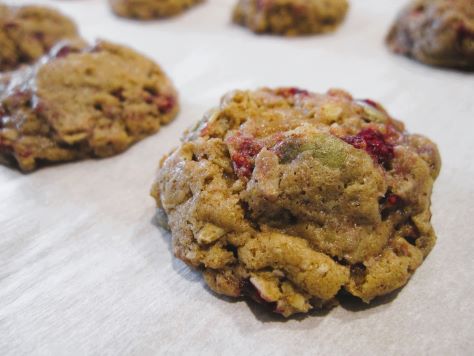
The chocolate is optional here, but I really do love that chocolate-raspberry combo. It adds some oomph (and results in a few more cookies). Only use mini chips, though, or you’ll likely have cohesion issues.
PrintBready or Not Original: Raspberry-Almond-Chocolate-Oatmeal CookiesThese are a special variant on standard oatmeal cookies. The frozen raspberries add a lovely punch of flavor. The optional mini chocolate chips (and only use mini-size here) add a great flavor contrast. Makes about 44 cookies without the mini chocolate chips, 48 with.Course Dessert, SnackKeyword chocolate, cookies, oats, raspberriesServings 44 cookiesAuthor Beth CatoEquipmentparchment paperkitchen shearssmall cookie scoop or teaspoonIngredients3/4 cups frozen raspberries unthawed1/4 cup unsalted butter room temperature1/4 cup almond butter room temperature1/2 cup brown sugar packed1/4 cup white sugar1 large egg room temperature1 teaspoon vanilla extract1/4 teaspoon almond extract3/4 cup all-purpose flour1/2 teaspoon baking soda1/2 teaspoon ground cinnamon1/4 teaspoon ground nutmeg1/4 teaspoon salt1 1/2 cups old fashioned rolled oats1/4 cup pepitas1/2 cup mini chocolate chips optional but awesomeInstructionsPreheat the oven to 350 degrees. Line a baking sheet with parchment paper.Use kitchen shears to gently shatter apart the frozen raspberries into a measuring cup. Set cup in freezer again as the rest of the dough is formed.In a large bowl, beat together butter, almond butter, brown sugar, and white sugar until light and fluffy. Add in eggs, vanilla, and almond extract. Follow up with flour, baking soda, cinnamon, nutmeg, and salt. Stir in oats and pepitas until combined.If using, fold in the mini chocolate chips. Gently fold in frozen raspberries until evenly dispersed in the dough. Note that if an excess of raspberry bits are left until the end, the dough will be especially wet and harder to work with.Use a small cookie scoop or teaspoon to form balls about 1 inch apart onto the prepared baking sheet. Bake until cookies are set, 9 to 10 minutes. Chill remaining dough while a batch bakes.Allow cookies to cool 5 minutes on the baking sheet before removing to a wire rack to cool completely. Store in a sealed container at room temperature.OM NOM NOM!December 18, 2024
Bready or Not: Gingerbread Cookie Cheesecake Bars
If you love both gingerbread cookies and cheesecake, oh boy, do I have the recipe for you. These Gingerbread Cookie Cheesecake Bars are dense, rich, and outright divine.
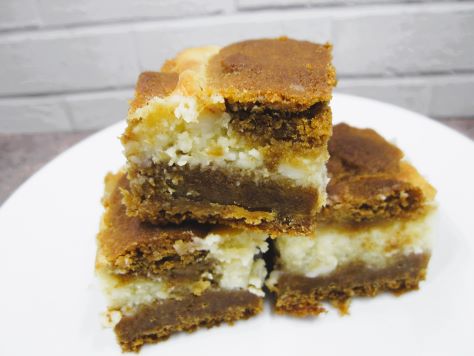
The creation process also dirties a lot of dishes, but hey, sometimes that’s what is required to make something that truly comes across as special. This recipe makes a 9×13 pan of thick bars, so bake this to feed a crowd!

Modified from Holiday Cookies magazine 2019.
 PrintBready or Not: Gingerbread Cookie Cheesecake BarsNot gonna lie: these bars take some effort and dirty a lot of dishes, but the result is a thick, sumptuous dessert that is perfect for winter. Make these for a crowd! Modified from Holiday Cookies Magazine 2019.Course DessertKeyword bars, cheese, cookies, gingerbreadAuthor Beth CatoEquipment9×13 panaluminum foilnonstick sprayuneven spatulaIngredientsGingerbread1 1/2 cups unsalted butter (3 sticks) softened1 1/4 cups white sugar3/4 cup brown sugar packed1/2 cup molasses2 large eggs room temperature4 cups all-purpose flour2 teaspoons ground cinnamon2 teaspoons ground ginger1 1/2 teaspoons kosher salt1 teaspoon baking powder1 teaspoon baking soda1/4 teaspoon nutmeg1/8 teaspoon allspice1/8 teaspoon cloves3 Tablespoons minced candied gingerCheesecake16 ounces cream cheese (2 blocks) softened1 cup white sugar1 Tablespoon all-purpose flour2 large eggs room temperature1 Tablespoon vanilla extractInstructionsPreheat oven at 350 degrees. Line a 13×9-inch pan with aluminum foil. Apply nonstick spray.In a large bowl, beat the butter and sugars until fluffy. Add the molasses, mixing until no streaks remain. Add eggs, one at a time, scraping the bottom of the bowl on occasion.In a separate bowl, combine the flour, cinnamon, ground ginger, salt, baking powder, baking soda, nutmeg, allspice, and cloves. Gradually add the dry ingredients to the wet. Fold in the candied ginger.Measure out 2 cups of the dough and set it aside.Press the remainder of the dough into the pan, forming an even layer.Time to make the cheesecake layer. Beat the cream cheese until creamy. Add the sugar and flour. Add the eggs one at a time, followed by the vanilla. The mixture should be fairly consistent in color and texture, but it’s okay if there are some small lumps.Use an uneven spatula to spread the cheesecake into an even layer. Crumble the reserved topping over it.Bake for 50 to 60 minutes; the middle should not look jiggly and should pass the toothpick test. If the top is browning too much, cover with foil.Cool at room temperature for about an hour, then place in fridge to completely chill for a few hours. Use foil to lift onto cutting board to slice into small pieces. Store in fridge in a sealed container.OM NOM NOM!
December 11, 2024
Bready or Not Original: Chewy Honey Peppermint Bark Cookies
I’ve shared a sequence of Peppermint Bark Cookies, but this one is my favorite: Chewy Honey Peppermint Bark Cookies.

The base “Chewy Honey” recipe here will be a familiar one to regulars on Bready or Not–or if you’ve met me at a convention at some point in about the past 10 years and had my Maple or Snickerdoodle versions. This new version is modified to incorporate lots of chopped peppermint bark candy.

As with the similar recipes, the quality of the peppermint bark will not only make a difference in taste but also the prettiness.

As with the other recipes in my “Chewy Honey” collection, these baked cookies will keep for weeks in a sealed container. That makes them great to mail as a holiday gift, but of course, be wary if you’re sending them to or from a warm destination. In an infernal place like Arizona (which I am so glad to be away from), it can still be hot, even into December!
PrintBready or Not Original: Chewy Honey Peppermint Bark CookiesThese cookies are soft, sweet, and delicious. Using higher quality peppermint bark will result in tastier, prettier cookies. Note that the dough needs to be chilled prior to baking.Course Dessert, SnackKeyword chocolate, cookies, mintAuthor Beth CatoEquipmentcookie scoop or spoonparchment paperIngredients3/4 cup unsalted butter softened1/2 cup light brown sugar packed1/2 cup white sugar2 Tablespoons honey1 large egg room temperature1 Tablespoon vanilla extract1/2 teaspoon peppermint extract1 cup bread flour1 cup all-purpose flour2 teaspoons cornstarch1 teaspoon baking soda1/2 teaspoon salt1 1/2 cups peppermint bark choppedmore peppermint bark pieces for toppingInstructionsIn a large bowl, beat butter until smooth. Add both sugars and honey; beat until creamy and fluffy. Scrape down sides of bowl, then mix in the egg and both extracts.In a separate bowl, combine the dry ingredients: bread flour, all-purpose flour, cornstarch, baking soda, and salt. Sift together.Slowly stir together the wet ingredients and flour mix until just combined. Fold in the peppermint bark. Encase dough in plastic wrap and stash in the fridge for several hours or days; dough can also be frozen at this stage.When ready to bake, preheat the oven at 350 degrees. Place parchment paper on cookie sheet. Use a teaspoon or tablespoon to space out cookies on the pan. Press additional peppermint bark pieces into the tops of the dough balls.Small cookies bake 9 to 12 minutes; larger cookies bake in 11 to 13 minutes. Once removed from the oven, let set on baking sheet for about 10 minutes before transferring to a rack to cool completely.Stored cookies will keep in a sealed container for weeks. They are excellent for travel or shipping.OM NOM NOM!December 4, 2024
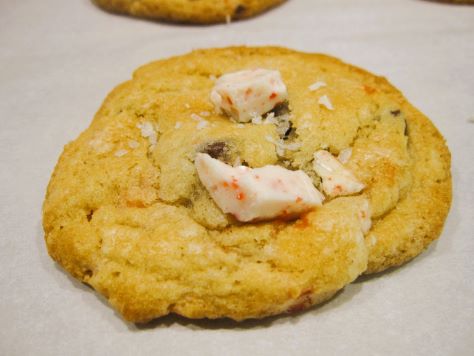
Bready or Not Original: White Chocolate-Peppermint Bark Cookies
Last week, I posted a Peppermint Bark Cookies recipe modified from Bake from Scratch Magazine. This week, I share a reworked version of the White Chocolate Macadamia Nut Cookies I’ve made for about two decades. This White Chocolate-Peppermint Bark Cookies recipe includes white chocolate melted into the dough, resulting in a smooth, sweet cookie that gets only better with the addition of peppermint bark.

A whole bag of white chocolate chips is included in this recipe. A cup is melted for the dough; the rest is added as chips, right along with the coarsely chopped peppermint bark.

These cookies are incredible. I preferred them over last week’s take, though both are excellent.

Modified from Bready or Not: White Chocolate Macadamia Nut Cookies.
PrintBready or Not Original: White Chocolate-Peppermint Bark CookiesMelted white chocolate chips make this dough especially smooth and sweet, the resulting cookie crisp, chewy, and soft all at once. Use a pretty peppermint bark to make this especially pleasing to the eye. Modified from Bready or Not’s White Chocolate Macadamia Nut Cookies.Course Dessert, SnackKeyword chocolate, cookies, mintServings 34 cookiesAuthor Beth CatoEquipmentmicrowave-safe small bowlcookie scoop or spoonIngredients10 ounces white chocolate chips divided2/3 cup white sugar11 Tablespoons unsalted butter room temperature1 teaspoon vanilla extract1/2 teaspoon peppermint extract2 large eggs room temperature2 1/2 cups all-purpose flour1 teaspoon baking soda1 teaspoon cream of tartar2 cups peppermint bark coarsely chopped, divided (about 12 ounces)InstructionsPreheat oven to 325 degrees. Place 1 cup of white chocolate chips in a microwave safe bowl. Microwave on 50% power in short increments, 20-25 seconds, and stop to stir between passes until the chips blend smoothly; take care, as it can burn fast! Set aside to cool.In a large mixing bowl, beat together the sugar, butter, vanilla, and eggs until they are creamy. Mix in the melted chips. Stir in flour, baking soda, and cream of tartar. Fold in the remaining chips and 1 cup of peppermint bark.Use a tablespoon cookie scoop or spoon to place dough in rounded lumps on cookie sheet. Using the reserved stash of peppermint bark, press a few pieces onto the top of each dough ball. Bake 10 to 12 minutes, until the tops just begin to turn light golden brown. Immediately add a few more pieces of peppermint bark onto the top of each cookie. Cool on the sheet for several minutes, then move to a rack to set for about 3 hours; this process can be speeded up by briefly placing cookies in the fridge.Store in a sealed container at room temperature. Best eaten within 5 days.OM NOM NOM!November 27, 2024
Bready or Not: Peppermint Bark Cookies
This Peppermint Bark Cookies recipe, modified from a holiday Bake from Scratch issue, is the first in a small series of such experiments.

One thing I’ll say straight up: peppermint bark can be expensive, and this recipe will look much prettier with nicer bark. I used cheap Palmer Peppermint Bark from Dollar Tree for this recipe, and it doesn’t look as nice as my other experiments.
That said, the cheap stuff can still make tasty cookies. These morsels are soft, chewy, and loaded with chocolate and peppermint flavor. They make for a great holiday treat. If you want to make them year-round, stock up on peppermint bark while you can get it–if you’re lucky, score some on clearance right after Christmas.
 PrintBready or Not: Peppermint Bark CookiesThese chewy cookies are imbued with chocolate and peppermint. Note that the dough needs to be chilled for at least a few hours prior to baking. Modified from Bake from Scratch November/December 2023.Course Dessert, SnackKeyword chocolate, cookies, mintAuthor Beth CatoEquipmentplastic wrapparchment paperlarge cookie scoopIngredients1 cup unsalted butter (2 sticks) softened3/4 cup white sugar3/4 cup brown sugar packed2 large eggs room temperature2 teaspoons vanilla extract2 3/4 cups all-purpose flour1 teaspoon baking powder1 teaspoon kosher salt3/4 teaspoon baking soda10 ounces peppermint bark chopped, divided1 cup semisweet chocolate chipsflaked sea salt for topping optionalInstructionsIn a large bowl, beat together butter and sugars until they are light and fluffy. Add the eggs one at a time, followed by the vanilla.In another bowl, combined the flour, baking powder, kosher salt, and baking soda. Gradually add the dry ingredients into the wet, beating until just combined. Measure out 1 cup of the peppermint bark and add that to the dough, folding it in. Add the chocolate chips and fold in.Wrap dough in plastic wrap and stash in the fridge for at least 2 hours, or up to 3 days.Preheat oven at 375 degrees. Place parchment paper on a baking sheet.Use cookie scoop to dole out dough, spaced out, on cookie sheet.Bake for 10 to 12 minutes, until cookies are set and turning golden brown. Immediately press a piece or two of the reserved peppermint bark onto each round. Add a small pinch of flaked sea salt to each, if desired. Let set until bark pieces solidify, then transfer to a cooling rack.Store cookies in a sealed container up to 4 days.OM NOM NOM!
November 20, 2024
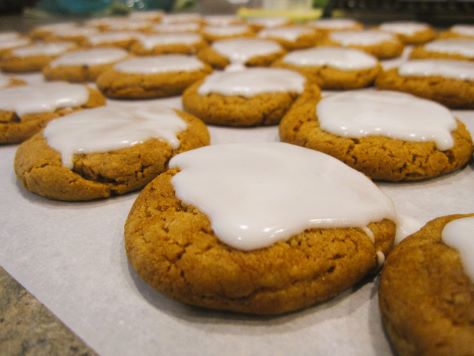
Bready or Not: Chewy Molasses Cookies
These Chewy Molasses Cookies are perfect holiday cookies. They are loaded with warm spices, with just the right hit of sugary icing.
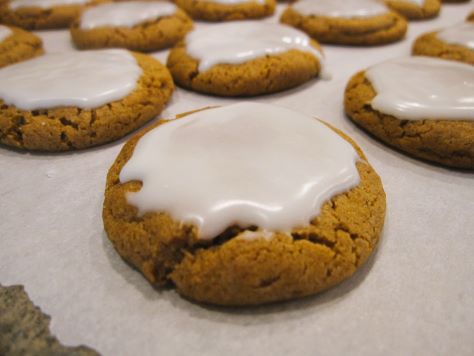
These are not massive cookies. They are dangerously bite size, the cookie chewy with the icing forming a pleasant sweet crunch.

Note that the dough needs to be made ahead of time so that it can chill for at least an hour, but up to a few days is fine. You can also freeze the dough, if desired.
Modified from Centennial Kitchen Fall Baking 2021.
PrintBready or Not: Chewy Molasses CookiesThese cookies are the epitome of holiday flavor, hearty, warming, with just the right hit of sweetness. Note that the dough needs to chill prior to baking. Modified from Centennial Kitchen Fall Baking 2021.Course Dessert, SnackKeyword cookiesServings 43Author Beth CatoEquipmentsmall cookie scoop or spoonparchment paperspoonIngredientsCookies3/4 cup unsalted butter (1 1/2 sticks) softened1 cup brown sugar packed1/3 cup molasses1 large egg room temperature2 1/2 cups all-purpose flour2 teaspoons baking soda2 teaspoons pumpkin pie spice1/2 teaspoon saltIcing1 1/2 cups confectioners’ sugar1/2 teaspoon clear vanilla extract3 Tablespoons half & half or milkInstructionsIn a large bowl, beat together the butter and brown sugar until fluffy. Add the molasses and egg.Gradually mix in the flour, baking soda, pumpkin pie spice, and salt. Make sure everything is combined. Wrap in plastic wrap and chill for anywhere from an hour to a few days.Preheat oven at 325 degrees. Line baking sheet with parchment paper.Use a small cookie scoop or spoon to dole out dough onto pan. Flatten each ball slightly; they won’t spread much.Bake for 10-11 minutes, until set with a crackling top. Let cool a couple of minutes, then transfer to a rack to completely cool.Once the cookies are cool, combined the icing ingredients. Glaze should be thick but spreadable. Coat the back of a spoon and transfer that to the top of a cookie, spreading to evenly coat. Cover cookies until icing is used up; the amounts should be a close match. Let them set for an hour for the icing to solidify, then pack into a sealed container.OM NOM NOM!

