
Allyson Kramer's Blog
August 13, 2014
Roasted Strawberry & Vanilla Almond Parfaits
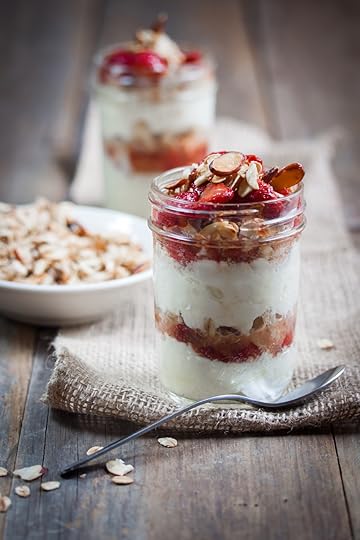
Have you ever experienced roasted strawberries? If not, there is no time like the present. Roasting, especially along with a drizzle of balsamic, brings out the best of the bright red berries and really makes their sweetness pop.
The individual recipes for both the strawberries and the vanilla granola are delightful when combined, but they also work well independently–try the granola along with a touch of almond milk, or stir the roasted berries into your morning porridge… or, better yet, atop a bowl of chocolate ice cream!
Roasted Strawberry & Vanilla Almond Parfaits
Your favorite brand nondairy yogurt, I love So Delicious Greek Style, Plain
For the Roasted Balsamic Strawberries
1 1/2 cups fresh strawberries, chopped into bite sized pieces
1/4 cup coconut palm sugar (or brown sugar)
1 teaspoon balsamic vinegar
Dash salt
For the Vanilla Almond Granola
1/2 cup sliced almonds
1/2 cup gluten-free oats (also good: kasha or flaked coconut)
4 teaspoon vanilla extract
4 teaspoons agave or maple syrup
Preheat your oven to 400 ºF. In a medium sized bowl, toss together the strawberries, sugar, balsamic vinegar, and salt and spread onto a small baking sheet/pan lined with parchment paper.
In a separate, smaller bowl, mix together the sliced almonds and oats.
In another small bowl, whisk together the vanilla extract and the agave syrup until very smooth and well blended. Drizzle onto the almond mixture and toss to coat. Spread the granola into a thin layer onto a small parchment lined baking sheet.
Place both baking sheets onto the middle rack of your preheated oven. Bake 8 to 10 minutes, gently stirring each mixture just once halfway through until the granola is golden brown and fragrant and strawberries are tender.
To Assemble the Parfaits
In small jars or glasses, layer the yogurt, strawberries and granola, and enjoy immediately. The granola stores well in an airtight container at room temperature and the roasted strawberries keep great in the fridge–also in an airtight container–up to 3 days.
Share with friends!


August 10, 2014
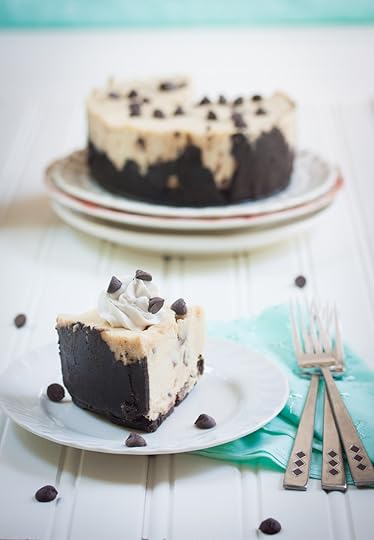
Chocolate Chip Cookie Dough Cheesecake
If you’ve ever perused the archives on this site, it wouldn’t take long to notice that I am a die-hard fan of cheesecake. I adore all kinds: carrot cake cheesecake, apple pie cheesecake, pear and ricotta cheesecake, even egg nog cheesecake.
This delicious recipe combines two of my favorite things, chocolate chip cookie dough and the creamy decadence of cashew based cheesecake. It’s brilliant because it’s a bit more nutritious than regular cheesecake, with cashews and agave or maple syrup in place of cheese and refined sugar, and better yet… it’s simple! Just whiz all the filling ingredients until smooth and voila! You have created one fine treat–suitable for solo enjoyment or impressing your friends.
Chocolate Chip Cookie Dough Cheesecake
For the Filling:
4 cups cashews, unsalted and unroasted
1/2 cup lemon juice
1 cup water
1 tablespoon vanilla extract
1 1/4 cups coconut oil (use refined for no coconut flavor)
1 cup agave or maple syrup
1 teaspoon salt
1 cup nondairy chocolate chips
For the Crust:
1 cup almond meal
1/4 cup dark cocoa powder
1 teaspoons agave or maple syrup
3 tablespoons coconut oil
Place the cashews into a medium sized bowl and cover with water. Lightly cover with a clean kitchen towel and let rest at least 2 hours, up to 3. Drain cashews and transfer into a food processor. Add in the lemon juice and 1/2 cup water and blend until well combined, scraping down the sides of the bowl as needed. Add the remaining 1/2 cup water, vanilla extract, coconut oil, agave and salt and blend very well, scraping sides often, until very smooth, about 5 to 7 minutes. Transfer to a high speed blender for extra smooth batter. Fold in chocolate chips.
To make the crust, simply blend the almond meal and cocoa powder using a fork. Stir in the agave and coconut oil until well mixed and then press the crust evenly into a 6 or 8 inch spring-form pan using your fingertips or a flat bottomed glass to make a thin crust up the sides of the pan.
Spread the cheesecake batter evenly into the crust. Cover loosely and place in freezer for at least 6 hours, up to overnight. Transfer to refrigerator and let thaw 2 hours before slicing. Serve cold and store in refrigerator up to 3 days.
Share with friends!
August 5, 2014
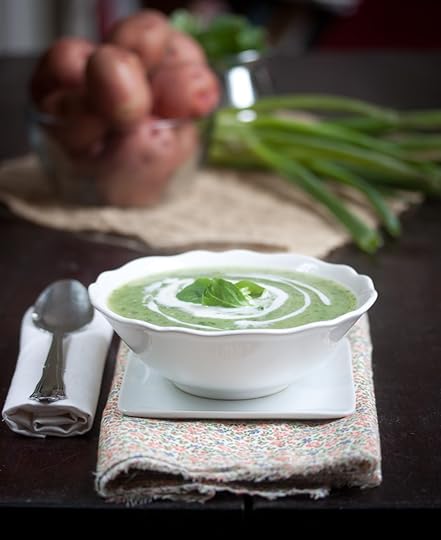
Red Potato & Watercress Soup
Today I wanted to share one of my most beloved recipes, which comes from my 2nd cookbook, Great Gluten-Free Vegan Eats from Around the World.
I am head over heels in love with this soup. Its red potato base gives it an undeniably familiar taste for anyone who loves potato soup, while the watercress adds a crisp note and fresh green color to the presentation.
This recipe is not only irresistible in the taste department, but good for you, too! Watercress is a nutritional powerhouse, high in Vitamin C, A, folic acid, and iron. It’s even believed to have cancer-protecting properties. So, eat up!
If you’re not familiar with watercress, or just don’t know how to best use it, try this easy recipe. It may just end up becoming a new favorite…
Red Potato & Watercress Soup
From Great Gluten-Free Vegan Eats from Around the World | Shared with Permission from Fair Winds Press
6 small red potatoes (1 pound, or 455 g), cubed
3 scallions, chopped
2 cloves garlic, minced
6 cups (1.4 L) water
1 teaspoon freshly ground black pepper
2 to 3 teaspoons sea salt, divided
2 large handfuls (10 to 15 g) watercress, chopped
Coconut cream (the thick part from a can of full-fat coconut milk) for drizzling
Yield: 6 servings
In a large pot, combine the red potatoes, scallions, garlic, water, black pepper, and 1 teaspoon salt and bring to a boil. Once boiling, reduce to medium heat and let simmer until potatoes are easy to smash with a bit of pressure under a fork, about 8 to 9 minutes.
Toss in watercress and cook an additional 1 to 2 minutes. Stir in an additional 1 teaspoon sea salt and blend using an immersion blender, or cool slightly and transfer to a blender. Blend until fairly smooth, making sure to leave some tiny bits of watercress floating throughout.
Add up to 1 teaspoon salt to taste. Garnish with a drizzle of coconut cream before serving. This is best serves when slightly cooled, not piping hot.
Share with friends!
July 28, 2014
Cinnamon Applesauce Muffins
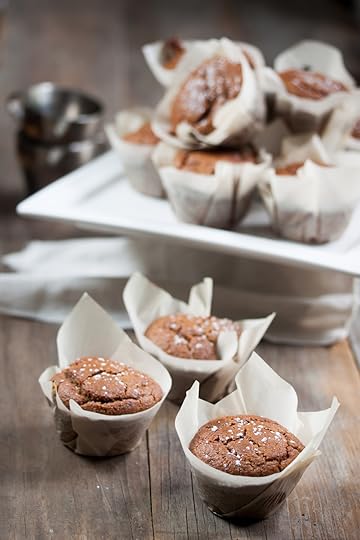
The other day my husband was begging me to make muffins–but not just any muffins. He requested the type of muffin that one my find in a bakery–you know the kind: fluffy, spongy, and oh-so-tender. A muffin that begs you to have another, and another…
I gladly accepted the challenge and came up with these slightly sweet muffins, which–to my mind–are quite reminiscent of a slice of applesauce cake. Feel free to use your favorite type of sugar–I opted for evaporated can juice–but another type of granular sugar, such as coconut palm, packed brown sugar, or turbinado–will bake up beautifully.
Cinnamon Applesauce Muffins | Vegan & Gluten-Free
1 cup applesauce (unsweetened)
1/4 cup olive oil
1 teaspoon vanilla extract
1 tablespoon blackstrap molasses
1 teaspoon salt
1/2 cup sugar
1 1/3 cup + 2 tablespoons besan/chickpea flour
1/2 cup superfine brown rice flour (reg. works too)
2 teaspoons baking powder
1 teaspoon baking soda
1/2 cup nondairy milk
2 teaspoons lemon juice
1 teaspoon cinnamon
Preheat your oven to 375 ºF. Line 12 muffin tins with paper liners, or grease a non-stick pan lightly. In a large mixing bowl, whisk together the applesauce, olive oil, vanilla extract, molasses, salt and sugar until well blended. Gradually add in the rest of the ingredients, one by one in the order given. Mix vigorously using a whisk about 100 strokes, or until very well mixed.
Drop 1/3 cup batter into each muffin tin and place onto middle rack of the oven. Bake 25 minutes. Let cool on wire rack.
Store in an airtight container for up to 3 days. Or, freeze in individual freezer-baggies and thaw at room temperature when ready to enjoy.

Share with friends!
July 24, 2014
Rocky Road Brownies
July 5, 2014
Blueberry Cheesecake from “Choosing Raw”
June 26, 2014
Blackberry Mojito Overnight Refrigerator Oats
June 6, 2014
Mexican (not) Fried Ice Cream
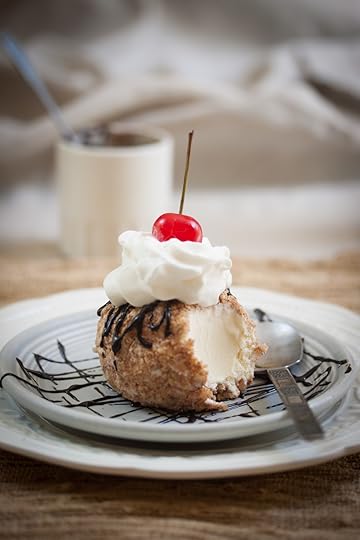
The other day as I was perusing pinterest I came across a fun twist on a dessert I have always loved, Mexican Fried Ice Cream. Granted, the version I saw used a non-ice cream filling and a totally different “fried” outside, but none-the-less, the idea had me excited to try my own spin on it!
I opted to use krispy rice cereal as the base for the perfect crunchy outside, and after one bite, I was smitten. This may very well be the best way ever to enjoy vanilla (or any flavor, really) ice cream. Seriously, give it a shot and see if you don’t start storing a canister of the crunchy coating in your cupboard just for the occasion of topping your next impromptu sundae.
Mexican (not) Fried Ice Cream
All you need is your favorite flavor of ice cream (chilled until hard) and you’re ready to roll! I recommend freezing a bowl and a large plate (and a few small serving plates) before starting so the ice cream melts less.
Coating:
2 cups rice krispy cereal (certified gluten-free)
3 teaspoons cinnamon
1/8 teaspoon allspice
2 teaspoons brown sugar or coconut palm sugar
Dash salt
To make the coating, simply place all the above ingredients into a large ziplock freezer bag. Seal and shake vigorously to mix and then lay flat onto a countertop or table. Roll gently using a rolling pin to crush the mixture into fine pieces, allowing a few larger pieces to remain. Place mixture into a bowl.
Scoop out your desired flavor of ice cream (I like this brand for storebought) using a large ice cream scoop, so that you are forming a solid sphere that’s about 1 serving size. Form as many as desired. Place the ice cream spheres onto a frozen plate and freeze for 15 additional minutes.
Once refrozen, drop 1 sphere at a time into the crushed rice krispies and roll quickly to generously cover, shaping gently as you work. Freeze one more time for 15 minutes and then using clean or kitchen-gloved hands, shape into spheres. Serve with chocolate sauce (recipe below) and vegan whipped cream.
Makes about 6 servings.
Sauce:
2 tablespoon cocoa powder
2 tablespoon agave or maple syrup
To make sauce, simply stir together the cocoa powder and agave until very smooth and shiny. Drizzle onto “fried” ice cream just before serving.
May 28, 2014
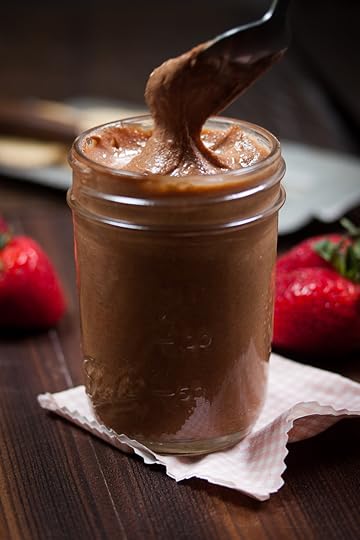
Salted Chocolate Cashew Butter
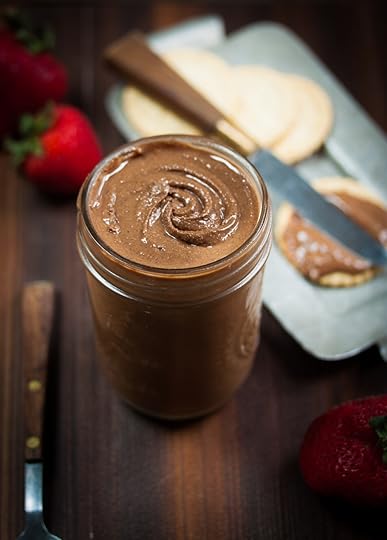
This recipe couldn’t be easier, and arguably, any more delicious! As a strong contender for “the next big thing”, cashew butter is quickly becoming one of my favorite treats. And, as always, chocolate–especially salted–makes everything better. The two are a winning combo. The trick to getting extra smooth cashew butter is using the best quality cashews you can find and having a lot of patience. After that it’s smooth sailing, and easy snackin’.
Salted Chocolate Cashew Butter
Yield: 20 servings (for those with smaller food processors, cut recipe by 1/3)
3 cups raw cashews
3 tablespoons cocoa powder (raw or dutch processed), or to taste
2 to 3 tablespoons coconut palm or brown sugar
1/4 teaspoon salt
Place the cashews into a food processor and blend until very crumbly, scraping down sides as needed, about 4 minutes. Add in the cocoa powder and continue to blend on highest speed of food processor, until the mixture begins to clump together. Stop blending and stir occasionally. Once the mixture becomes very clumpy, add in the sugar and salt and stir once. Continue to blend in the food processor until the mixture turns to nut butter, and the oils begin to release. As it becomes “butter”, there will be a moment where it looks smooth, but actually feels very dry to the touch. Let it keep blending until the mixture is actually smooth and tacky. The total blending time can be up to 10 minutes, depending on your food processor. Patience is key.
Straight from the food processor, this butter is quite warm! You can eat it right away or transfer to a jar and let come to room temperature.
Savor on top of ice cream, blend in your favorite oatmeal, eat as a dip for fruit slices, or simply enjoy by the spoonful. For an extra touch of sweetness and smoothness, mix in 1 to 2 teaspoons agave or maple syrup after the butter has completely blended.
Store in an airtight container up to 1 month.
May 26, 2014
Peach Daiquiri Sorbet

Peaches are a telltale sign of the impending summertime (it’s coming!). The fragrant and fuzzy fruit appear just as the weather warms and the days grow nice and long. Peach season–lucky for us–has already begun and will continue all the way through August. The other day I was trilled to find some red Cling-stone peaches from my local market, and they are out-of-this-world delicious.
Cling-stone peaches (most often used for canning and baking) are rather elusive–oftentimes only found at Farmer’s Markets, farm stands, or specialty grocers. Free-stone peaches are generally the type available at most grocery stores. The difference between the two types is the how “cling”y or “free” the fruit’s stone is to its flesh. Cling-stone peaches generally show up first, with Freestone varieties appearing later in the summer months. There is even a Semi-free-stone variety, that, you guessed it, has a pit that’s only partially “free”. I can’t often locate Cling-stones, so if I see them available, I like to scoop up more than a few and relish them as long as I can. Sorbet is a wonderful way to preserve that peachy flavor.
Whichever type of fruit you fancy, this recipe is made for peach season; it works equally as well for slightly under-ripe peaches (for the impatient among us), or overripe (for those may have overindulged in a good deal at the farmers market). But, in my opinion, this sorbet works brilliantly with perfectly ripened fruits. As hard as it is to forgo simply eating a ripe peach out-of-hand, this recipe–with a silky smooth texture and summery peach flavor–is worth it. Depending on which variety of peach you choose, your sorbet will vary in color from pale yellow to pink.
Peach Daiquiri Sorbet
1 tablespoon lime juice
1/2 cup water
1/2 cup sugar
3 medium sized peaches, pits removed
1/4 cup rum *
In a very small saucepan, whisk together the lime juice, water, and sugar and warm over medium heat just until sugar has completely dissolved. Transfer to a bowl and chill in your refrigerator for 20 minutes, or until cold.
Place the peaches, rum, and chilled sugar syrup into a blender and blend until completely pureed, scraping sides as needed. Pour mixture into the bowl of an ice cream maker and process according to manufacturer’s instructions. Alternatively, place sorbet into a shallow pan (such as an 8 x 8 inch brownie pan) and freeze for 20 minutes. Stir very well using a whisk and freeze for another 20 minutes. Repeat until sorbet is completely frozen through, about 1 1/2 to 2 hours.
Store in a flexible airtight container up to 3 months in the freezer.
* For an alcohol free sorbet, simply replace the rum with 1/4 cup white grape or apple juice.


