
Ruth Soukup's Blog, page 115
April 1, 2014
Part 5: How to Clean Your Bathroom
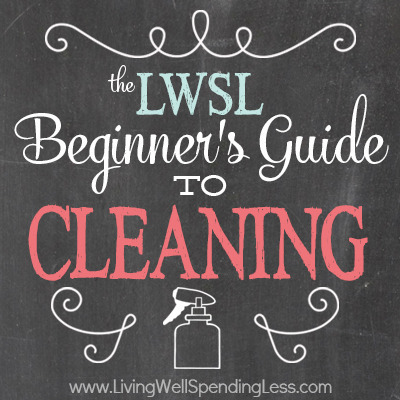
This is Part Five of an 8-Part Beginner’s Guide to Cleaning Series. See the overview here.
* * *
Welcome back to the Beginner’s Guide to Cleaning! With two major spaces—your living spaces and kitchen—now out of the way, I truly hope you are feeling like you’ve found your groove and are ready to take on almost anything!
Of course you might need to dig deep for motivation, because today we taking on one of the most dreaded spaces in the house. I mean, let’s be honest. Is there anything less fun than scrubbing toilets?
But a clean bathroom is not only a much nicer place to start your day, it is essential to a healthy home, since it can very easily become a breeding ground for bacteria, germs, and mold. So let’s get started!
Once again I will walk you through the steps for cleaning the surfaces most commonly found in this zone, giving detailed instructions for how to clean each one. If you are a seasoned bathroom cleaning pro, much of it may be review—feel free to skip to the end of the post, or add your own tips & tricks in the comments below! At the end of the post you will get a printable checklist to use as you tackle your bathroom, and if you have any questions about which products & tools to use, you can get the full lowdown in this Cleaning Supply 101 post.
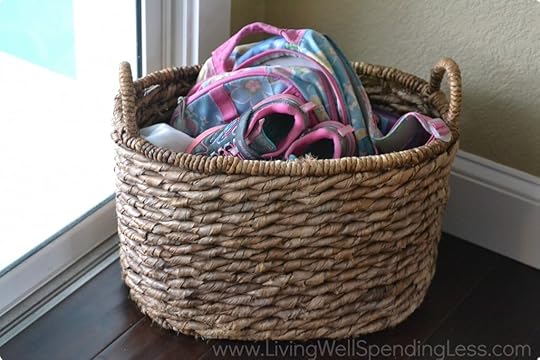
Step 1: Pre-clean & declutter
Supplies needed: A large basket or individual baskets for each family member
How-To: Pick up any items lying around the kichen, including any clutter that has collected on counters, shelves, or floors. Place items in appropriate baskets for each family, or collect items in a single basket to be put away.
 Step 2: Clean the Toilet
Supplies needed: toilet bowl cleaner, toilet brush, all purpose cleaner, rag
How-To: Squirt bowl of toilet with cleaner just under rim; let sit for at least 5 minutes. Use brush to scrub inside of bowl and bottom side of seat. Spray seat, lid, and tank with all-purpose cleaner, then wipe clean with wet rag.
 Step 3: Clean the bathtub/shower
Supplies needed: all purpose cleaner, non-abrasive scrub brush or sponge, bucket rag or towel
How-To: Spray tub, shower walls, and shower curtain with all purpose cleaner. Scrub stains and dirt with scrub brush or sponge. (Be sure to test brush or sponge to make sure it will not scratch the surface of your tub or shower!). Rinse with warm water until clean, then dry with old towel. Be sure to buff fixtures to remove water spots! Wash shower curtain in washer, if necessary.
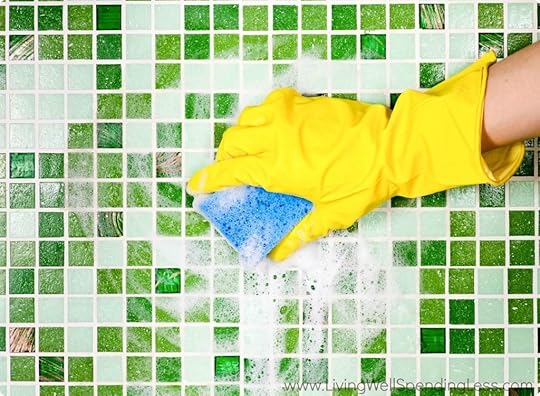 Step 4: Clean the tile & grout
Supplies needed: old toothbrush, bleach, dish soap, rags
How-To: Dip toothbrush in bowl filled with bleach; scrub onto grout lines. Fill bucket or sink with warm soapy water, then rinse grout and tile clean. Wipe dry with old towel.
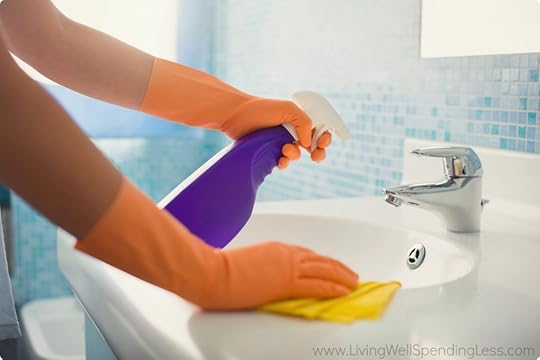 Step 5: Clean the sink & counters
Supplies needed: All purpose cleaner, rags
How-To: Spray countertop and sink with all purpose cleaner. Fill sink with warm water. Wet rag in water and wipe down all counters until clean. Let water out of sink and wipe down sink. Dry counters and sink with old towel. Be sure to wipe down fixtures to remove water spots.
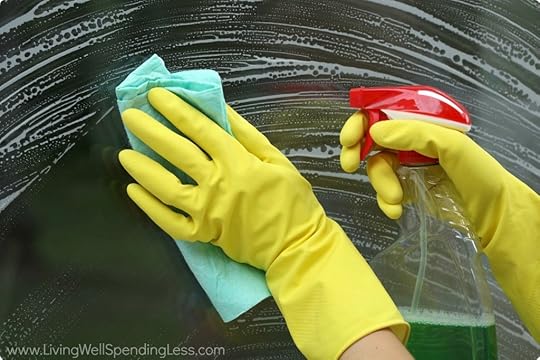 Step 6: Clean the mirrors & windows
Supplies needed: Glass cleaner, old newspaper or squeegee & rag
How-To: Spray glass; wipe clean with old newspaper or run squeegee against glass from side to side, wiping blade with rag as necessary. Use glass cleaner to shine faucets as well.
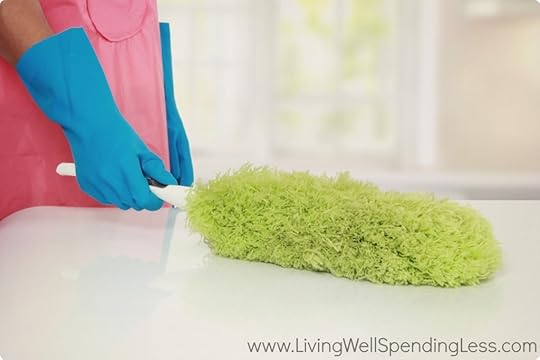 Step 7: Dusting
Supplies needed: reusable or disposable dusting wand
How-To: Run duster over all horizontal surfaces, including shelves, the tops of light switches and fixtures, baseboards, picture frames, mirrors, storage boxes, and any knick knacks or figurines.
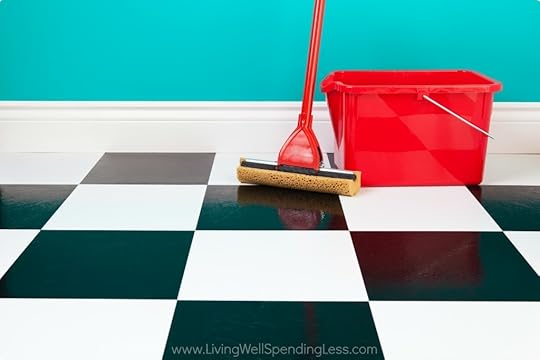 Step 8: Clean the floors
Supplies needed: broom & dustpan, dust mop all purpose cleaner, wet mop
How-To: Before beginning, move as much furniture from the floor as possible. Starting at one end of the room, carefully sweep loose dirt and hair towards the center of floor. Methodically make your way around the room, sweeping all dirt towards the center into one pile. Sweep into dustpan and throw away. Next, do a sweep of the floor with your dust mop to remove any remaining dust or hair. Spot clean any sticky or dirty spots, or mop entire floor with wet mop and let dry.
Of course now that you know just what to do, it is time to get to work! To stay on task, use this handy printable checklist to help walk you through all the steps:
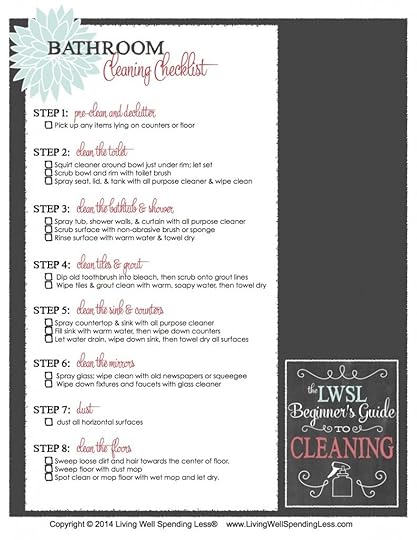 {Get your printable Bathroom Cleaning Checklist here}
Part Five Assignment
Just to review, here is your fifth assignment:
Set aside a good chunk of time—again at least 30-60 minutes per bathroom—sometime this week to work on deep cleaning your bathrooms.
Clear the clutter in each bathroom. Make it a goal to keep nothing on your counters except the products you use on a regular basis. Work on training your family to use the “collection zone” you set up in week three.
Follow the Bathroom Cleaning Checklist to get your bathroom clean and fresh from top to bottom. If possible, open up the windows to let in some fresh air as well!

The LWSL Beginner’s Guide to Cleaning:
Part 1: Getting Started
Part 2: Cleaning Supply 101
Part 3: How to Clean Your Living Space
Part 4: How to Clean Your Kitchen
Part 5: How to Clean Your Bathroom
Part 6: How to Clean Your Bedroom
Part 7: Laundry 101
Part 8: Home Maintenance & Seasonal Cleaning
* * *
Did I miss anything? What are your biggest challenges to keeping your bathroom clean?
Pin It
The post Part 5: How to Clean Your Bathroom appeared first on Living Well Spending Less™.


March 31, 2014
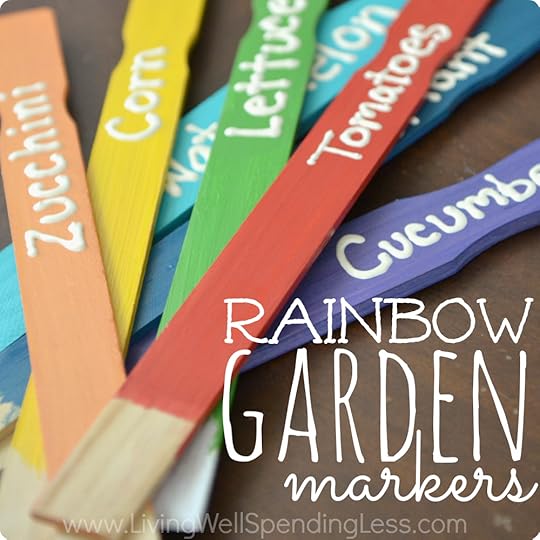
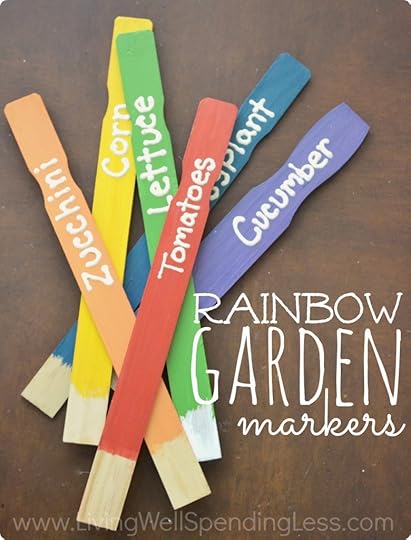
DIY Rainbow Garden Markers
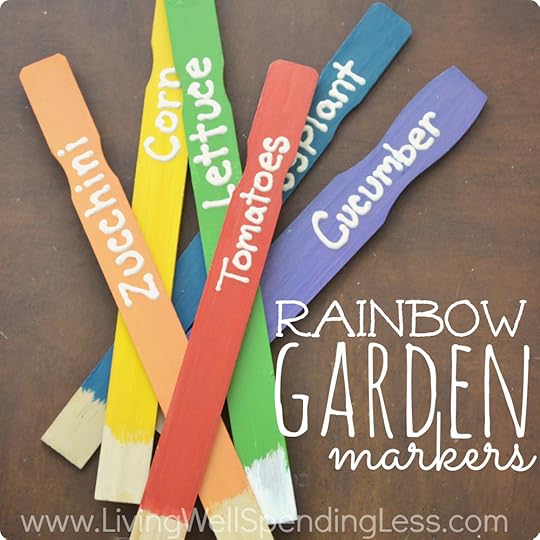
My husband and I have been *trying* to grow a vegetable garden for almost four years now. Suffice to say, in those four years we have learned that a.) gardening is not as easy as it looks and b.) that despite our best efforts, we are just not very good at it. But we keep trying! And this year, our little garden–at least parts of it–look like they might actually make it.
I can’t help but think these little rainbow garden markers have made all the difference.
Wishful thinking?
Perhaps.
Even so, they are super cute and make our still-somewhat-pitiful garden a little more fun to look at. And since I already had all the supplies I needed on hand, they were more-or-less free to make. Works for me!
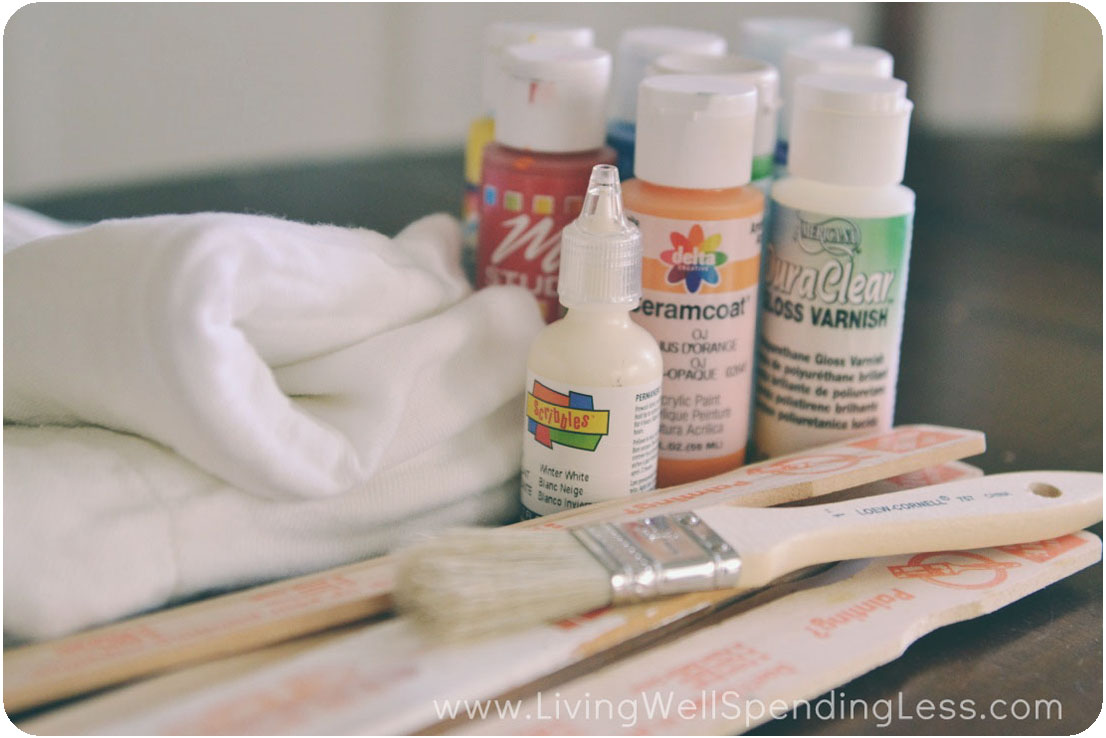
Here is what you need:
paint stirrers (free at Home Depot!)
assorted acrylic paint
acrylic sealer
slick & puffy fabric paint
drop cloths or newspaper

Step 1: Paint first side of stirring sticks in assorted colors, leaving the bottoms unfinished. Let dry.
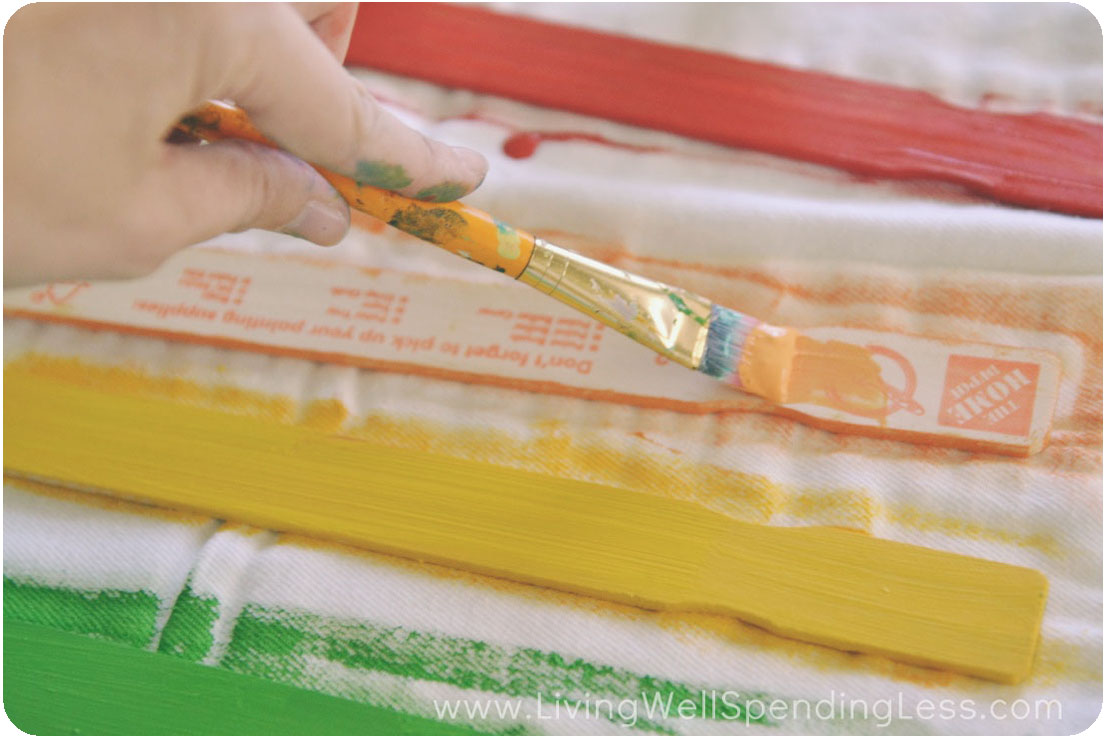
Step 2: Flip sticks and paint reverse sides. Let dry. Repeat steps 1 & 2 for a second coat.
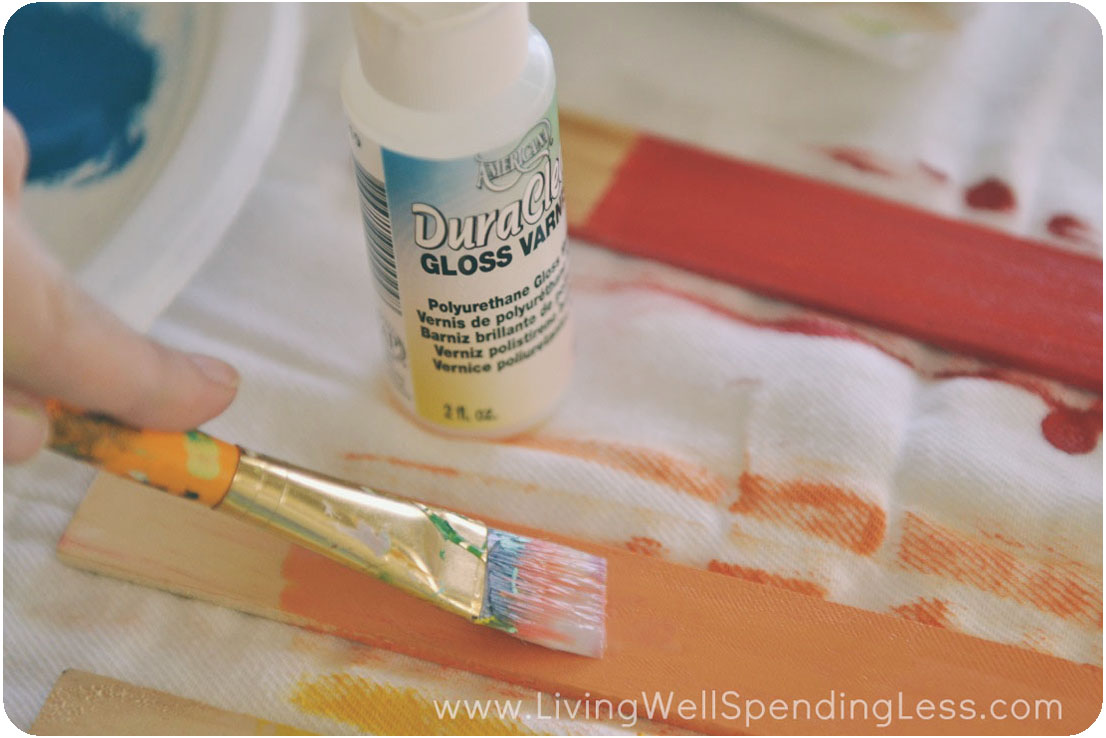
Step 3: Brush sealer onto one side; let dry. Repeat for reverse side.
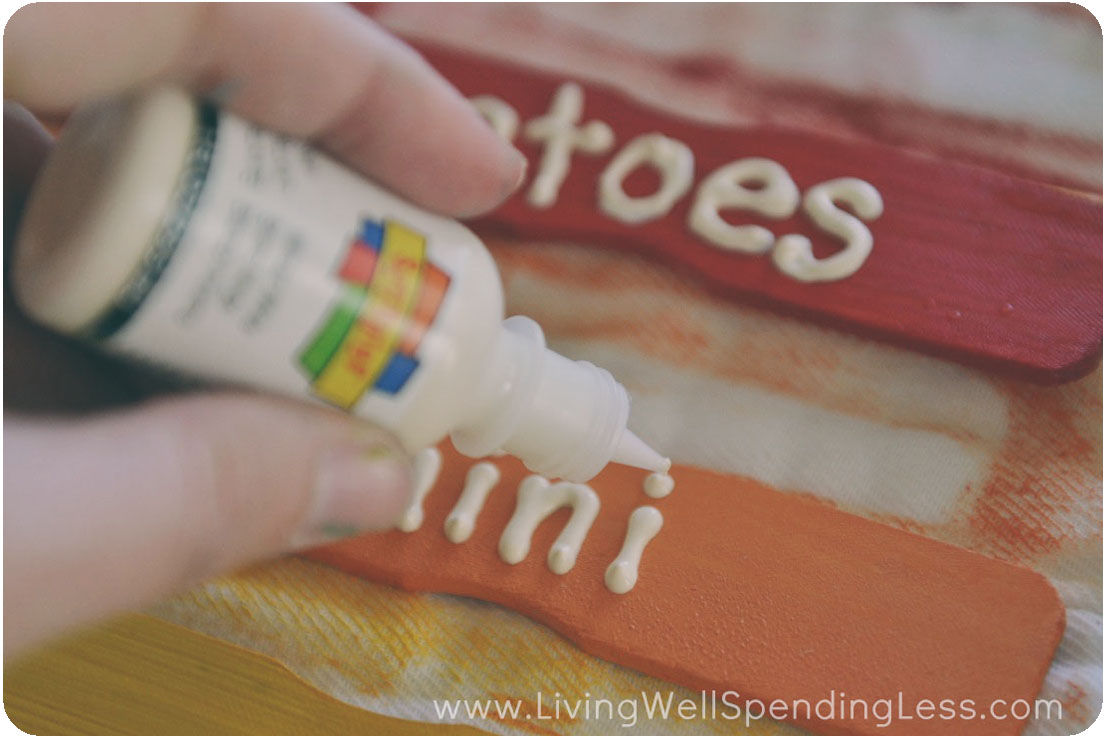
Step 4: Carefully write names of herbs, flowers, fruits, or vegetables on each marker with fabric paint; let dry. If desired, repeat on second side.
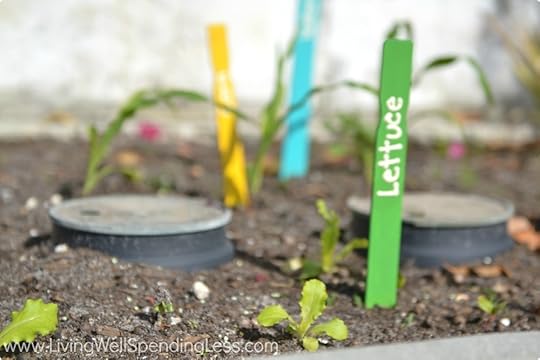
Place in your garden to mark your plants & you are good to go.
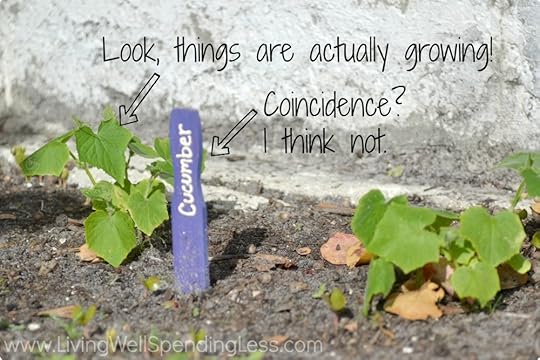
I made them for our vegetable garden, but I think they would also be super cute in herb pots or flower gardens as well!
* * *
Are you planning a garden this year? What will you grow? Got any great garden tips to share? I’d love to hear them–we can use all the help we can get!
Pin It
The post DIY Rainbow Garden Markers appeared first on Living Well Spending Less™.
March 30, 2014
Weekend Wandering


Happy Sunday everyone! I hope you are having a fantastic weekend. We had a super busy day yesterday but are looking forward to just chilling out at home this afternoon. I honestly can’t believe that tomorrow is the last day of the month. Seriously, where did this month go? In any case, there were a ton of great ideas shared at Thrifty Thursday this week. I was especially inspired by all your fun home & garden ideas for spring! With over 400 posts to choose from it is always SO hard to choose favorites, but these are the posts I really loved this week:
* * *
First of all, I think my family would be all over these Honey Garlic Crunch Chicken Tenders from Spend With Pennies!

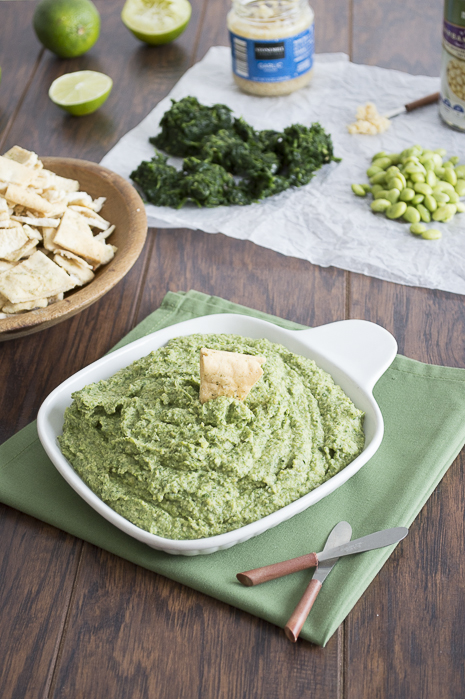
Of course something like this Spinach Edamame Garlic Hummus from The First Year Blog is definitely more my speed. Yum!
Have I told you how much I love lemon? These Lemon Poppy Seed Pancakes from Joyful Homemaking sound absolutely delicious!

Decorating with color is such a challenge for me, which is why I loved these 3 Inexpensive and Easy Ways to Add Spring Colors to Your Home from Unexpected Elegance.

And speaking of cute colors for spring, I also loved these fun ideas for Adding a Little Spring with a wreath,banner or terrarium from The Colored Door. How cute is that wreath?

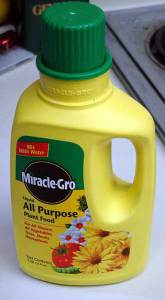
Do you wish you had magic powers to help your garden grow? The Lady Prefers to Save has a recipe for Homemade Liquid Miracle Grow Concentrate for $0.35 a Container! Can’t wait to try this!
My kids are constantly asking if we can make crafts & I have to admit, sometimes I just run out of ideas! These adorable Toilet Paper Roll Baby Farm Animals from View From the Fridge look easy and fun. We may even make some this afternoon!

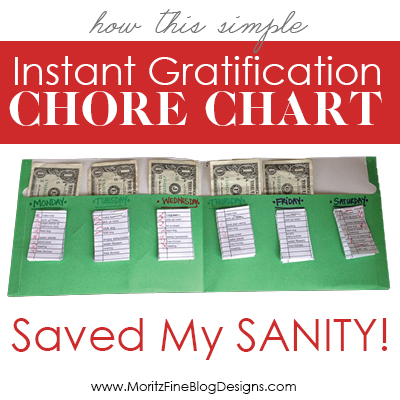
Looking for ways to motivate your children into doing chores? Mortiz Fine Designs has an Instant Gratification Chore Chart that is seriously brilliant!
Longing for a home office but don’t have the space? Check out this great Closet to Office Reveal from Elizabeth Joan Designs. What an amazing transformation!

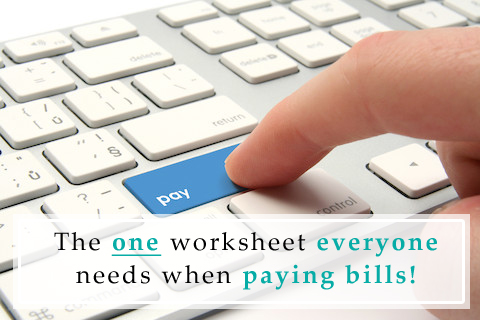
Do you ever have trouble keeping track of all your bills? Grab this great free printable Bill Pay Worksheet from One Beautiful Home!
Or need to cut your grocery bill even further? Make sure you know these 5 Things NOT to do While Grocery Shopping if You Want to Save Money from Saving the Family Money.

Finally, Snail Pace Transformations has 20 Ways Thrifty People Save Money on Clothing. I especially loved #7!

* * *
What did you love this week?
Pin It
The post Weekend Wandering appeared first on Living Well Spending Less™.
March 28, 2014
10 Smart Ways to Build an Emergency Fund


There is nothing that can derail your financial progress faster than an emergency. You think you’re doing okay, making headway towards your goals, and boom! The refrigerator stops working, your car breaks down, or your child falls off her bike and needs four stiches in her chin and suddenly you are right back in crisis mode.
If you’ve read Dave Ramsey’s Total Money Makeover or taken the Financial Peace University course, you already know that the very FIRST step in regaining control of your money and avoiding yet another financial crisis is to establish an immediate emergency fund of $1000.
While that number may feel daunting at first, the truth is that there are plenty of ways to build an emergency fund quickly. The key to success is being willing to accept the idea that getting your finances in order might not be fun or easy, but it will be worth the effort. Plus, the great thing about all of these ideas is that they will not only help you build your emergency fund, but they can also help you kickstart your debt snowball and get you well on your way to becoming debt-free!
Here are 10 super smart ideas to get you started:
 1. Sell Something (Or Several Somethings)
Chances are that if you have found yourself in a financial crisis, you have probably bought more than a few things you either didn’t need or couldn’t afford along the way. It is time to start cutting your losses by selling anything and everything you can. Don’t hang on to things because you are afraid you won’t get what you paid—you won’t. The money is already gone, but at least you will be making progress towards a solution. Check out this post for great tips on how to sell your stuff on eBay, Craigslist, Facebook or at a garage sale (and for knowing which one to use!) And, if by some chance you still haven’t opened the item, see if you can return it to the store you bought it from! (You never know!)
“We sold out whole bedroom set for $900 and have been sleeping with the mattress on the floor for almost a year. Last week a friend came over to visit and saw that we had no bedroom furniture and the next day she GAVE us her whole set and bought herself a new one. God is always doing amazing things in my life like this!” ~Jade Hodge
“I returned my Christmas present from my husband. It was a Cricut Die Cutting machine that I thought I wanted desperately. Guess what? I wanted an emergency fund and to be out of debt WAY more.” ~Andrea Vaughn
2. Get a Second Job
It doesn’t have to be your dream job, and if you are struggling to make ends meet, here is the brutal truth: There is no job you are “too good” for. Go work at McDonalds or deliver pizza or wait tables or clean houses or stock grocery shelves at night. Check out the classified section of the newspaper or look on Craigslist—Jobs may be hard to come by sometimes, but I promise there are always jobs for people who are willing to work hard and do anything.
“I went back to work and used every single penny or every single paycheck (this is not at exaggeration) for a full year to put towards my bills. I also had two HUGE yard sales and made about $1500. At the end of that year, all by myself I had paid off approx $22,000 in debt.” ~Kris Stevens-Starks
“I started dog sitting. I sometimes make more money dog sitting than I do at my “real” job!” ~Deb Foster
“I started cleaning houses on the weekend and took the money from that and invested in items to embroider and sell…kind of started a little business all with the goal of paying off debt!” ~Daisy Work
“Delivered Yellowbooks to pick up extra cash. Easy and got exercise while doing it without a gym membership!” ~Shawna Squibb
3. Work from Home
If going out and getting a job outside the home isn’t an option, consider finding a way to work from home instead. Do you stay home with your kids? Why not offer babysitting or after-school care for a few of their friends whose parents need childcare? Are you good with computers? How about becoming a Virtual Assistant? Do you sew? Why not offer a tailoring service or perhaps sell your own items on Etsy.com? Are you able to spot a diamond in the rough? You could salvage & spruce up old furniture then resell it on Craigslist. Still not sure what to do? These five ideas for making money online are a great place to start.
“We cleaned out some big ticket “toys” (motorcycle, jeep, etc) to clear a line of debt and put a chunk in savings. My husband used the profit to buy a table saw that he now earns money with doing side projects. All side project earnings go straight to paying off debt. We’re free of a car loan, 3 student loans and 2 credit cards in the last 6 months. Thank the Lord!!” ~ Sarah Burmeister
“As a graduate student, I bought designer gowns at the Salvation Army and resold them at trendy consignment shops. Financed my education for two years.”~Mary Walker
 4. Cut Your Grocery Bill in Half
If the thought of starting your own home business is too overwhelming, why not instead start by cutting your everyday expenses? Just a few simple tweaks to the way you shop for food can result in drastic savings at the checkout line. Start by buying only what is on sale, then stockpile items when they are at their lowest price. Eat less meat (and save on the meat you do buy), plan your meals using a budget-friendly service such as eMeals, which lets you plan your menu based on what is on sale at your grocery store that week (use LWSL15OFF to save 15% on your plan), or find even more dramatic savings by learning to use coupons.
“I started monthly meal planning, so no wasted trips to the store, which saves a lot of money!“~Reader Leah Donn Scott
“We save money by using coupons and combine them with sites like Ibotta and Checkout 51 that pay you cash for buying items you already buy like milk,cereal, eggs and bread. We also do a lot of meal planning freezer meals and take lunches to work.” ~Becky Tester
5. Save on Utilities
Spending too much on things like electricity, water, phone, or even cable is practically like pouring money down the drain. Another great way to “earn” money from home is to start paying close attention to the money you are spending right in your own home without even thinking about it. A little vigilance can go a long way! Check out this post for 12 smart ways to save on utilities!
“I ditched cable and got a roku box. Small savings month to month help a lot!” ~Reader Sarah Eckert
“We called providers for every single bill we have (credit card, utility, phone, satellite, car, insurance, mortgage) and threatened to terminate our account unless they lowered the bill. Worked for every one, even the mortgage company! The key is you have to mean it, and have a number in mind that you want to pay. Don’t give up!!“~Carter Robinson
“We live by candlelight every other week put the money we save on electricity into savings.“~Chris Schmeltzer

6. Stop Eating Out
Believe me, I get it! When life gets hectic sometimes eating out just seems like the path of least resistance. After all, fast food is quick and easy and relatively cheap, right? Wrong! All those quick & easy fast food meals still add up to a lot more than you would pay to just eat at home, and just a couple of family dinners at a nice sit-down restaurant or a daily run to Starbucks could pay for a whole month’s worth of food and coffee at home. Why not try scheduling a freezer cooking day to stock up on ready-made meals? Or, if you’ve really got a craving, check out these great copycat recipes for restaurant flavor right at home!
“We very rarely eat out, cut back on meat dinners and eat beans, lentils, etc instead. I’m a single mom with no child support or alimony and I’m still able to pay down and pay off my debts!” ~Karen Muri
“I Gave up my Redbull and Starbucks addictions–it gave me an extra 300 a month.” ~Jennifer Bryan
7. Get Free Stuff
It is actually pretty amazing to find out how much stuff you can get for free or close to free once you really start looking. Check out sites like Freecycle.org or the free section on Craigslist.org, or just drive around an upscale neighborhood on trash day to find things you need, or even to repurpose and resell. Bartering with friends and neighbors for goods and services is also a great way to get the things you need for free, while taking advantage of online freebies and samples can help keep expenses down as well.
“I scrounge around Goodwill frequently and rehab stuff to sell on Craigslist. Found a huge Pottery Barn rug at Goodwill once. Had a few stains but otherwise ok. Looked it up online, retail price was $250. Cleaned it, then sold on Craigslist for $80, and put that toward debt.“~Angie Doster
“I stopped buying beauty and cleaning products, and turned to my pantry for all of those needs!!! It’s amazing how a little vinegar, baking soda, honey and lemon can transform into all that you really need!!! It adds up to hundreds in savings, and I squirrel the money away into my savings“~Bonnie Pierce
“I picked up perfectly good toys in someone’s trash and sold them online in less than an hour” ~Cindy Gillis-Williams
 8. Pay for Necessities Gift Cards
If you haven’t already, sign up for Swagbucks, then check out this post to see all the ways you can earn free Swag Bucks doing the things you already do anyway, such as searching the web or watching TV. Signing up is super easy. Just fill out the form here. Be sure to click the link that says “I have a sign-up code,” then enter the code LWSL (case sensitive!) to be rewarded with an extra 70 Swagbucks at sign up! These Swag Bucks can then be traded in for rewards or gift cards that you can use for the things you do need, like gas, food, or even travel.
9. Skip This Year’s Vacation
Here’s another hard dose of reality: If you don’t have any money in your savings account, you can’t afford to go on vacation. Period. Cancel any and all plans to travel, because the truth is that between the gas, the lodging, and the food, (not to mention the unforeseen expenses that always come up), even the most frugal vacations still cost more than staying home. Try planning a Staycation instead, or better yet, spend your week planning for & hosting a family garage sale to earn some extra cash!
“We cancelled a vacation so our savings would not be touched.“~Rachel Carrier-Stone
10. Go on a Spending Freeze with Like-Minded Friends
Years of living in a “spend” mode can sometimes make it hard to stop, even when you know you should. Even so, if you are committed to building that emergency fund then you need to resist the temptation any way you can. The LWSL 31 Days of Living Well & Spending Zero Challenge has some fun ideas to help you make it through an entire month of no spending, and a great way to ensure success is to team up with others who are taking on the same challenge in order to hold each other accountable. You can join thousands of current and past participants in the private LWSL Facebook Group (this is different than the main LWSL Facebook page) for great discussions, creative money-saving ideas, and a ton of moral support.

* * *
What are some things you’ve done to build your emergency fund or pay off debt?
Pin It
The post 10 Smart Ways to Build an Emergency Fund appeared first on Living Well Spending Less™.
March 27, 2014
Thrifty Thursday {Week 53}

Happy Thursday everyone! Welcome back to the Thrifty Thursday link party and I hope you have all had a fantastic first week of Spring, even if it doesn’t quite feel like Spring yet where you are. Here’s to warmer days ahead! This week I would especially love to see your Easter projects & ideas, as well as any gardening tips you might have to share. Of course, as usual, the sky’s the limit for what you can share, so long as it is budget friendly! (But no deals or giveaways, please.)
Here are the most clicked links from last week:

1. Cha Ching on a Shoestring {Dollar Store Organization in One Hour}
2. Frugality Gal {4 Clever Ways to Save Money on Produce}
3. One Beautiful Home {Paying Off Debt- Free Workbook}
4. Aspired Living {Practical Tips For Frugal Living}
5. My Love for Words {Declutterathon: How to De-Clutter Your Life in Only 40 Days}
6. Frugal Family Home {Eating on the Cheap, Feeding My Family for Less}
7. Early Bird Mom {My $10 a Month Smart Phone Plan}
8. Redefined Mom {Why I’m Only Wearing Clothes I Love}
9. The Teacher’s Wife {Our Journey to Debt Free Living}
10. Live Like You are Rich {9 Ways to Prepare Your Family for Catastrophes}
Never linked up before? Here’s how:
Scroll down, find the little blue “Add your Link” Button and click on that.
Follow the instructions on the next page – add a great image of your project and an interesting title. Make sure you link to the direct page of your budget friendly post – not the main page of your blog!
Try to visit at least a few other blogs at the party. Be sure to leave a comment to let them know you stopped by!
Please link back to this post somehow. There are badges available here; a simple text link is just fine too.
 Feel free to tweet about Thrifty Thursday so others can join the fun, and don’t forget to check back here Sunday morning to see which posts have been featured this week at Weekend Wandering!
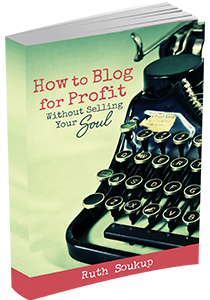
If this is your first time here I also invite you to check out my eBook, How to Blog for Profit (Without Selling Your Soul). It is a fantastic resource if you are interested in building your blog, getting more traffic, or learning how to monetize. Or, if you have read the book and are still looking to take your blog to the next level, I encourage you to check out my options for one-on-one blog consulting.
An InLinkz Link-up
Pin It
The post Thrifty Thursday {Week 53} appeared first on Living Well Spending Less™.
March 26, 2014
Honey Lemon Garlic Chicken


This simple but delicious grilled chicken is one of my family’s very favorite “cheater” freezer recipes. Even my littlest, who doesn’t normally like chicken, gobbles it up like she has never seen food before. I like it because it is ridiculously easy and makes almost no mess. My husband likes it because it involves the grill, which he would happily cook with every single night if he could.
To make it as part of a freezer cooking day, just double or triple the recipe, split the marinade & chicken into multiple bags, then throw it right into the freezer–no cooking required! Making it ahead of time is not necessary, though, as it is equally delicious just marinated at room temperature
You can use any type of chicken but my family much prefers the boneless, skinless chicken thighs, which are a darker, juicier meat and also tend to be cheaper than the boneless skinless breasts.
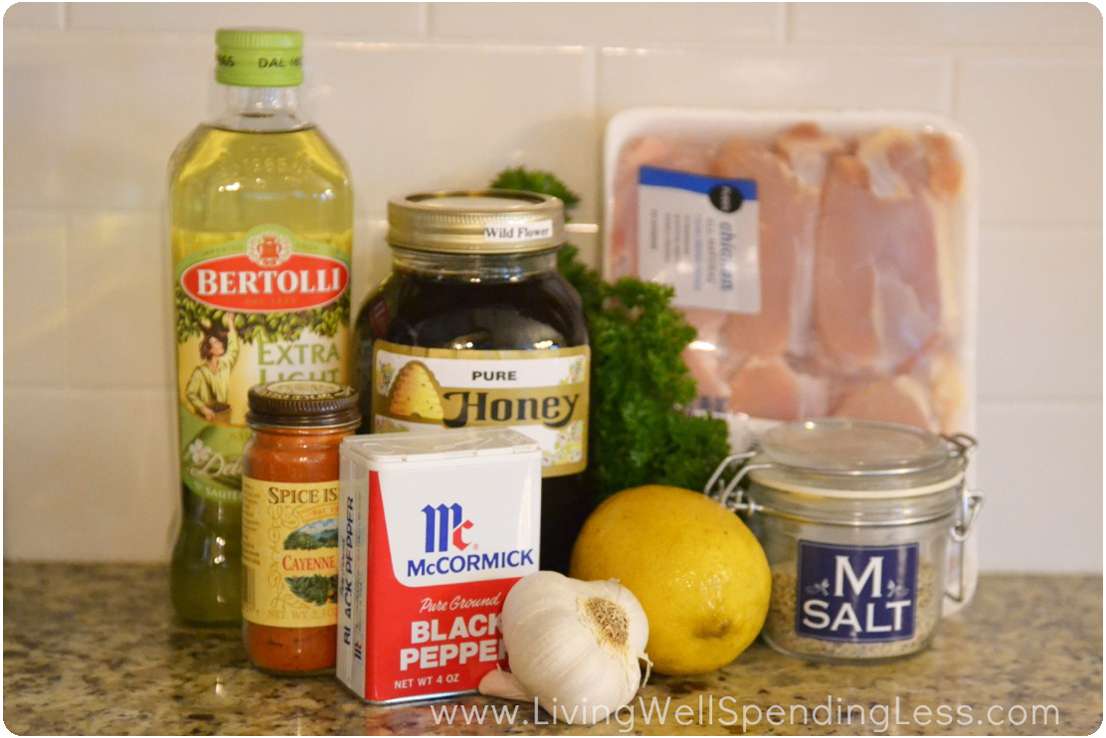
Here is what you need:
1 lemon
1/2 cup olive oil
4-6 cloves garlic
4 tablespoons honey
1 teaspoon seasoned salt
1/4 teaspoon black pepper
1/4 teaspoon cayenne pepper
1/4 cup fresh parsley, chopped (optional)
2 pounds boneless chicken
Step 1: Squeeze lemons to release 1/3 cup of fresh lemon juice.
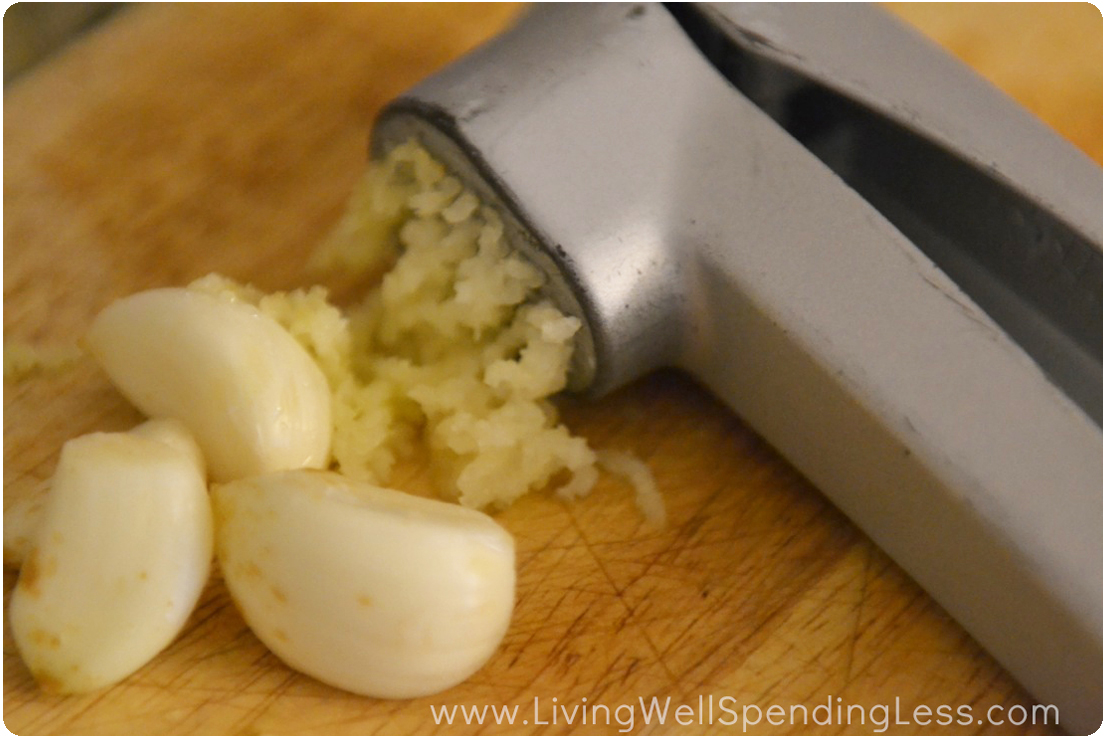
Step 2: Mince or crush garlic in garlic press.
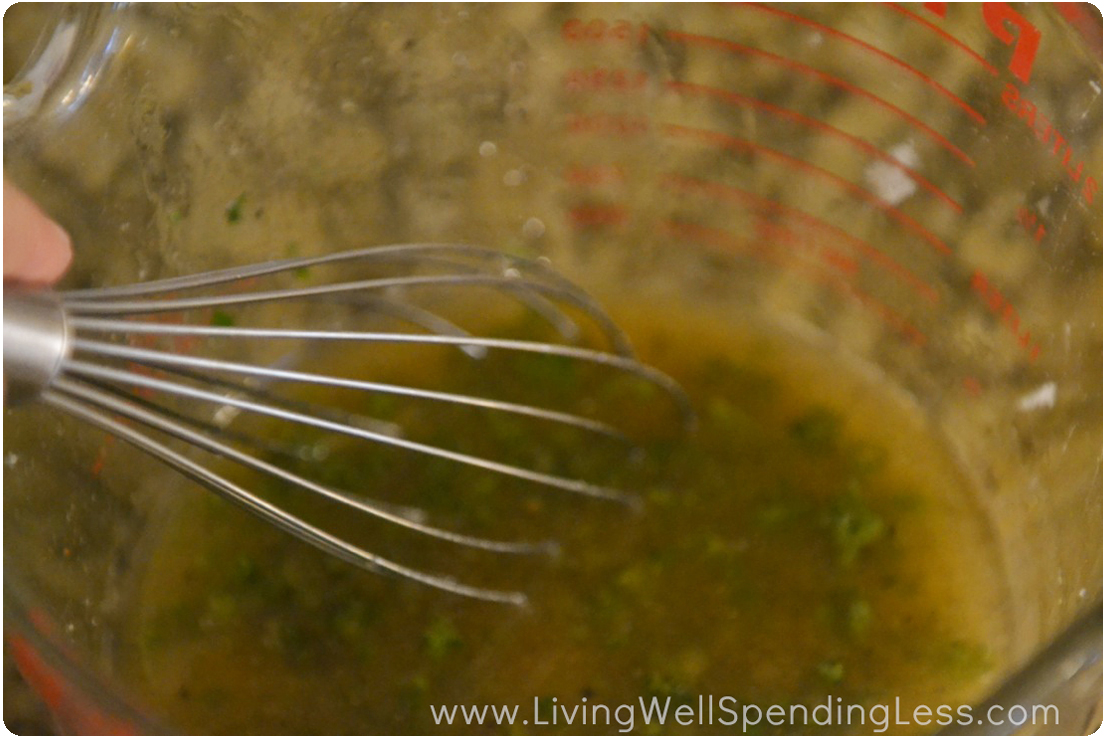
Step 3: Whisk lemon juice, olive oil, honey, minced garlic, parsley, seasoned salt, & pepper together in bowl, then pour into 1 gallon freezer bag. (If freezing, be sure to label bag ahead of time.)
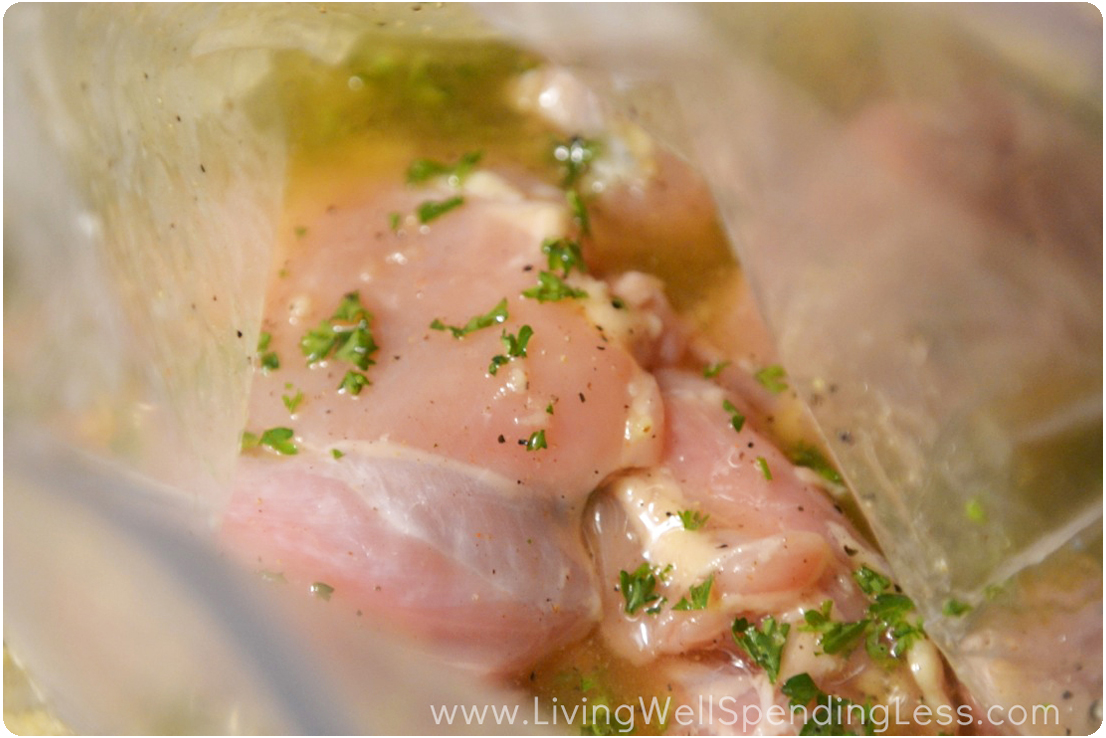
Step 4: Marinate chicken in bag for at least 30 minutes or longer, or press out air from bag and freeze.

Step 5: Thaw if frozen. Grill 6-8 minutes per side, basting with additional marinade, if desired.

Print This!
Recipe: Honey Lemon Garlic Chicken
Summary: This simple but delicious grilled chicken is sure to be a family favorite!
Ingredients
1 lemon
1/2 cup olive oil
4-6 cloves garlic
4 tablespoons honey
1 teaspoon seasoned salt
1/4 teaspoon black pepper
1/4 teaspoon cayenne pepper
1/4 cup fresh parsley, chopped (optional)
2 pounds chicken
Instructions
Squeeze lemons to release 1/3 cup of fresh lemon juice.
Mince or crush garlic in garlic press.
Whisk lemon juice, olive oil, honey, minced garlic, parsley, seasoned salt, & pepper together in bowl, then pour into 1 gallon freezer bag. (If freezing, be sure to label bag ahead of time.)
Marinate chicken in bag for at least 30 minutes or longer, or press out air from bag and freeze.
Thaw if frozen. Grill 6-8 minutes per side, basting with additional marinade, if desired.
Preparation time: 30 minute(s)
Cooking time: 6-8 minute(s)
Number of servings (yield): 4
* * *
What are your favorite freezer recipes?
Pin It
The post Honey Lemon Garlic Chicken appeared first on Living Well Spending Less™.
March 25, 2014
Part 4: How to Clean Your Kitchen
This is Part Four of an 8-Part Beginner’s Guide to Cleaning Series. See the overview here.
* * *
Welcome back to the Beginner’s Guide to Cleaning! After getting your hands dirty last week and tackling some of the most visible areas in your home—your living spaces—hopefully you are feeling inspired and motivated to keep going until the rest of your home shines as well. I know I am! (And if this is your first week, you might want to start at Part 1 here to get caught up!)
Today we are going to tackle another room that gets daily use….and abuse. I don’t know about you but while I don’t always mind doing the dishes and wiping down the counters so that my kitchen looks clean, I absolutely dread the thought of deep cleaning. Sometimes I would just prefer that all those closed cabinets just stay closed. No one needs to look behind there anyway right?
But a clean kitchen is not only a joy to look at, it is a joy to work in too. And considering just how much work we really do there—preparing 3 meals a day, 7 days a week, doesn’t it seem like a good use of time to make your kitchen space as clean & functional as possible?
Kitchen counters, with all that flat surface space, can easily become collection zones for everything from school work to mail to shoes, keys, clothing, toys, and any number of items that have somehow lost their way. After clearing your surfaces, vow to make your kitchen a “clutter free zone” instead using the permanent collection zone you set up last week to gather the items that need to be put away.
Once again I will walk you through the steps for cleaning the surfaces most commonly found in this zone, giving detailed instructions for how to clean each one. If you are a seasoned kitchen-scrubber, much of it may be review—feel free to skip to the end of the post, or add your own tips & tricks in the comments below! At the end of the post you will get a printable checklist to use as you tackle your kitchen.
Step 1: Pre-clean & declutter
Supplies needed: A large basket or individual baskets for each family member
How-To: Pick up any items lying around the kichen, including any clutter that has collected on counters or the kitchen table, then wipe down surfaces to remove any sticky residue or crumbs. Place items in appropriate baskets for each family, or collect items in a single basket to be put away. (A great task for kids!) Hopefully after last week’s task you have already created a permanent collection zone in your home, but if you haven’t, be sure to do so now—either at the front entrance, near the stairs, or in a corner of the kitchen or living room. Use your basket or baskets to collect any items that would normally get left lying around.
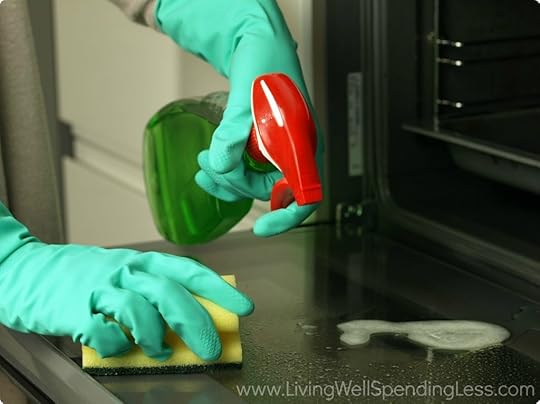 Step 2: Clean the oven
Supplies needed: rags, dish soap (if oven is self cleaning); baking soda, water, spray bottle, vinegar, dish soap, windshield chipper or sturdy plastic spatula, rags (if oven is not self-cleaning)
How-To: a.) Self Cleaning Oven: Remove oven racks & soak in soapy water solution, then scrub clean and let dry. Open windows to air out kitchen while oven is cleaning. Turn on self-cleaning mode on oven. Be sure the door locks! This cycle will take anywhere from 2-6 hours. When oven has cooled completely and door unlocks, wipe out any ashes & wipe down oven with wet rag. Return racks to oven. b.) Non Self-Cleaning Oven: Remove oven racks & soak in soapy water solution, then scrub clean & let dry. Mix ½ cup baking soda with 3cups warm water, then liberally spray solution on sides, top & bottom of oven. Let set for 1-2 hours, then check to see if charred areas have loosened. If not, reapply spray and let set longer. Chip away charred areas with chipper or spatula, then spray with ½ water/ ½ vinegar solution. Wipe clean with wet rags.
 Step 3: Clean the refrigerator
Supplies needed: all purpose cleaner, rags, dish soap, stainless steel polish, large cooler, garbage bag, small box baking soda
How-To: Fill sink with hot soapy water. Empty contents of refrigerator & freezer. Use cooler for frozen items. Toss any items that have expired, smell bad, or don’t look quite right. Remove all drawers, shelves, and ice trays and wash in soapy water solution. Spray inner sides, doors, top and bottom of refrigerator with all-purpose cleaner, then wipe down with wet rag. Replace shelves & drawers. Return food to refrigerator & freezer. Wipe down outer front, top, and sides of refrigerator with rag, then polish stainless steel if necessary by rubbing with polish then buffing clean with a dry rag.
 Step 4: Clean the stovetop
Supplies needed: dish soap, all purpose cleaner, baking soda, sponge or rags, stainless steel polish or glass cleaner.
How-To: a.) Electric Stovetop: Remove heating coils and reflector bowls from stove. Soak bowls in hot soapy water to loosen and remove caked on gunk and scrub coils clean with hot soapy water. Wipe down stovetop with wet rag, then sprinkle with baking soda. Scrub well with sponge or rag. Towel dry. Lift stovetop and clean underneath. Return reflector bowls and heating coils. Wipe down knobs. Polish any stainless steel, if necessary. b.) Gas Stovetop: Remove heating grates and soak in hot soapy water to loosen and remove caked on gunk and scrub clean with hot soapy water. Wipe down stovetop with wet rag, then sprinkle with baking soda. Scrub well with sponge or rag. Towel dry. Wipe down knobs. Polish any stainless steel, if necessary. c.) Glass Stovetop: Wipe down stovetop with wet rag, then sprinkle with baking soda. Scrub well with non-abrasive sponge or rag, using plastic scraper to remove any caked on gunk. Towel dry. Spray with glass or counter cleaner and buff until shiny. Wipe down knobs. Polish any stainless steel, if necessary.
 Step 5: Clean the microwave
Supplies needed: water, vinegar, bowl, sponge or rag, dish soap, glass cleaner, stainless steel polish.
How-To: Fill bowl with ½ water, ½ vinegar solution. Microwave on high for 7-10 minutes, allowing water to boil for several minutes so that steam forms and softens any debris or residue. Remove bowl and try; wipe sides, bottom, and top of microwave clean with wet sponge or rag. Wash tray in soapy water solution. Wipe down front of microwave with glass cleaner & polish stainless steel, if necessary.
 Step 6: Clean the dishwasher
Supplies needed: cup or bowl, vinegar, baking soda
How-To: Remove bottom rack & check drain to make sure there are no blockages or loose pieces. Sprinkle bottom of dishwasher with baking soda, then return lower rack. Fill a cup or bowl with vinegar and place on top rack of empty dishwasher. Run dishwasher on the hottest water cycle. The combination of the vinegar and water will clean, sanitize, and brighten your entire dishwasher. Wipe down front of dishwasher & polish stainless steel, if necessary.
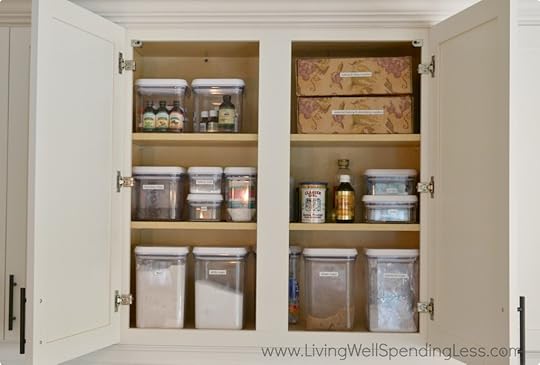 Step 7: Clean the cabinets
Supplies needed: all purpose cleaner, sponge or rag, dish soap
How-To: To keep from being totally overwhelmed, only clean out one cabinet at a time. Start by emptying cabinet of all contents. Toss any food items that are expired or no longer look/smell/taste edible. If cleaning a non-food cabinet, remove any appliances, dishes, or tools that are broken or that you no longer use & either toss them or fill a box for donation. Once cabinets are empty, wipe down all shelves with all purpose cleaner and wet rag, followed by a dry rag. Return items to cabinet. Wipe down door fronts with wet rag or Magic Eraser to remove fingerprints and dirt.
 Step 8: Clean the counters & countertop appliances
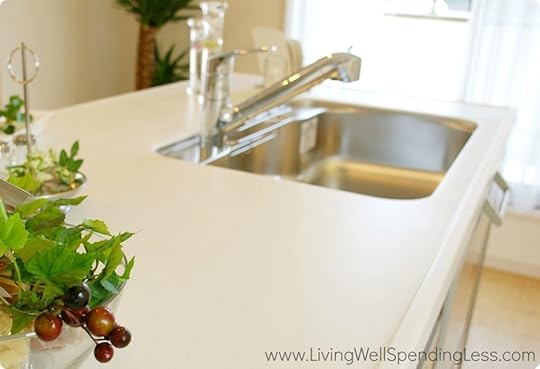
Supplies needed: dish soap, all purpose cleaner, sponge or rag, glass cleaner or counter spray
How-To: Fill sink with hot soapy water. Empty toaster tray & shake out crumbs. Wipe down all countertop appliances, then clear counters. Spray countertops with all-purpose cleaner and wipe clean. For granite countertops, finish with glass cleaner or countertop spray to get extra shine. (I love the smell of the Mrs. Meyer’s spray but glass cleaner works just as well!)
 Step 9: Clean the sink
Supplies needed: baking soda, vinegar, hot water, whole lemon, sponge or wet rag, old towel
How-To: Clear sink and rinse clean with water. Sprinkle baking soda liberally over wet surface of sink and use sponge or wet rag to scrub sides and bottom of sink, as well as faucet and caulk seal around rim of sink (if necessary). Let sit for a few minutes. Pour ½ cup baking soda down garbage disposal, followed by 1 cup of vinegar. Boil 4 cups of water, then pour water down disposal to rinse baking soda and vinegar. Cut lemon in half and place in disposal, then run disposal until lemons have been crushed and washed away. Rinse sink and faucet thoroughly, then buff dry with an old towel.
 Step 10: Clean the floors
Supplies needed: broom & dustpan, dust mop all purpose cleaner, wet mop
How-To: Before beginning, move as much furniture from the floor as possible. Starting at one end of the room, carefully sweep loose dirt and hair towards the center of floor. Methodically make your way around the room, sweeping all dirt towards the center into one pile. Sweep into dustpan and throw away. Next, do a sweep of the floor with your dust mop to remove any remaining dust or hair. Spot clean any sticky or dirty spots, or mop entire floor with wet mop and let dry.
Of course now that you know just what to do, it is time to get to work! To stay on task, use this handy printable checklist to help walk you through all the steps:
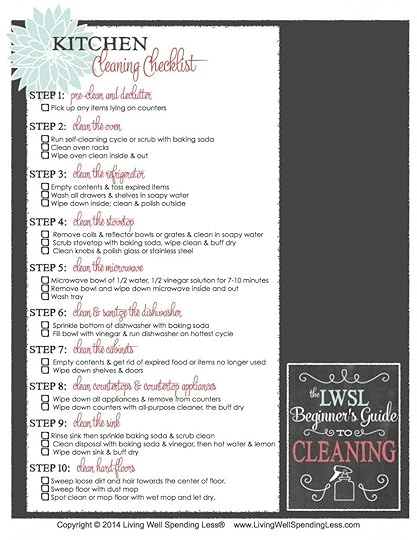 {Get your printable Kitchen Cleaning Checklist here}
Part Four Assignment
Just to review, here is your fourth assignment:
Set aside a good chunk of time—again at least 2-4 hours—sometime this week to work on deep cleaning your kitchen.
Clear the clutter in your kitchen and declare a clutter free zone. Make it a goal to keep nothing on your counters except the kitchen appliances you use on a regular basis. Work on training your family to use the “collection zone” you set up last week.
Follow the Living Space Cleaning Checklist to get your living area shining from top to bottom. If possible, open up the windows to let in some fresh air as well!
The LWSL Beginner’s Guide to Cleaning:
Part 1: Getting Started
Part 2: Cleaning Supply 101
Part 3: How to Clean Your Living Space
Part 4: How to Clean Your Kitchen
Part 5: How to Clean Your Bathroom
Part 6: How to Clean Your Bedroom
Part 7: Laundry 101
Part 8: Home Maintenance & Seasonal Cleaning
* * *
Did I miss anything? What are your biggest challenges to keeping your kitchen clean?
Pin It
The post Part 4: How to Clean Your Kitchen appeared first on Living Well Spending Less™.
March 24, 2014
DIY Dollar Store Makeup Tray


There are a lot of ways I save on beauty products & toiletries. I use coupons for toothpaste & razors, make my own dry shampoo, do my nails at home, and haven’t had my hair cut or colored at a salon in years. But when it comes to beauty, the one thing I am willing to pay a little more for is makeup.
Quite honestly, I used to go a little crazy at the drugstore makeup counter, buying this and that and everything, but then hardly using any of it because the color was a little off or the texture wasn’t quite right But then eventually I realized it was more cost effective to invest in just a few higher quality items that last and that I love rather than have a whole drawer full of inexpensive makeup that I never use. It is also a great way to cut down on clutter!
Of course while I might be willing to splurge on high quality makeup, I would rather save as much as possible when it comes to storing it! Over the years I have tried keeping my makeup in a bag or box or drawer, but I find that it always ends up on the counter eventually. Finally I just gave in and realized the perfect storage spot was simply a cute tray right on the counter.
Luckily I found the perfect sized tray right at my local dollar store, jazzed it up just a bit with paint and pretty paper, and added a small square vase (also from the dollar store) for holding brushes, mascara, & lip gloss, and voila! Functional makeup organization for right around $2.
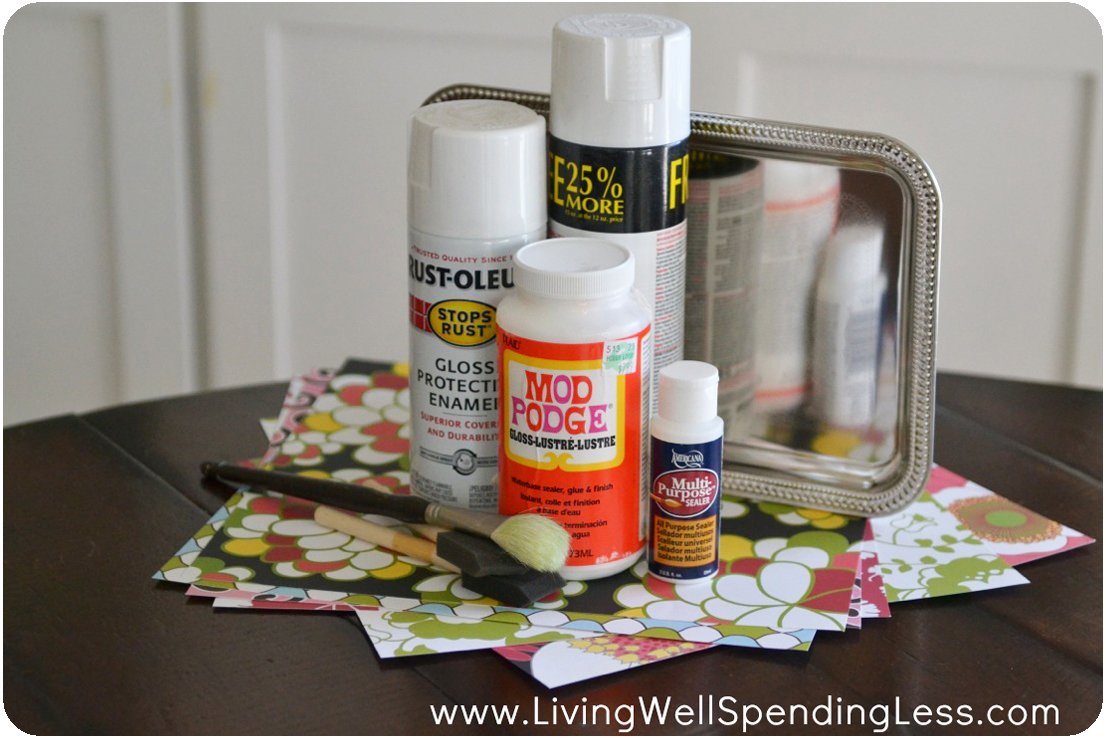
Here is what you need:
tin tray from the dollar store
spray primer (optional)
spray paint
scrapbook paper
Mod Podge
Paint Brush
Sealer
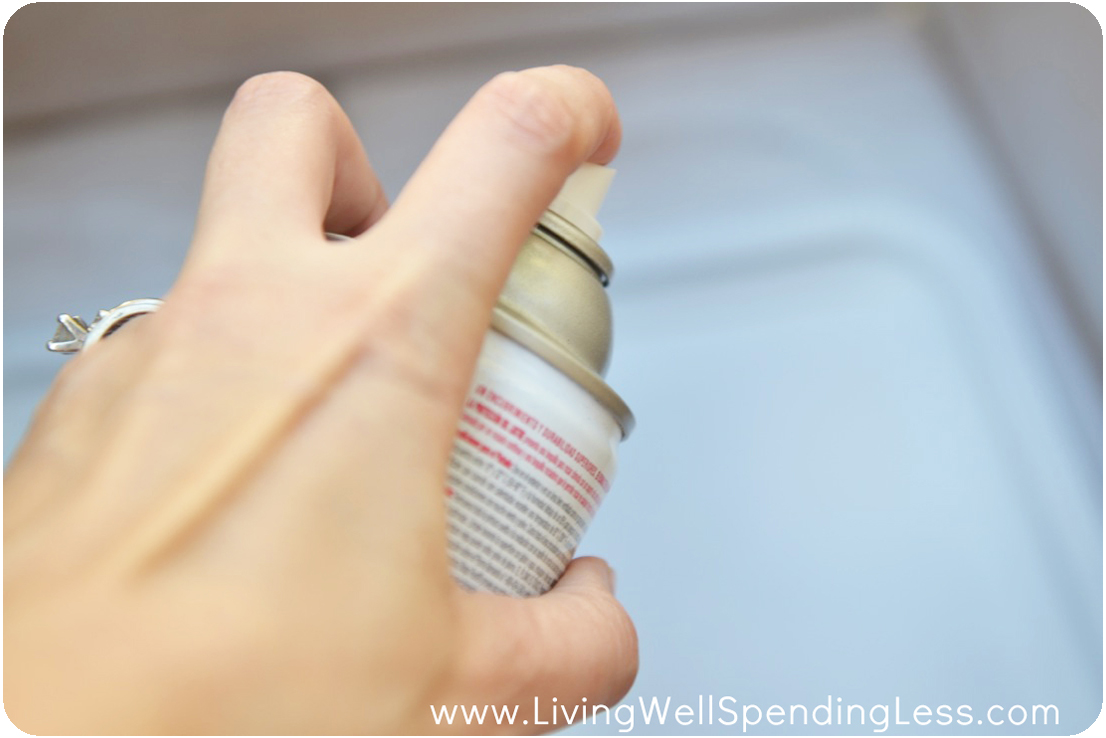
Step 1: Spray the front of tray with primer if you happen to have it on hand, & let dry. If you don’t have primer, 2 coats of spray paint should be fine, just be sure to let it dry at least 20-30 minutes between coats. Let final coat dry overnight.
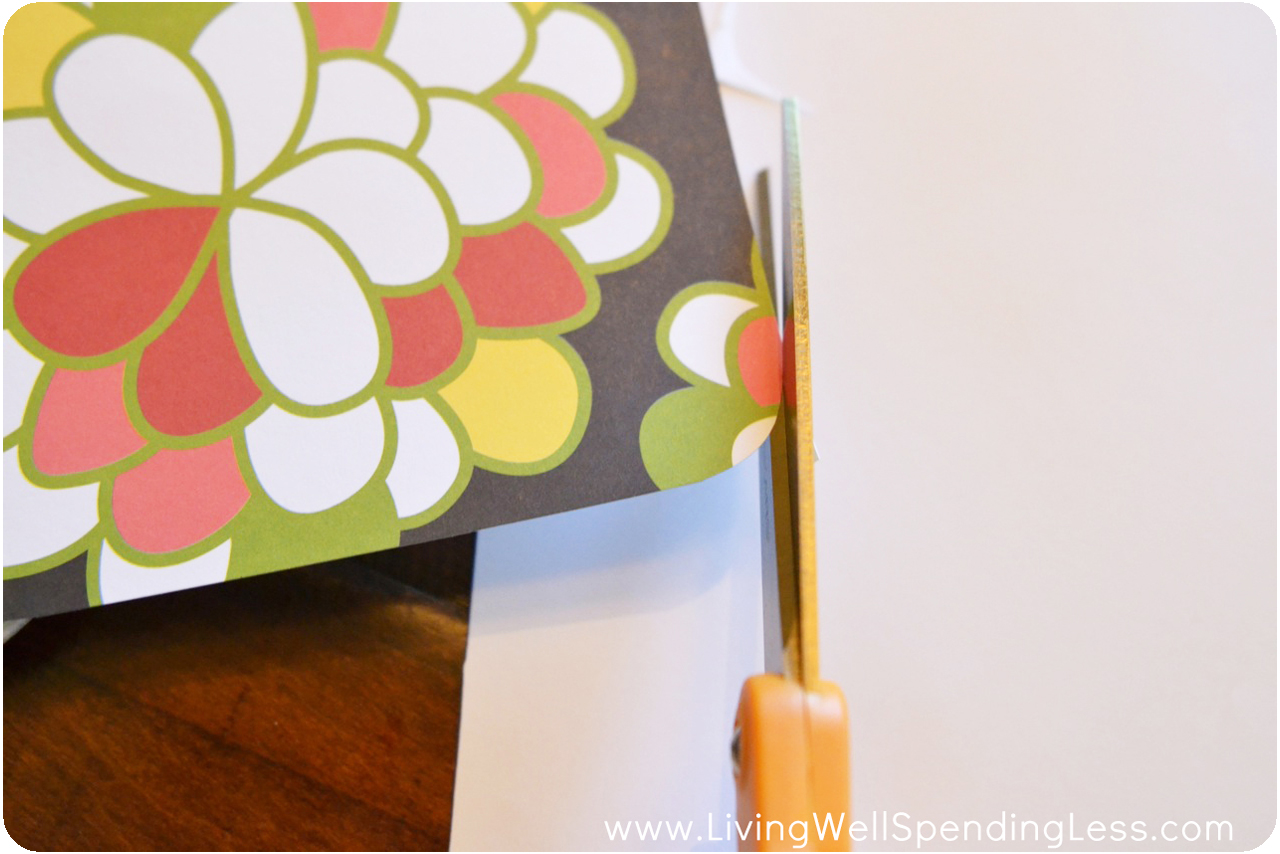
Step 2: Cut scrapbook paper to fit bottom of tray, rounding corners if necessary.
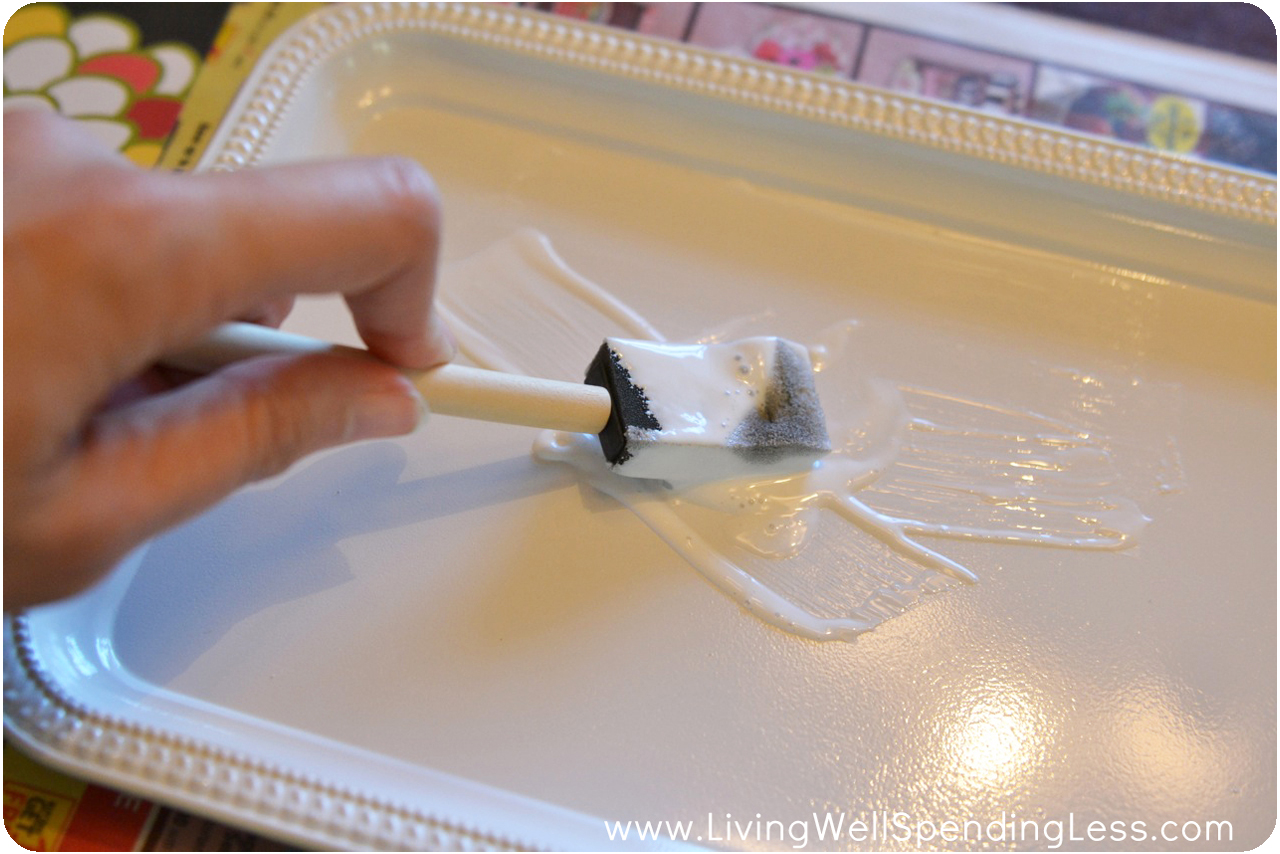
Step 3: Brush bottom of tray with Mod Podge, then carefully press paper over tray from center to edges, pressing out any air bubbles or wrinkles.

Step 4: Brush Mod Podge over top of paper and over painted portion of tray. Let dry.
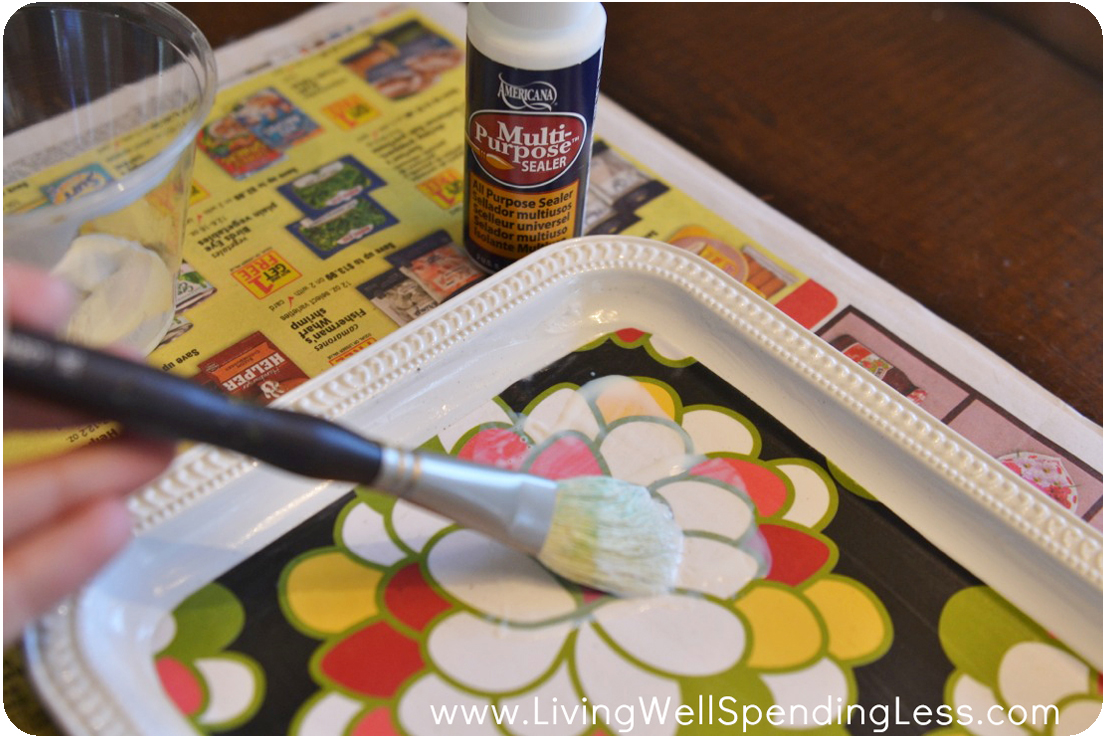
Step 5: Seal tray with a coat of sealer; let dry.
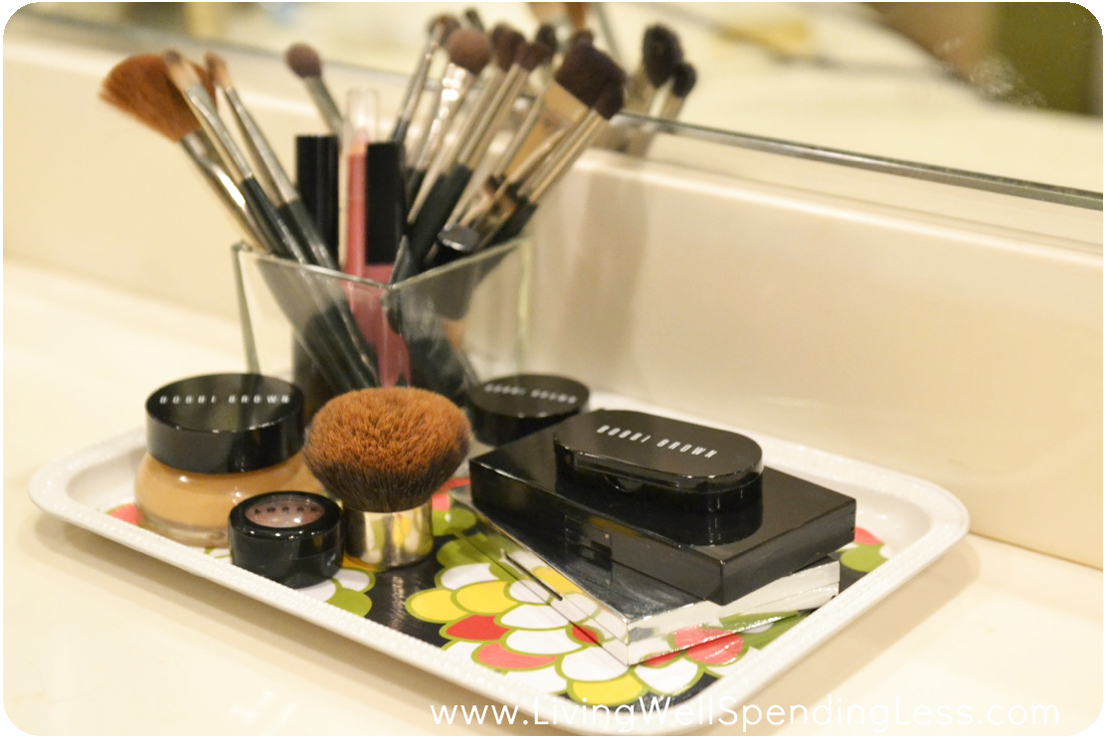
Step 6: Arrange makeup on tray, adding small vase or jar to hold brushes if desired.

* * *
What beauty products do you splurge on? Where do you save?
Pin It
The post DIY Dollar Store Makeup Tray appeared first on Living Well Spending Less™.
March 23, 2014
Weekend Wandering
Happy Sunday! I hope you are all enjoying this first official weekend of Spring! I had a great time kicking off the season at the Home Depot #SpringMadeSimple Garden Party in Miami this past Thursday. There were DIY herb pots to make, yummy garden-to-table fare to eat, and even a gardening expert on hand to answer questions. And it was so much fun! I posted lots of pictures of the event on Instagram (and you can see even more under the hashtag #SpringMadeSimple) but here were a few of my favorites:

Got my official apron on & all ready to party!
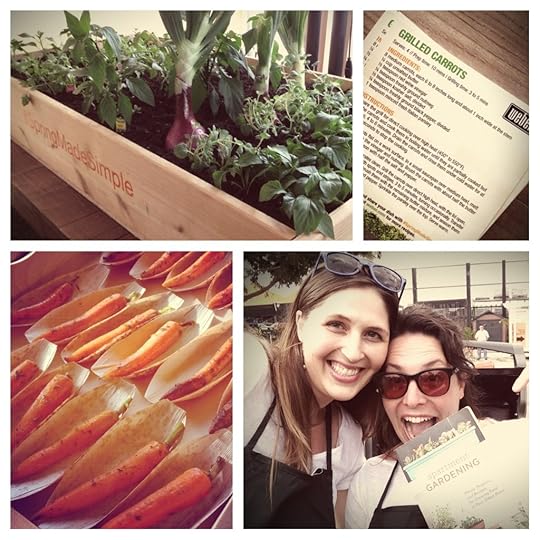
Celebrity chef Amy Pennington dished up some amazing food on the grill. Grilled carrots? I die.

This little cutie pie was super shy….until I taught him how to do his first selfie! 

And this sweet family was SO excited to win a Home Depot gift card! They have been wanting to build a fence in their backyard for more than 4 years, and now they will finally be able to do it!
But even if you missed the fun in Miami, there will be MORE #SpringMadeSimple garden parties in cities all around the country, so definitely try to stop by if there is one happening in your area! You can get more information and RSVP here.

But now, on to all the great posts I loved this week:
* * *
First of all, this Spinach Tomato Tortellini Soup by Carmel Moments looks & sounds SO delicious–the perfect blend of fresh vegetables & warm comfort food!

Next, this Sun-dried Tomato Mayo, Bacon and Egg Sandwich by Joyful Homemaking looks pretty darn incredible too! I wonder if I can

There were some great party dip recipes shared this week too! This Easy Buffalo Chicken Dip by Slick Housewives is sure to be a hit.

Of course I’m more partial to Spinach Artichoke Dip and this one by Spend with Pennies looks absolutely delicious!

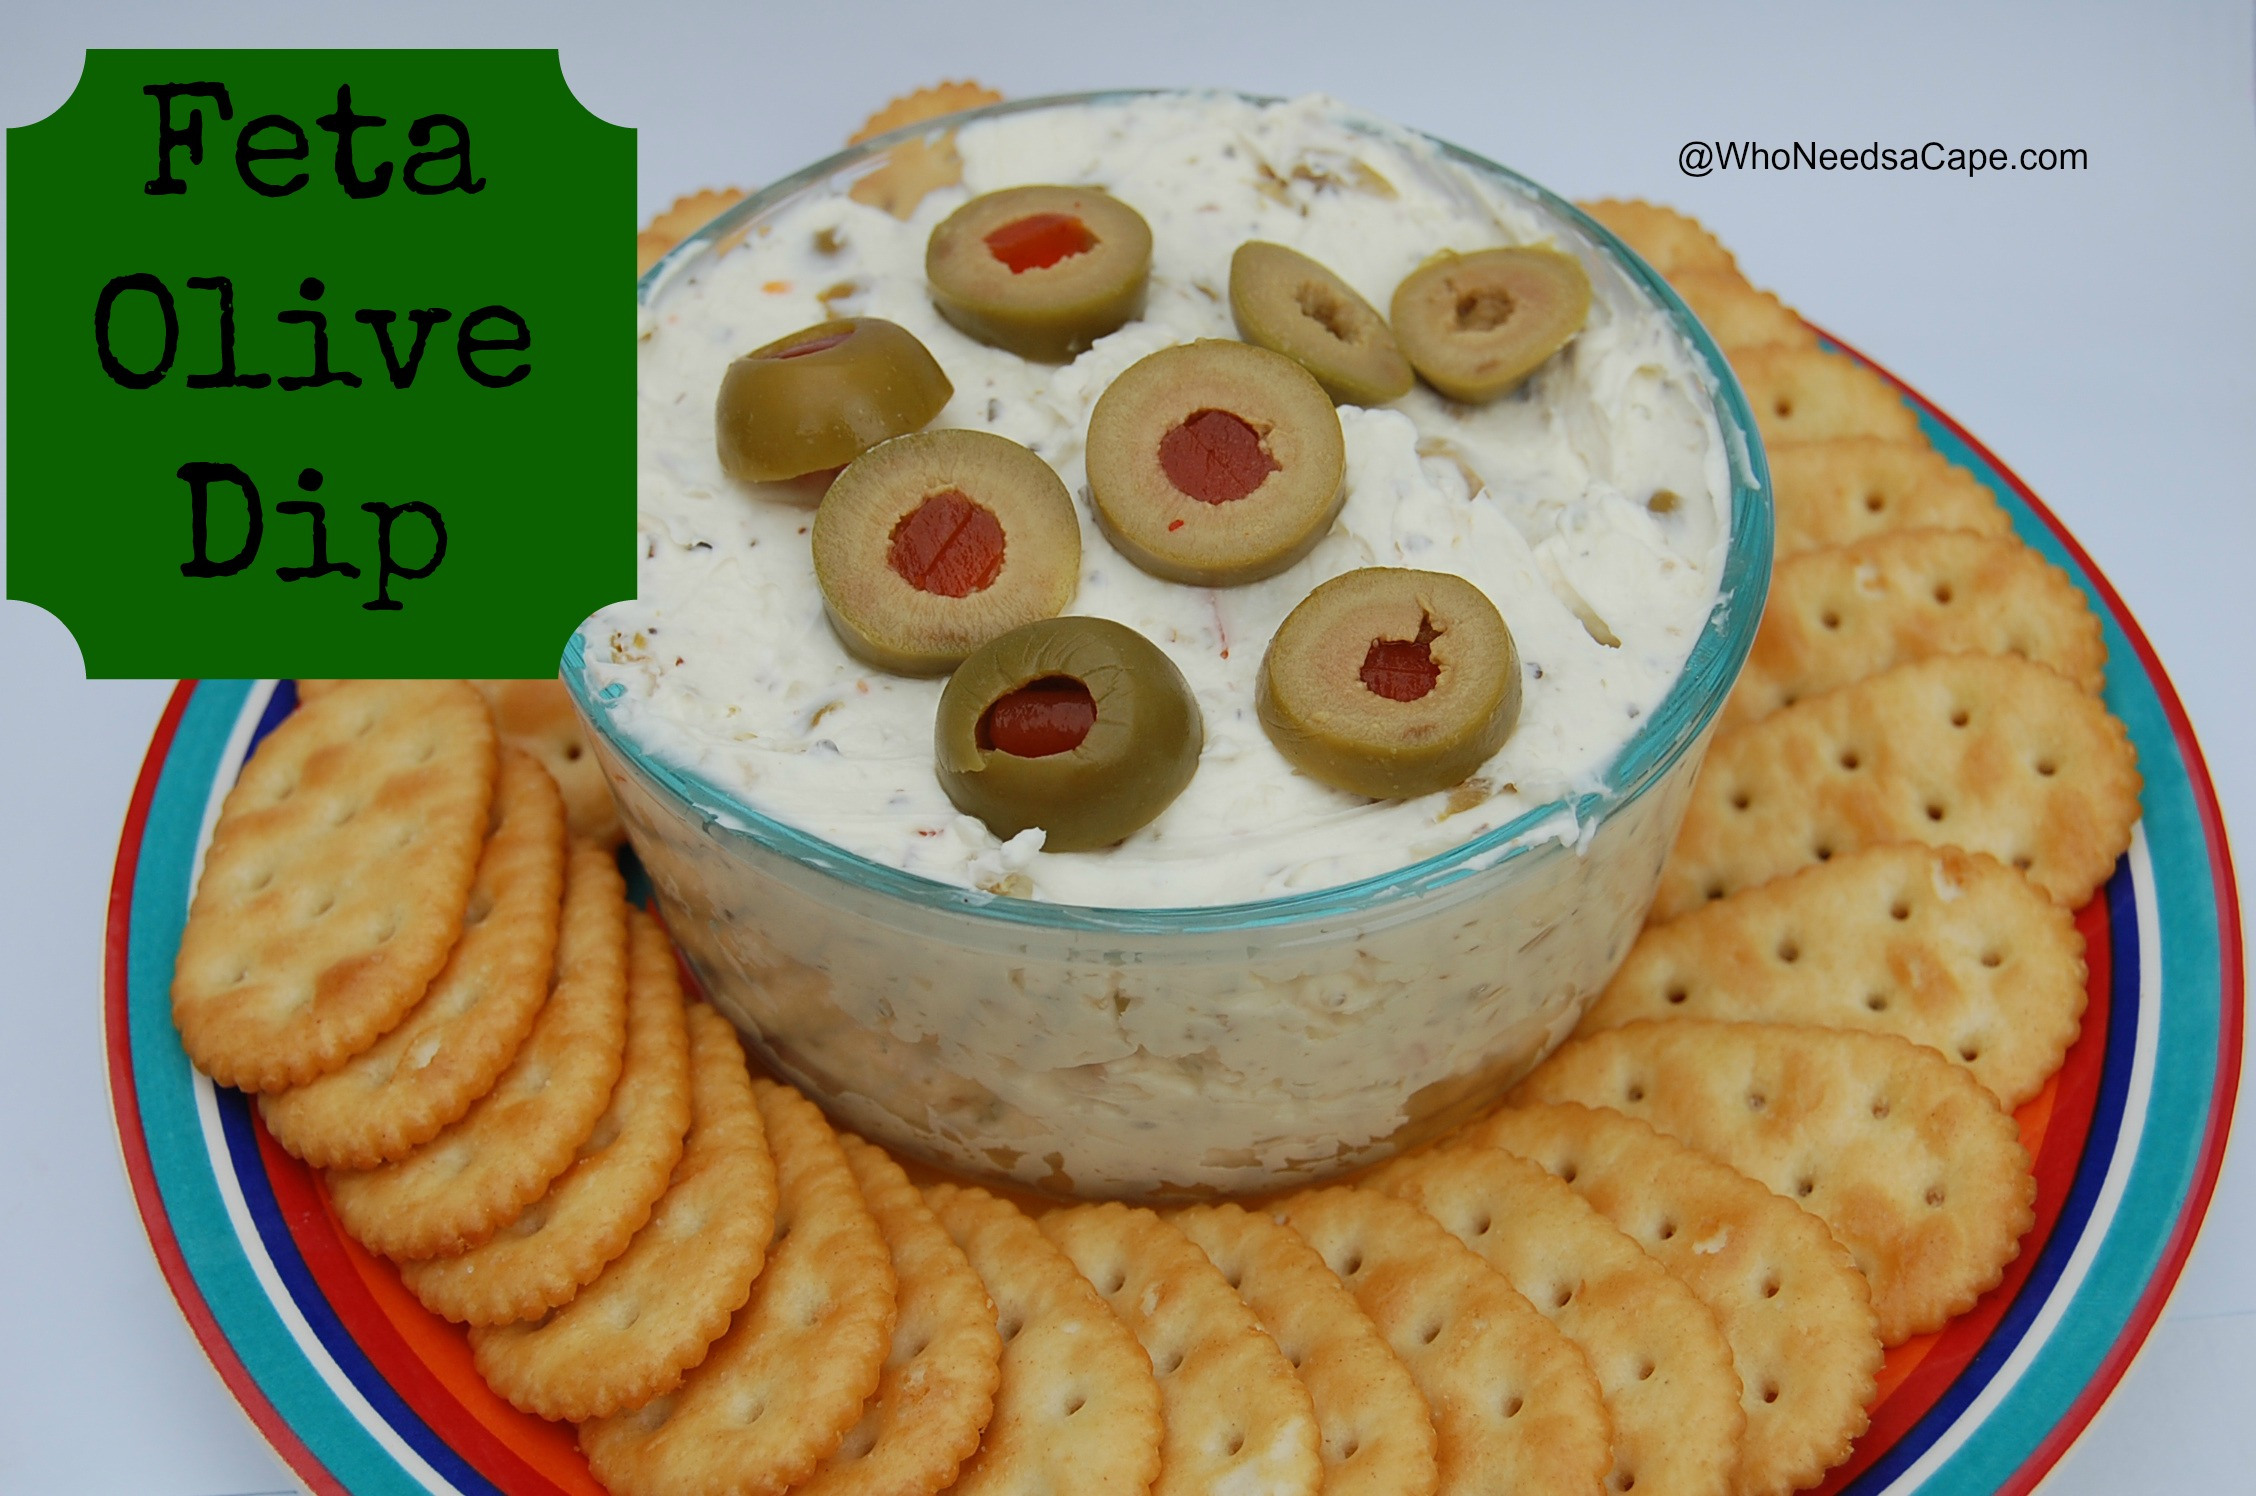
This Feta Olive Dip from Who Needs a Cape sounds really yummy too!
I never met a Starbucks treat I didn’t love, so this copycat Starbucks Banana Bread Recipe by The Real Thing With the Coake Family is definitely a must try!

You may have noticed I have a little thing for dahlias around here. Naturally I couldn’t resist these darling Flower Cupcakes with Marshmallows from Moms and Munchkins! What a cool idea!

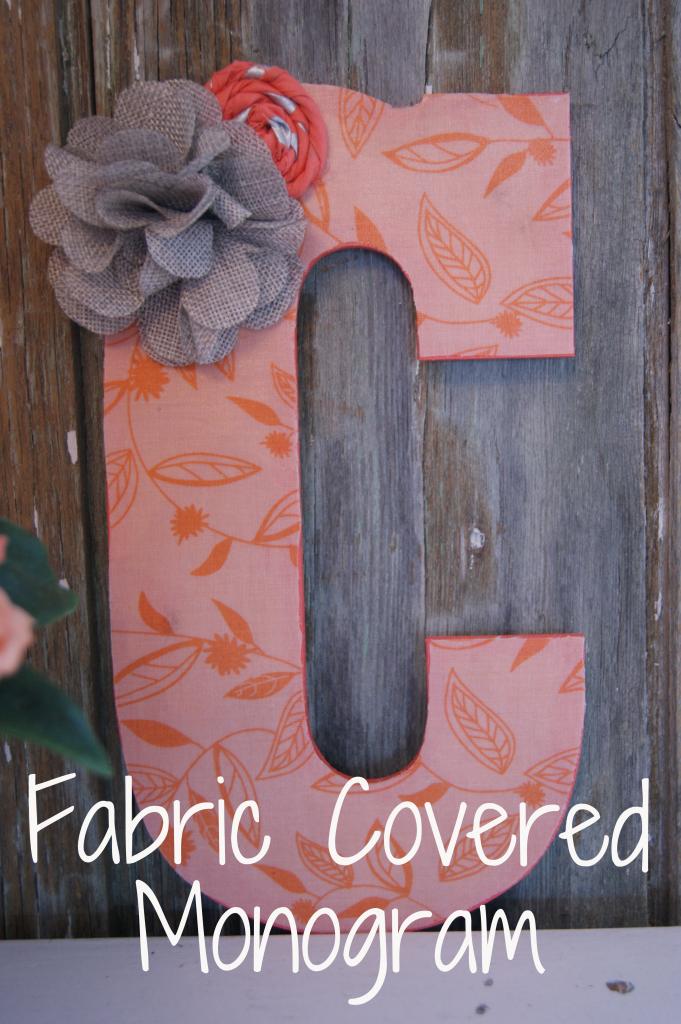
Moving on to DIY projects, I love this Fabric Covered Monogram by The life of a Craft Crazed Mom! Too Cute!
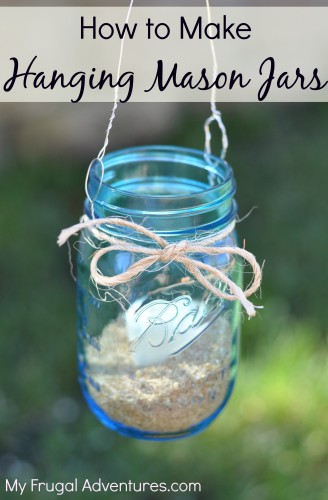
These Hanging Mason Jar Lanterns by My Frugal Adventures are really pretty. What a fun way to turn your backyard into a special retreat for not a lot of money.
I also love this DIY Anthropologie Knock Off Vase from Up to Date Interiors. Such a cute idea for spring!

Are you looking for tips on How to Paint Your Cabinets? Kate Sokolewicz has 9 easy step to follow!

Finally, if you are looking for ways to say Goodbye to Your TV The Practice of Simplicity has a true story about how they have lived without a TV for over 6 months. Definitely something to consider!

* * *
What did you love this week?
Pin It
The post Weekend Wandering appeared first on Living Well Spending Less™.
March 21, 2014
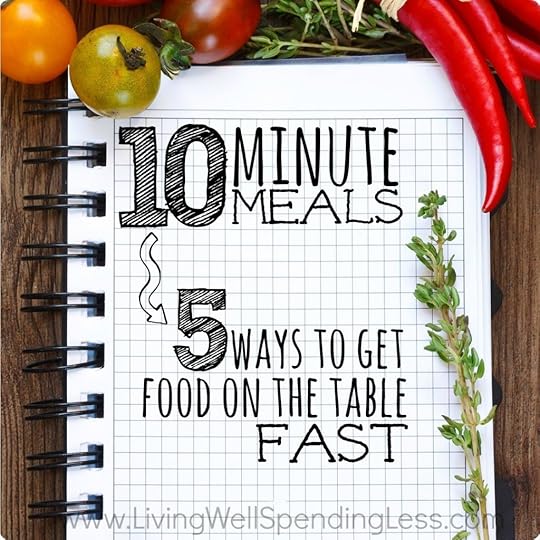
10 Minute Meals: 5 Ways to Get Food on The Table FAST

Today I am so happy to introduce you to my dear friend Jen from Balancing Beauty and Bedlam and 10 Minute Dinners. Not only is Jen one of the sweetest, kindest, and most genuine people you will ever meet, she is also FULL of wisdom, especially when it comes to getting food on the table fast! Today’s post is SUCH a treat and I am so excited to share it with you! I got some great ideas and I know you will too!
This is a guest post from Jen of Balancing Beauty and Bedlam
I close the van door with my foot, grocery bags lining each arm like a carefully trained circus acrobat. I rush into the kitchen unloading the bounty and am greeted with calls from upstairs.
Hey Mom! What’s for dinner?
My inner voice screams, Didn’t I just make dinner yesterday?!
As a mom of five, I understand busy schedules, deadlines, unending “chauffeur” jobs paired alongside that constant nag that somewhere along the line, something’s been forgotten.
For many of us, when our balancing act gets off kilter, homemade meals are the first thing to go since it’s much easier to grab convenience food on the run. When that starts to happen in my home, I go back to five simple, yet life changing strategies I began implementing years ago.
On those particularly chaotic weeks, my goal is to be very intentional about our meal time. I want not only to spend less time preparing the food, but more time connecting over a shared meal. All while keeping our food budget to a minimum, of course!
Doesn’t ten minutes of food prep sound like a dream come true? Implement these easy ideas and you will be thrilled to see how quickly a wholesome meal can come together on the spur of the moment.
1. Set up Fast Family Favorites
When dinner time is rushed, it’s safe to say we all tend to get stuck in a rut of making the same meals over and over. First off, let’s break that habit together and set ourselves up for success.
One evening over dessert, gather your family together to brainstorm some of your favorite, fast family meal ideas. Make a list of at least 15 – 20 tried and true recipes. If you need to do so, pull out some old cookbook and magazines to trigger those creative juices. If you have kids, include them in this process. It gives them a voice and ownership of the family decision making process. They’ll be much more willing to be a kitchen helper if you need some assistance during meal prep if they know the meal they chose is on the agenda.
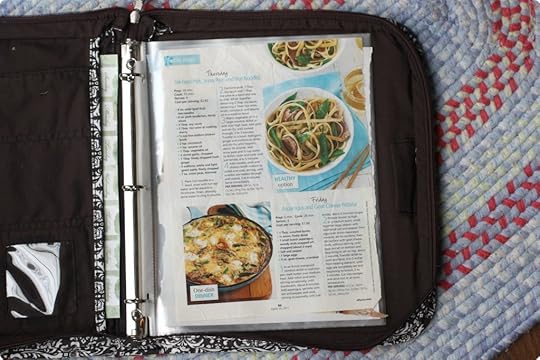
Once your list is complete, print the recipes out or write them down. Yes, I want you to have a physical copy of each one. Use this to create a simple meals solutions notebook which will be your ”cooking brain” when you’re overwhelmed and need someone–or some thing–to think for you. (Am I the only one who needs that help?) With your meal solutions notebook in hand, you’ve already done the thinking.
This notebook, which can be as simple as a three ring binder, holds recipes of all your fast, family favorite recipes, the ingredients needed, and our shopping lists. I even add quick snack ideas and kid friendly recipes that they can make for themselves.
Next, take your list and designate a pantry shelf or bin where some of the the non refrigerated recipe staples will be stored. When I race through the door and haven’t a clue what I am making for dinner that night, I need to be assured that I will always have ingredients for some of our fast, family favorites. I don’t want to count on easy burritos, only to find I am out of the necessary tomato sauce or tortillas. Those should already be in stock on that fast favorites shelf/bin. Don’t try and keep all the ingredients from your entire top 15 list because that may get overwhelming, but just make sure that you always keep at least five recipes in stock.

2. Implement C.O.S.T. Cooking Strategies
One of my greatest feats is trying to determine how nearly every meal can become a “Cook Once, Serve Twice or Three Times” adventure. I am not talking about left overs, although I definitely recommend them and doubling recipes is always a recommendation. My family would be lost without leftover, but I do know that many won’t eat them.
C.O.S.T Cooking sets apart the meal and completely recreates it. Every protein cooked becomes another recipe without any complaints.
For instance, a simple Crock Pot BBQ Chicken over rice or noodles, becomes BBQ pizza the next evening. Depending on how much chicken I have prepared, BBQ quesadillas, tortillas or our favorite BBQ sandwiches made this a three time winner.
A second examples is our family’s favorite Asian Pork Tenderloin recipe. First showcased as a main dish served with rice and vegetables, we rounded out our “Take Two” meals by serving it sliced on a warm hoagie roll topped with provolone cheese for a quick and hot sandwich. Even the biggest left over naysayers will be none the wiser.
When you begin thinking with C.O.S.T Cooking meals in mind, you knock extra dinners out of the way without much effort.
3. Do a Once-a-Week Power Cooking Hour
In my opinion, the best use of one hour a week is my “Power Cooking Hour.” It’s simple, become the Kitchen Manager that you are and challenge yourself to work against the clock. I love a good competition, so I set the timer for one hour. I then cook, chop, dice, prep and freeze as many items as I can in that time period.
In one hour of concentrated time, I am able to break down certain kitchen tasks enough to prep for 8-10 meals in just that one hour.
When I first started my Power Cooking Hour, I prepped 15 meals, making it possible to execute that goal of a ten minute dinner for weeks. I couldn’t believe how much I got done and after that, I was committed to setting that time aside regularly.
While prepackaged foods are incredibly convenient, they come with both a hefty price tag and typically, many extra preservatives. I do keep a few convenience items on hand, but I’ve realized that by using this hour strategically, I can create my own convenience items so simply.
Think through what quick items you find yourself being drawn to at the grocery store. Walk down the freezer aisle and figure out how to recreate them.
Here are just a few tasks that I take on during my Power Cooking Hour:
Cook rice in bulk (love my rice cooker), then separate into quart size portions.
Cook Crock Pot full of beans for additions to meals, taco dip and homemade re-fried beans.
Do some bulk baking - it’s just as easy to make up batter for four banana breads loaves, as it is just one loaf.
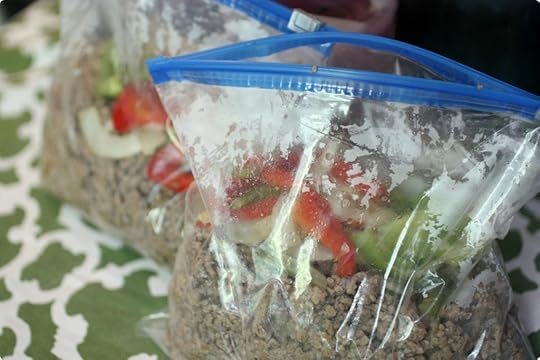
Seasoned Ground beef packages: Fry or use the crock pot to cook up large quantities of ground beef at one time. Since we love Mexican and Italian meals, I then add garlic, onions and chopped peppers right to the beef. Once that is finished, I separate the mixture into freezer bags and add the appropriate seasonings.
Make burrito filling. Using the above mentioned taco meat or grilled chicken, separate into freezer containers or bags, then add your favorite fillings – rice, beans, etc.
Chop individual bags of onions, peppers and other veggies we eat often. Some stay in fridge for snacks, while others head to the freezer.
Make DIY green smoothie packages. We love the prepackaged smoothie mixes found in the freezer section, but they are costly and doesn’t feed our large family. I began creating my own by mixing our favorite fruits, yogurt, chia seeds, and spinach. Yes, healthy smoothies on the go.
Grill or bake chicken in bulk. When we grill out, I always grill up at least ten pounds at a time. Today I checked out the price of 1/2 pound of prepackaged grilled chicken – $5.45. That’s crazy! You can make two pounds of your own grilled chicken for the same price. If you bake chicken or throw it in the crock pot, always make more chicken that you will eat, so that you have extras. Once cooled, then slice, shred and chop into individual meal size freezer bags for quick additions to salads, soups, sandwiches and casseroles all week long. Making up these meal packets is such a great time saver.
This Power Cooking Hour is multitasking at its finest. You will be amazed that the more often you give it a try, the more skilled you will become at having multiple items cooking and baking at once. It’s truly worth the extra effort.

4. Have Breakfast for Dinner
I have yet to determine who deemed certain “foods” as breakfast items. That just seems wrong. Honestly, I love some ham, eggs and hash brown casserole in the evening just as much as a good steak. Our kids think a hot breakfast for dinner is a “treat,” so I am more than happy to oblige since it’s easy to get some nourishing on the table quickly..
I’ve found that a DIY breakfast burrito bar is not only the perfect option when serving large groups, but it’s also a wonderful way to clean out the fridge from any miscellaneous items. We serve our “bars” buffet style with everything from eggs, cheese, steak, ham, veggies, salsa, sour cream etc. The list is unending with what you can add to your buffet line.

5. Start or Join a Cooking Group
There’s nothing better than a night out on the town with some great friends, yet when I started getting together with friends for cooking nights, it mixed the best of both worlds. It brought back the cozy feel of a good ‘ole fashioned quilting bee, but substituted food for fabric. It makes the tedious of everyday cooking so much more fun. There are so many options with how to implement these, but you decide what works best with your friends.
Here are three options I’ve done:
One-for One Meal Swap. Make all the meals at your own home and drop them off at friends’ homes. Then they reciprocate.
Host a meal making party in someone’s home. Everyone brings all the ingredients for their assigned main dish x the number of people involved. So if I was assigned a Chicken Pot Pie, I would bring enough ingredients for five pot pies (if five friends were involved).
One person organizes, sets the menu, and buys all the pantry staple ingredients. The others cover the cost of the ingredients, but brings their own meat, chicken etc. The next month, another person organizes and does the purchasing.
And finally, after you’ve worked so hard to make these meals happen, don’t forget to sit down, relax, unwind and enjoy them. A tip that has soothed many hectic days is my personal understanding of the power of ambiance. We eat by candlelight nearly every dinner. Even if it’s frozen pizza or Mac and Cheese, I turn off the lights, play some soft music and let those candles flicker. It sets a tone at the table that soothes, calms, and relaxes our soul. I can have five baskets of laundry sitting on the sofa behind me, but during that time, there’s nothing else in the world that’s more important than those gathered around our table.
Hopefully those five simple strategies will help you get dinners on the table more quickly, save you a lot of money on the grocery budget, but more importantly, give you some needed encouragement to share time around the dinner table with family and friends.
Enjoy!

* * *
What are some of your best strategies for getting dinner on the table?
As a mom of five blessings, Jen Schmidt has learned to balance and embrace both the beauty and bedlam of every day life and shares about that journey on her blog, aptly named, Balancing Beauty and Bedlam. Her practical, yet tangible, lifestyle ideas encourages others to open their eyes to a “living on less, but living Life to the full” mentality focusing on being
intentional with your every day. You can find her on any given day dreaming about a cleanhouse, whipping up 10 Minute Dinners (and sharing them on that blog), thrift store hunting, spray painting anything in her way or inviting you to share a cup of coffee on her front porch that took 17 years to build.
Pin It
The post 10 Minute Meals: 5 Ways to Get Food on The Table FAST appeared first on Living Well Spending Less™.


