Managing Scrivener Projects & Templates Pt. 1
Scrivener has been a key component to improving my productivity this year. I’ve recently written about various uses for Scrivener such as blog posts, newsletters and even template email messages. Additionally, I’ve shared about using Scrivener templates including some resources for these. In this post I want to delve deeper into template creation and usage. By next week, I intend to create a basic template that I can post for download on my website that I hope may be useful.
Why Use Scrivener Templates
Templates are used for quickly creating projects by type so that you don’t have to configure your new projects from scratch each time you create one. Using templates can be a time saver that allows writers of all kinds to tap their creativity almost immediately. This is important since spending time on minute details can undermine your writing with distractions.
There are several ways you can approach creating a template. If you want something for your most common type of writing then you might want to create a template. For instance, if you write short stories, there is already one in Scrivener. However, I’ve downloaded one specific for speculative fiction that’s geared towards magazine markets that are accepted by SFWA. In this case, the template has common traits expected for submission to these short fiction markets which is a great help. I don’t need to think about the specifics of manuscript format so I can get down to business. In this kind of template usage each short story is created as an individual project.
However, if you are working on a larger project of repetitive actions – such as blogging or a regular newsletter – you may want to have a template that covers the whole year. In such a template you can create individual blog posts or newsletter volumes by adding folders and sub-folders in the binder as you go. The point here is saving time by avoiding creation of whole new, blank projects and then trying to keep up with them. Instead, all your blogs, newsletters, etc, are organized in one macro-project.
Compiling Individual Projects in a Macro-Project
How are these individual projects compiled instead of compiling the whole project? Here are the basic instructions:
1. Click File to expand the menu.
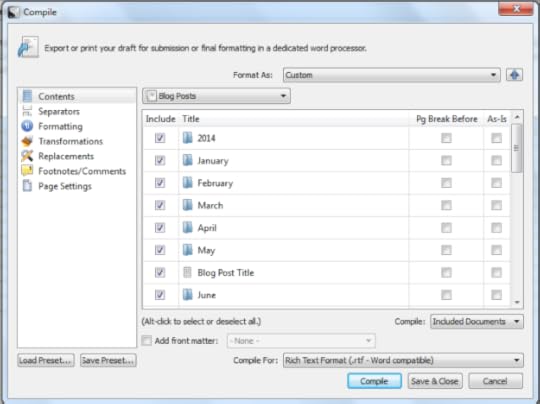
2. Click Compile to open the Compile window:
3. From here I can choose an individual blog to compile by de-selecting everything but the blog I’m currently publishing.
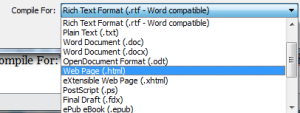
4. Next choose the formatting by clicking the “Compile For:” menu. For a blog post you might choose an html format:
5. Now you click compile to proceed with completion of the function (and yes, I’m compiling this post when completed).
This is particularly helpful if you want to organize your projects differently. Let’s go back to the short story template. You could organize one large project for all your short stories so that all of them are together. Compiling one folder or text container allows you to prepare one story at a time for submission or posting somewhere.
Creating a Template in Scrivener
Creating a template is a rather simple matter for those who haven’t done so yet. Here are the basic instructions:
1. Open a new project and name it.
2. Since you are making a project you will configure it how you want.
3. Once you have the template setup to the basic configuration you want it is ready to save.
4. Click File and then on “Save As Template…” and proceed to create the template.
Importing Templates into Scrivener
Once you’ve created your template you then need to import the template. Here are those instructions:
1. Click on File and then New Project to get the appropriate window.
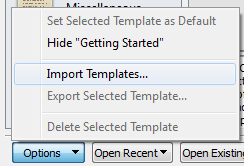
2.Click on the Options menu in the lower left of the pane and choose “Import Templates…”
3. As part of the import process you have the options to choose what category the template should be place in as well as an associated image for the template.
So these are the instructions for compiling individual projects, creating templates and importing templates in Scrivener. For more information consult the Help menu.
Next week, I hope to have completed a template or two to begin sharing for download for those interested. Check back for the post.
 Are you using Scrivener and templates? What templates have you created and why? Please share your thoughts and ideas in the comments section. I’d also love to connect with you over social media so check my Contact page for that information. See the News page for announcements and remember to sign-up to receive news and posts by email. I’ve added a new sign-up tab on my FaceBook page to simplify the process. New followers can download The Black Bag via free coupon today! Also, the cover of my book, The Bow of Destiny, was revealed recently so take a look.
Follow Blog via Email
Enter your email address to follow this blog and receive notifications of new posts by email.
Screenshot of Scrivener from my own projects.
Also, in no way do I represent Scrivener or sell the product. All questions about the product, its sales, support and licensing for your own computing needs should be referred to the company.
Filed under: Blogging, Cover Reveal, Creativity, Editing, Fantasy, Fiction, Indie Publishing, Planning, Self-publishing, Social Media, Tech Tips, The Black Bag, The Bow of Destiny, Tips, Twitter, Writing Tagged: blogging, Coverart, creativity, Facebook, Indie Publishing, P. H. Solomon, Scrivener, Short Stories, Social Media, The Black Bag, The Bow of Destiny, Twitter, writing


