
Beth Cato's Blog, page 19
October 12, 2022
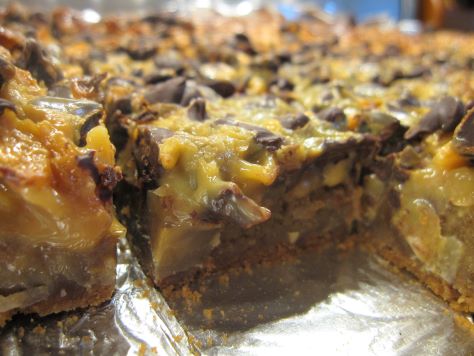
Bready or Not: Browned Butter Lamington Blondies
These Browned Butter Lamington Blondies are rich and indulgent, all chewy, chocolaty and good.
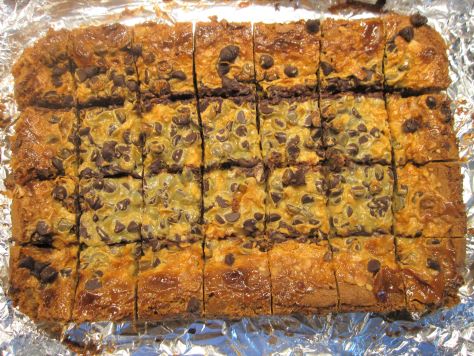
A lamington is an Australian dessert wherein pieces of sponge cake are rolled in chocolate and coconut. I haven’t gotten to try the real thing, but I can vouch for the fact that this home-baked version is delicious.
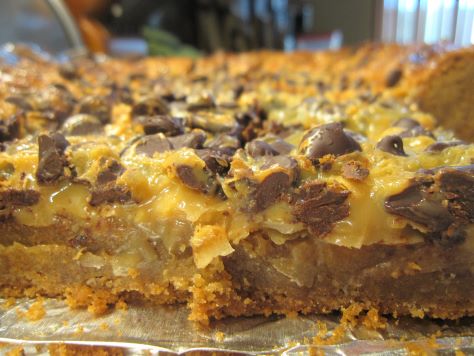
You start out with a blondie base that is rich on its own, with bountiful butter, brown sugar, vanilla, and eggs. Then you go even more ultra by adding an ooey-gooey chocolate and coconut-laden topping.
The original version of the recipe, in the Bake from Scratch May/June 2019 issue, proposed this Lamington version as a modification for a standard Blondie recipe. I rewrote it to streamline the process and change out some ingredients. Like… this doesn’t need sweetened coconut. It’s already sweet enough!
As I live in Arizona and have a warm kitchen, I found it essential to chill these bars so that they could be sliced up. I stored them in the fridge afterward as well, but if you’re in a cooler area, that likely isn’t needed.
PrintBready or Not: Browned Butter Lamington BlondiesThese rich, indulgent blondies are a fun twist on Australian Lamingtons. Make them to share with a crowd–these are dangerously good and oh-so-sweet!Course Dessert, SnackCuisine AustralianKeyword bars, chocolate, coconutAuthor Beth CatoEquipment13×9 panuneven spatulaIngredientsBlondie Base1 1/2 cups unsalted butter 3 sticks3 cups light brown sugar packed2 teaspoons baking powder1 teaspoon kosher salt4 large eggs room temperature1 Tablespoon vanilla extract3 cups all-purpose flourTopping1 cup unsweetened flaked coconut1 cup bittersweet chocolate chips14- ounces sweetened condensed milkInstructionsIn a medium saucepan, melt butter over medium heat, stirring often until butter turns golden-brown with a nutty aroma, about 5 to 10 minutes. Pour into a small bowl to let stand at room temperature while the next steps are prepared.Preheat oven at 350-degrees. Line a 13×9 pan with foil and apply nonstick spray or butter.In a large bowl, beat together the brown sugar, baking powder, and salt. Beat in the browned butter. Add eggs one at a time, scraping bowl after each addition. Add vanilla extract. Fold in flour until just combined. Pour into prepared pan, evening out with an uneven spatula.Bake for 30 minutes. Middle needs to be set or the toppings will sink. Once that is done, no need to cool the base layer–remove the pan from the oven and sprinkle coconut over the top followed by the chocolate chips. Pour the sweetened condensed milk all over both.Place pan back in oven to bake for 20 to 25 minutes, until middle is molten. Let cool for a while at room temperature, then place in fridge to completely set and chill.Use foil to lift contents onto a cutting board. Slice. Store individually wrapped-up or in a sealed container at room temperature or in the fridge for up to 3 days.OM NOM NOM!

October 5, 2022
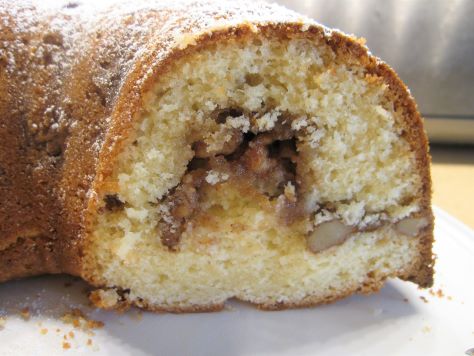
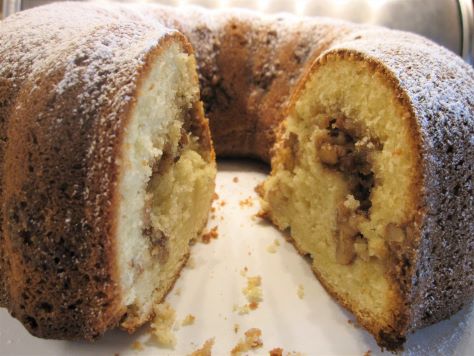
Bready or Not: Walnut Streusel Coffee Cake in a Bundt Pan
Coffee Cakes can be delicious but so very messy to eat. This bundt cake version turns things inside out by putting the ‘messy bit’ inside the cake, making for easier yet still scrumptious eating.
The most negative thing I can say about this Walnut Streusel Coffee Cake in a Bundt Pan is that it dirties a lot of dishes. So yeah, there is some effort involved, but the result is well worth it!
I individually wrapped slices of this for my husband to take to work. He had a co-worker tell him this cake was “f—–n’ awesome.” I take that as high praise.
This would be a great cake to make a day-ahead for a breakfast or brunch for a lot of people!
PrintBready or Not: Walnut Streusel Coffee Cake in a Bundt PanThis luscious bundt cake dirties a lot of dishes, but is well worth the effort! Normal coffee cakes are messy, but this one is neater to pack and take since the usual crumble topping is actually the filling! Modified from Taste of Home November 2013 issue.Course Breakfast, Dessert, SnackKeyword bundt cake, cake, walnutsAuthor Beth CatoEquipmentlarge bundt pannonstick spray with flourmixerIngredientsCandied Walnut Filling1 cup walnuts chopped1/2 cup light brown sugar packed2 Tablespoons unsalted butter melted1/2 teaspoon ground cinnamonCoffee Cake4 large eggs separated1 cup unsalted butter room temperature1 3/4 cups white sugar1 teaspoon vanilla extract3 cups all-purpose flour2 teaspoons baking powder1/2 teaspoon baking soda1/4 teaspoon salt1 cup sour cream or vanilla or plain Greek yogurtconfectioners' sugar to dust on top, optionalInstructionsIn small bowl, combine the walnuts, brown sugar, butter, and cinnamon, tossing to coat well. Set aside.Separate eggs, placing the whites in a large bowl. Let them come to room temperature for about 30 minutes.Preheat oven at 350-degrees. Use nonstick spray with flour on a large bundt pan.In a big mixing bowl, cream the butter and sugar together, making them light and fluffy. Add egg yolks one at a time. Add vanilla.In a separate bowl, combine flour, baking powder, baking soda, and salt. Add the dry ingredients to the butter mix alternatively with the sour cream, scraping the bowl on occasion, until just combined.Using clean beaters, beat the egg whites on medium until stiff peaks form. Fold the whites into the batter, making sure not to overmix and deflate.Pour half the batter into the bundt pan. Sprinkle the walnut mixture fully around the ring. Pour the rest of the batter on top and smooth out.Bake cake for 45 to 55 minutes, plunging a toothpick in the middle of the cake to test for doneness. Cake is done when the toothpick comes out clean. Cool for 20 minutes, then invert onto a rack to completely cool.If desired, sprinkle confectioners’ sugar over the top prior to serving. Cake is best eaten within two days, but can also be individually sliced, wrapped, and frozen to enjoy later.OM NOM NOM!September 30, 2022
Publications from Summer 2022
Well, hi. There hasn’t been anything but scheduled-ahead Bready or Not posts over the past while because I have been in DEADLINE LAND. Deadline Land is a nightmarish place where you don’t leave the house except to acquire groceries and get your kid to therapy, and you write and write and write and panic and write some more AND THEN you get copyedits for another book and you then quietly scream.
I’m still in Deadline Land but the landscape has changed enough to grant me some catch-up time to update my bibliography and also compile those changes in this very post. Along with the new short stories, poems, and podcast linked below, I can also say that my book A Thousand Recipes for Revenge is now scheduled for release on June 13, 2023. I hope to have a cover to share soon!
New Short Stories
“Prognostiqueso,” Daily Science Fiction
“The 207th Time I Went Back to March 9, 1980,” Uncanny Magazine Issue 48 (Sept/Oct 2022)
“How to Creatively Host Cheese Parties During and After the Apocalypse,” Hexagon Magazine
“A Light in the Garden,” Nature
Poetry
“Only Times,” Eye to the Telescope #45
“When As An Adult, You Choose to Again Believe in Magic,” The Magazine of Fantasy & Science Fiction July/August 2022
“In Spring, We Thanked the Wee Folk,” Kaleidotrope (Summer 2022)
“The Ship is Wrong,” Felis Futura [Amazon Affiliate link]
Podcast
“Consider the Monsters” (reprint), Manawaker Studio’s Flash Fiction Podcast
#SFWAPro
September 28, 2022
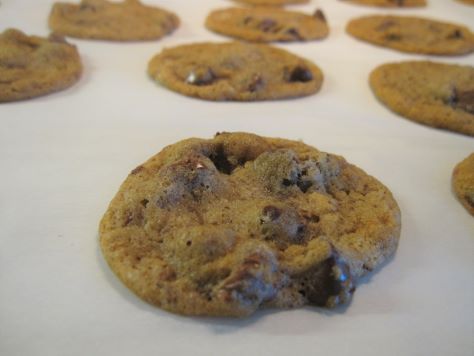
Bready or Not: Banana Snickerdoodles
Bready or Not is all about different Snickerdoodle recipes, and this one is especially unique: Banana Snickerdoodles!
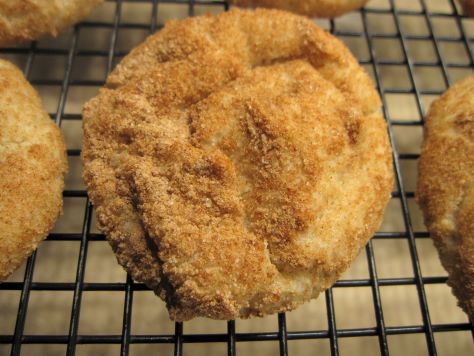
I found the original version in in the May/June 2019 issue of Bake of Scratch, in a fascinating article on bakeries and baked goods in Bermuda. I had to give it a try, with some tweaks throughout the process.
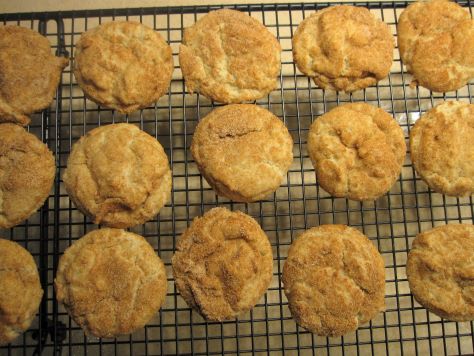
These cookies feature the necessary cream of tartar and cinnamon-sugar coating, plus they look like Snickerdoodles should with a crackled top. The texture is different, though—a bit fluffier, and the banana flavor is light and pleasant.
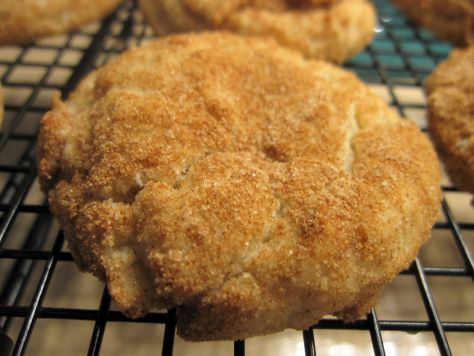
The dough is also stickier to work with. I didn’t have big issues with that, but if you do, lightly flour your hands to make the dough workable.
PrintBready or Not: Banana SnickerdoodlesThese unique Snickerdoodles are a somewhat lighter and fluffier than standard version, but are still true Snickerdoodles with that cream of tartar flavor and cinnamon-sugar coating! The banana flavor is light and pleasant. Makes 44 cookies using a tablespoon scoop. Modified from Bake from Scratch May/June 2019 issue.Course Dessert, SnackKeyword banana, cookies, snickerdoodleAuthor Beth CatoEquipmentbaking sheetparchment papertablespoon scoopIngredientsDough1 cup unsalted butter (2 sticks) room temperature1 1/2 cups white sugar1 teaspoon vanilla extract2 large eggs room temperature3/4 cup banana puree 2 medium bananas4 1/2 cups all-purpose flour2 1/2 teaspoons cream of tartar1 1/2 teaspoons baking soda1/4 teaspoon sea salt1/4 teaspoon ground cinnamonTopping3/4 cup white sugar1 1/2 Tablespoons ground cinnamonInstructionsPreheat oven at 350-degrees. Line a baking sheet with parchment paper.In a big bowl, beat the butter and sugar until fluffy. Add vanilla, then eggs one at a time. Mix in the banana puree.In a separate bowl, stir together flour, cream of tartar, baking soda, salt, and cinnamon. Gradually beat the dry ingredients into the wet. The dough will be somewhat sticky. Mix the two topping ingredients in a small bowl.Use a tablespoon scoop or spoon to shape a small ball of dough. Roll it in the cinnamon-sugar then place on baking sheet. Repeat, spacing out coated dough balls.Bake for about 10 to 12 minutes, until they are puffed with a crackled top. Let cool on pan for 5 or 10 minutes before moving them to a rack to completely cool. Store in an airtight container at room temperature.OM NOM NOM!September 21, 2022
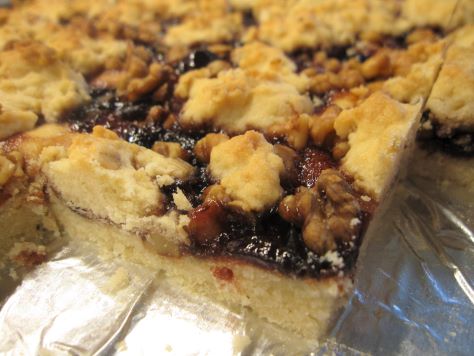
Bready or Not Original: Fruity Pastry Bars
These Fruity Pastry Bars are the perfect treat for a crowd. This recipe makes a nice big pan to share with others!
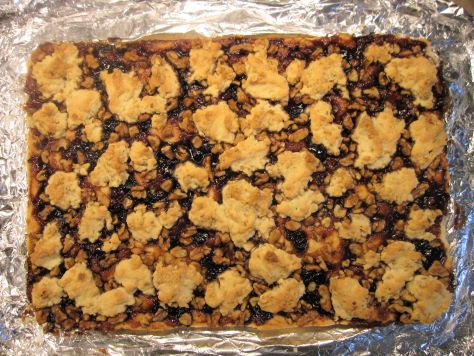
When I make bars like this, I’m always worried about how crumbly they will be. I can report that, at least for me, these were surprisingly durable bars that could even be held in the hand when eating. They barely crumbled when they were cut.

I love how they can be customized, too. You can use all sorts of berry preserves; these pictures depict Bonne Maman Cherry Preserves. The rich, bold flavor is lovely with the buttery crust, while the nuts add a great textural contrast. Of course, you could substitute different nuts like sliced almonds, or omit them entirely.
 PrintBready or Not Original: Fruity Pastry BarsThis Fruity Pastry Bars balance bold fruit flavors with a dense, buttery crust. This recipe makes a big batch!Course Breakfast, Dessert, SnackKeyword bars, cherries, walnutsAuthor Beth CatoEquipmentjelly roll panaluminum foilnonstick sprayIngredientsBars1 1/2 cup unsalted butter (3 sticks) room temperature1 1/4 cups white sugar2 large eggs room temperature1 teaspoon vanilla extract1 teaspoon salt3 1/2 cups all-purpose flourTopping12 to 13 ounces fruit preserves such as strawberry, cherry, or raspberry1 cup chopped walnuts1/4 cup quick oatsInstructionsLine a jelly roll pan with a large piece of aluminum foil. Apply nonstick spray or butter. Preheat oven at 350-degrees.In a large bowl, cream together the butter and sugar until light and fluffy. Beat in eggs and vanilla. Gradually mix in the flour and the salt. Batter will be very thick. Grease a hand and use that to pat down about 3/4 of the dough into the bottom of the pan.Wash hands. Spread preserves over the dough. Sprinkle the walnuts over the top. Add quick oats to the reserved dough. Place small handfuls of dough spaced out over the top.Bake for about 35 minutes, until top is set and doesn’t jiggle in middle. Cool completely, speeding process in fridge if desired. Use foil to lift contents onto a cutting board to slice into bars. Store in a sealed container. Bars can also be frozen for later enjoyment.OM NOM NOM!
September 14, 2022
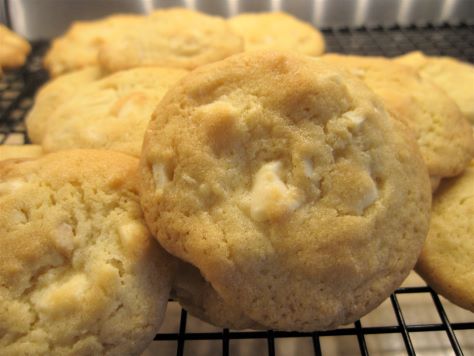
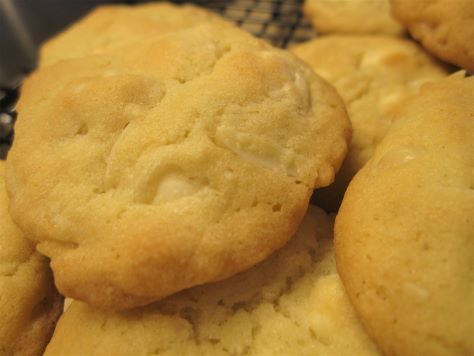
Bready or Not: Almond White Chocolate Cookies
These Almond White Chocolate Cookies are quick to fix-up and bake, making them the perfect treat when you need cookies in a hurry!
And who among us hasn’t had a few cookie emergencies in their lives, truly?
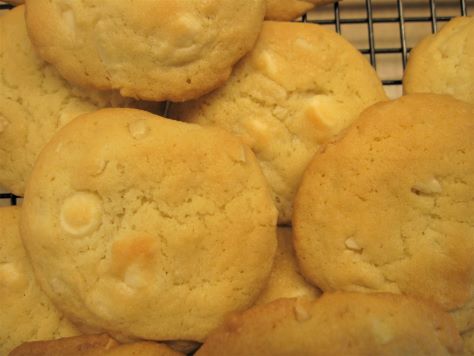
These cookies are light and crisp. The almond flavor is imbued in the dough thanks to almond extract and the almond slivers throughout. White chocolate is the perfect sweet to balance with the nuttiness.
Modified from a McCormick product ad.
PrintBready or Not: Almond White Chocolate CookiesThese cookies are fast to make and bake, and are light, sweet, and crunchy!Course Dessert, SnackAuthor Beth CatoEquipmentparchment paperbaking sheetteaspoon scoopIngredients2 1/2 cups all-purpose flour1 teaspoon baking soda1/2 teaspoon salt1 cup unsalted butter (2 sticks) room temperature1 1/4 cups white sugar2 large eggs room temperature1 1/2 teaspoons almond extract9 ounces white chocolate chips1 cup slivered almondsInstructionsPreheat oven at 375-degrees. Line a baking sheet with parchment paper.In a medium bowl, combine flour, baking soda, and salt. Set aside.In a large bowl, beat butter and sugar until they are light and fluffy. Add the eggs and almond extract. Gradually add in the dry ingredients, scraping the bowl as needed. Fold in the white chocolate and almonds.Use a teaspoon scoop to place dough, spaced out, on cookie sheet. Bake for 7 to 9 minutes, until cookies are set. Immediately transfer to a rack to cool.Store cookies in a sealed container at room temperature.OM NOM NOM!September 7, 2022
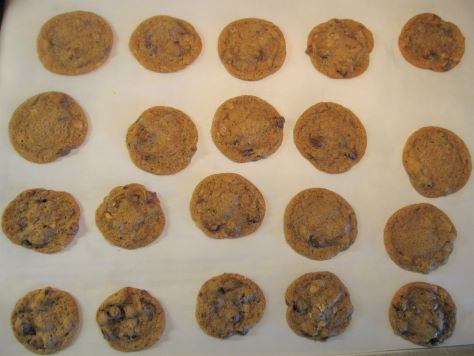
Bready or Not Original: Chewy Honey Graham Cracker Cookies
Today’s Chewy Honey Graham Cracker Cookies are a new twist on my original Chewy Honey Cookie base recipe.
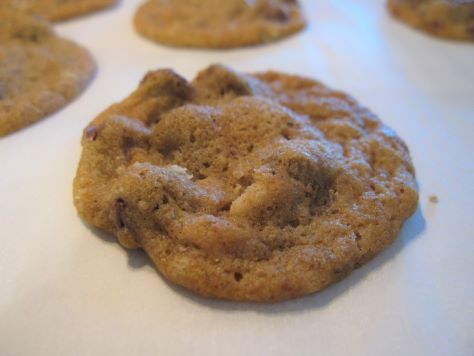
This time around, crushed graham crackers are substituted for some of the all-purpose flour. This not only changes the texture, adding some pleasant grittiness, but also introduces a different sort of sweetness that pairs beautifully with chocolate.
Want to try some of my other original cookie recipes that use this same base? Here you go!
Chewy Honey Chocolate Chip Cookies
 PrintBready or Not Original: Chewy Honey Graham Cracker CookiesThis fresh take on my classic Chewy Honey Cookies substitutes crushed graham crackers for some of the flour, resulting in a delicious cookie with a different texture and sweetness.Course Dessert, SnackKeyword chocolate, cookies, graham crackerAuthor Beth CatoEquipmentplastic wrapteaspoon or tablespoon scoopIngredients3/4 cup 1 1/2 sticks unsalted butter softened1/2 cup light brown sugar packed1/2 cup white sugar2 Tb honey1 large egg room temperature1 Tablespoon vanilla extract1 cup bread flour1/2 cup all-purpose flour1/2 cup graham cracker crumbs2 teaspoons cornstarch1 teaspoon baking soda1/2 teaspoon salt1 cup chocolate chips add a variety!InstructionsIn a large bowl, beat the butter until smooth. Add the sugar and honey and beat until creamy and fluffy, about 3 minutes. Scrape down the sides of the bowl and then mix in the egg and vanilla extract.In a separate bowl, combine the dry ingredients: bread flour, all-purpose flour, graham cracker crumbs, cornstarch, baking soda, and salt. Sift together.Slowly stir together the wet ingredients and flour mix until just combined. Sprinkle in the chocolate chips. Wrap the dough in plastic wrap and stash in the fridge for several hours or days; dough can also be frozen at this stage.When ready to bake, preheat the oven at 350-degrees. Use greased stoneware, parchment paper, or silpat mats. The cookie dough, even straight from the fridge, has a soft Play-Doh-like consistency, and will spread when it bakes; keep this in mind when spacing cookie dough.Teaspoon-sized cookies need to bake 9 to 12 minutes; Tablespoon-sized take 11 to 13 minutes. Let set on cookie sheets for 10 to 15 minutes before moving to a rack to cool completely.Store cookies will keep in a sealed container, between waxed paper or parchment layers, for weeks. They are excellent for travel or shipping.OM NOM NOM!
August 31, 2022
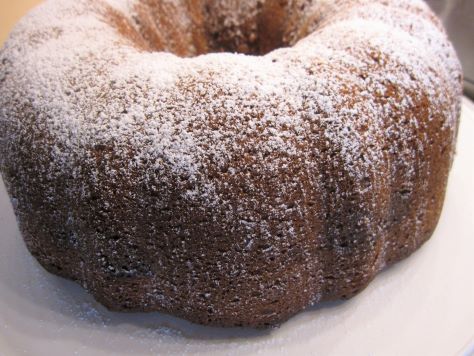
Bready or Not: Sicilian Orange Bundt Cake
If you’re in need of a refreshing summer bundt cake, look no further. This Sicilian Orange Bundt Cake is it.

This is a super-easy cake to make. The ingredients are minimal. It doesn’t make a massive cake. The oranges get used in the cake and in the glaze, so nothing is likely to go to waste.
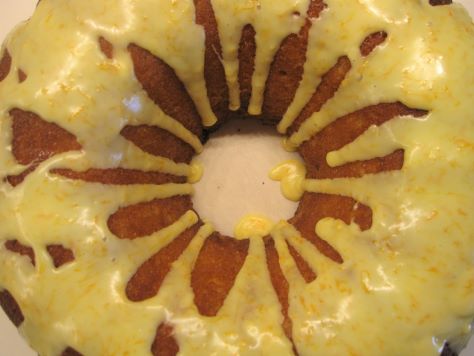
I love that the orange makes the cake look orange AND taste orange. There is something aesthetically pleasing about that. No surprises, no fake-outs. Orange cake tastes like orange. Got it.

If you have any leftovers, no worries. I found that the cake freezes wonderfully, even glazed. Freeze those extra slices the first day and they’ll taste fresh when you thaw them later!
Modified from Food & Wine September 2020 issue.
PrintBready or Not: Sicilian Orange Bundt CakeThis light bundt cake is orange in appearance and in flavor, with a sweet orange glaze for added oomph! Modified from Food & Wine September 2020 issue.Course Breakfast, Dessert, SnackCuisine ItalianKeyword bundt cake, citrusAuthor Beth CatoEquipmentsmall bundt cake panIngredientsCake2 cups all-purpose flour3 large oranges zested and juiced1 1/2 Tablespoons baking powder1 1/2 cups white sugar1/2 cup vegetable oil3 large eggs room temperatureGlaze3/4 cup confectioners’ sugar3 teaspoons orange juiceorange zestInstructionsPreheat oven at 350-degrees. Use a baking spray with flour (or alternatively, some extra vegetable oil and flour) to coat the interior of the bundt pan. Set aside.In a small bowl, combine the flour, 2 Tablespoons of orange zest (the rest reserved for the glaze), and baking powder. Set aside.In a big mixing bowl, beat together sugar, vegetable oil, and eggs on high speed until it becomes quite pale, about a minute and a half. Add 1 1/4 cups orange juice, beating until combined. Gradually mix in the dry ingredients, scraping bottom of bowl as needed.Pour batter into the pan. Bake for 45 minutes, until the middle passes the toothpick test. Cool for about 20 minutes, then invert it onto a rack to completely cool, speeding the process in the fridge if desired.Make the glaze. Measure out the sugar. Add orange juice and any remaining zest. If mixture is thick, add a touch more juice; if runny, add more sugar. It should be a thick texture as it is drizzled on the cake. Let glazed cake set at least 30 minutes at room temperature or in fridge before slicing in.Cake is great kept sealed at room temperature for up to 3 days. It can also be sliced and frozen, glaze and all, and makes for a delicious treat even weeks later.OM NOM NOM!August 29, 2022
CoKoCon is this coming weekend!
Note that this is updated from the previous post several weeks ago. I now have a signing on Sunday afternoon.
I’m attending my first in-person convention in about three years this Labor Day weekend. CoKoCon is a small con in the Phoenix area. This year, it’s at a new location at the DoubleTree in Tempe. I’ll be there Friday, Saturday, Sunday, and early Monday morning. Feel free to talk, ask to have books signed (which I’ll gladly do unless I’m on the run to a panel!), and generally hang out. I’ll be in a black mask, channeling my old favorite Mortal Kombat ninjas.
Panels are always subject to change; I’ll post any updates via Twitter and Facebook.
Friday, September 2
4:30pm Writing on the Spectrum
Fiesta Ballroom 2, 4:30pm – 5:30pm
Neurodiverse writers talk about how their unique filter on the world impacts their writing and about neurodiverse representation in books.
Saturday, September 3
10am Beth & Mike’s Book Club: The City We Became
Coronado, 10am – 11am
Michael Senft, who runs the Sci-Fridays Book Club at the Poisoned Pen, and Nebula Award®-nominated author, Beth Cato, will be leading a discussion on The City We Became by N. K. Jemisin. Read or listen to it ahead of the event or come in blind, but beware of spoilers!
6pm Writing Speculative Poetry
Fiesta Ballroom 2, 6pm – 7pm
Join our award-winning poets as they discuss the craft and market for speculative poetry, and maybe even share some of their own award-winning work!
Sunday, September 4
1pm Literary Charcuterie
Coronado, 1pm – 2pm
Let’s talk about the glories of food in literature and reality and inspire everyone to scamper for the nearest cheese shop (and there are several near the hotel!)
2:30pm Signing: Beth Cato
Dealers’ Room, 2:30pm – 3:30pm
6pm Author Self-Care: Not Post-COVID Yet
Fiesta Ballroom 2, 6pm – 7pm
We’re back in person, but are we really back to normal? This popular panel returns in a world that still hasn’t gotten through the COVID times.
7:30pm Historical Fiction Meets Fantasy
Fiesta Ballroom 2, 7:30pm – 8:30pm
What is the proper proportion of facts with fiction when writing historical fantasy? What resources the perils and joys of research.
August 24, 2022
Bready or Not: Marble Sheet Cake
I love frosting, so take it on my authority that this Marble Sheet Cake is delicious without need of any frosting on top. Plus, enjoying the cake in naked or near-naked form with just a sprinkling of confectioners’ sugar on top reveals that beautiful marbling to the world.
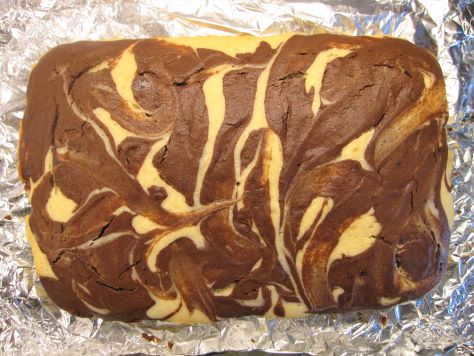
That marbling is delicious stuff, too. The base batter is vanilla-flavored, with the other portion including cocoa powder and additional goodness.
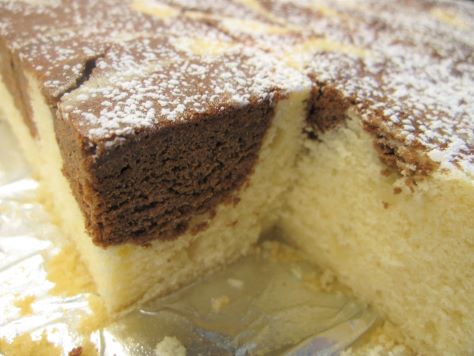
The texture of the cake is tender and soft. Since there’s no need for frosting, this is a good travel cake. When I made this for my husband to take to work, I individually wrapped pieces to-go in a plastic bin. They made the journey without issue.
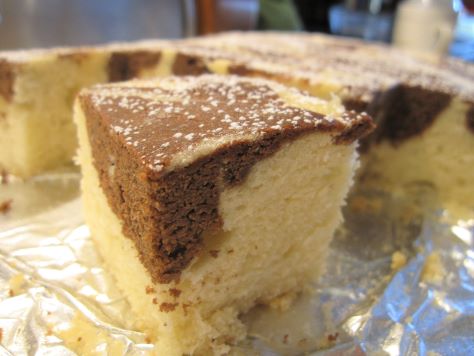
Modified from One Bowl Baking Special Issue from Bake from Scratch.
PrintBready or Not: Marble Sheet CakeThis beautiful 9×13 cake features marbled cocoa and vanilla. It’s delicious enough (and pretty enough) to not need any frosting on top. Just a dusting of confectioners’ sugar will do!Course Dessert, SnackKeyword cake, chocolateAuthor Beth CatoEquipment9×13 panaluminum foilnonstick sprayIngredientsVanilla batter3 cups all-purpose flour1 3/4 cups white sugar1 Tablespoon baking powder1 teaspoon kosher salt1 1/2 cups milk room temperature3/4 cup unsalted butter melted2 teaspoons vanilla extract3 large eggs room temperatureCocoa batter2 Tablespoons unsalted butter melted1/3 cup unsweetened cocoa powder sifted1/2 teaspoon almond extractTopping, optional2 Tablespoons confectioners’ sugarInstructionsPreheat oven at 325-degrees. Line a 9×13 pan with foil and apply nonstick spray.In the bowl of a stand mixer with a paddle attachment, combine flour, sugar, baking powder, and salt. With the mixer on low, pour in milk, butter, and vanilla, stopping a few times to scrape the bottom of the bowl. Add eggs one at a time. Batter should be smooth.Measure out about 3 cups of the vanilla batter and pour it into the pan. Add the remaining three ingredients to the bowl, mixing until smooth. Dollop heaping spoonfuls of the cocoa batter onto the vanilla. Use a butter knife to swirl the colors to create a marbled effect. Tap the pan on the counter a few times to knock air bubbles free.Bake for about 35 minutes. The middle should pass the toothpick test. Let cool completely on a wire rack. Use foil to lift the cake onto a cutting board for easy slicing. Sprinkle on confectioners’ sugar just before serving. Store in a sealed container.OM NOM NOM!

